Assault Mode
Game modes
OLD‑WIKI.WARTHUNDER.COM (DEFUNCT)
Assault Mode is a cooperative game mode for aircraft, ground vehicles and helicopters where players fight against the AI. The main objective is to defend the base from several waves of enemies. Team can consist of up to 10 players. This game mode uses the damage and flight models, and other mechanics, from Arcade Battles (including rearming in flight). There is no limit for how many times players can spawn the same vehicle, so it is possible to bring only one.
Unlike in other modes, it is required to pay SL to spawn in the vehicle (0.8 x the vehicle's AB repair cost), instead of when the player's vehicle is destroyed. Rewards are given based on how long the player survives the mission. In addition, the player's first battle of the day gives a special reward depending on the mission length (how many waves have been defeated). The minimal required amount of points in a battle to get the full reward (RP and SL amount) is 1,500, everyone after reaching it will get the same amount of RP and SL. The best reward that is possible to get is a 300% SL or RP booster and a universal backup for any vehicle.
Levels in Assault Mode
Air Assault mode
Depending on the BR of the aircraft being used, there are five level in Air Assault battles:
- The first level includes aircraft with a BR of between 1.0 and 2.3.
- The second level includes aircraft with a BR of between 2.7 and 3.7.
- The third level includes aircraft with a BR of between 4.0 and 5.0.
- The fourth level includes aircraft with a BR of between 5.3 and 6.3.
- The fifth level includes aircraft with a BR of between 6.7 and 12.7.
Players can still use aircraft with a battle rating lower than the indicated range. For example, it is possible to use propeller-driven fighters in the highest rank battles.
Ground Assault mode
Depending on the BR of the ground vehicle or helicopter being used, there are six ranks in Ground Assault battles:
- The first level includes tanks with a BR of between 1.0 and 2.3.
- The second level includes tanks with a BR of between 2.7 and 3.7.
- The third level includes tanks with a BR of between 4.0 and 5.0.
- The fourth level includes tanks with a BR of between 5.3 and 6.3.
- The fifth level includes tanks with a BR between 6.7 and 8.0.
- The sixth level includes tanks and helicopters with a BR of 8.3+.
Air Assault
Objective
Players use aircraft to defend the base at the centre of the map which is located under the spawn zone. The AI can use three unit types: bombers, attackers, and ground artillery units. The number of active players affects the amount of AI units which is being spawned by the game, for example when there are only five players then the game will spawn only half of the normal amount of planes.
The total amount of waves is 15. The remaining amount of waves to spawn for the mission is shown in the bottom-left corner to the right side of the other indicators. The next wave appears when all planes are either destroyed or the time counter between waves reaches 0 (it is reset every time a new wave appears). The time counter's start value decreases as the mission progresses, so waves of enemies will appear faster and at the end it is possible to fight two at the same time.
Waves
Waves can be composed of (B) bombers or (A) attackers and in some cases it is (R) random (there's a 50% chance of getting either bombers or attackers). Bombers spawn 20 kilometres away from the base position at 3,500 metres altitude and they fly in a straight line towards their target. Attackers also spawn 20 kilometres from the base but at much lower altitude - 1,500 metres. Just before reaching the base, they start to dive to drop their bombs, and they can still be intercepted during that action.
A table showing when and what type of units spawn during the mission:
| Waves | |||||||||||||||
|---|---|---|---|---|---|---|---|---|---|---|---|---|---|---|---|
| Wave | 1 | 2 | 3 | 4 | 5 | 6 | 7 | 8 | 9 | 10 | 11 | 12 | 13 | 14 | 15 |
| Type | B | A | R | B | A | R | B | A | R | B | A | R | A | R | B |
The number of spawned units can vary depending on battle level (1-5) and number of beaten waves, the more of them that are destroyed, the more enemies that spawn and their number will be increased up to 4 times per battle (it happens every 3-4 destroyed waves).
Artillery units
The artillery units use different mechanics to the bombers and attackers. Though they do not have the range to directly damage the main base, they instead regularly remove points from the base's health pool. This pool is shown in the bottom-left corner next to the artillery icon. The points decrease for as long as artillery units remain alive and the battle ends when the base's health reaches 0.
Spawn of artillery units is random and can happen from the second wave, but its chance for spawn gets higher every wave. Once they appear, they will not spawn again until the 8th wave, at which time the random chance to spawn is reset and they are able to spawn again.
Enemy types
Depending on level, the game spawns different units, the higher is the level of battle the harder they are to destroy.
   |
  |
  |
  |
  |
  |
  | |
Level 1 - (1.0 - 2.3)
|
 SB 2M-103 Su-2 (M-82) |
Hampden Mk I Beaufort Mk VIII |
B-18A SBD-3 |
F.222.2 Potez 631 |
Do 17 Z-2 Ju 87 B-2 |
B.R.20DR Breda 88 (P.XI) |
H6K4 Ki-21-Ia |
Level 2 - (2.7 - 3.7)
|
IL-4 IL-2M (1943) |
Wellington Mk X ▄Avenger Mk II |
B-25J-1 A-20G-25 |
LeO 451 late ▄A-35B |
Ju 88 A-4 Bf 110 C-7 |
S.M.79 B ▄Ju 87 D-3 |
H8K2 Ki-45 tei |
Level 3 - (4.0 - 5.0)
|
Pe-8 Su-6 (AM-42) |
Lancaster B Mk I Typhoon Mk Ib/L |
B-17E A-26B-10 |
M.B.162 ▄SB2C-5 |
Do 217 K-1 Me 410 B-1 |
Z.1007 bis serie 3 SM.91 |
G5N1 P1Y1 mod. 11 |
Level 4 - (5.3 - 6.3)
|
Tu-2S IL-10 |
Lancaster B Mk III Spitfire F Mk 22 |
B-24D-25-CO A-26B-50 |
M.B.162 ▄F8F-1B |
He 177 A-5 Ju 288 C |
P.108B serie 2 G.56 |
G5N1 Ki-67-I otsu |
Level 5 - (6.7+)
|
Tu-4 Su-6 (M-71F) |
Lincoln B Mk II Canberra B Mk 2 |
B-29A-BN F3D-1 |
▄PB4Y-2 S.O.8000 Narval |
He 177 A-5 Do 217 M-1 |
Z.1007 bis serie 3 ▄Bf 109 G-14/AS |
G8N1 Kikka |
Ground Assault
Objective
Players use ground vehicles and helicopters to defend the zone on the map centre from incoming waves of enemy tanks. Helicopters are allowed only in the top tier bracket (BR 8.3+).
The main objective is to not let the enemy units capture the area on the centre of map and slow them down as much as possible. If the AI units manage to enter the capture zone, it will start to flash and the team will start to lose tickets, the more AI that enter it, the more tickets the team loses. The enemy units slow down upon entering the zone, and their shooting accuracy is also lowered. After successfully defending the zone and destroying enemy waves your team regain a small amount of lost tickets. The battle is lost once the team's tickets reaches 0. The counter in the bottom-left corner shows the remaining amount of waves to beat (including current one).
Destroying enemy planes is optional but highly recommended, some of them are equipped with weapons that can destroy player's vehicle in a single attack. Sometimes a pickup can appear outside the zone, it can repair the tank and replenish its ammunition. The number of active players affects the amount of AI units which is being spawned by the game.
Waves
Waves can be composed of four unit types: light tanks, medium tanks, slightly better medium tanks, and heavy tanks. Every wave, two planes are also spawned which attack ground units and player controlled helicopters. In top tier assault battles, SPAA units can also appear, they will engage only flying units. Usually the game spawns one SPAA unit per player in a helicopter, their range is so large that they can reach players very soon after they leave the helipad. SPAA units spawn during the 2nd, 5th, 8th and 11th wave and it happens 20 seconds after the tanks start to appear. Spawn position of ground units is random, they always spawn from seven different predetermined directions.
Some enemy ground units can attack player-controlled helicopters by using their roof-mounted machine guns, such as the Russian tanks on Kursk map. The accuracy of the AI remains very high even when driving at full speed.
It is a viable tactic to destroy track of the front most vehicles to make them stop, but keep in mind that they can repair damaged parts, including the engine and extinguish parts that are set on fire.
A table showing when and what type of units spawn during the mission (Light (L), Medium (M), Intermediate (MH), Heavy (H) and (S) Air Cover (in top tier battles)):
| Waves | |||||||||||||||
|---|---|---|---|---|---|---|---|---|---|---|---|---|---|---|---|
| Wave | 1 | 2 | 3 | 4 | 5 | 6 | 7 | 8 | 9 | 10 | 11 | ||||
| Type | L | M + S | H | M | MH | H | L + S | MH | H | MH + S | H | ||||
The amount of spawned units can vary depending of battle level (1-6) and amount of beaten waves, the more of them are destroyed the more of enemies are spawning and the game increases their number up to 4 times per battle (that happens every 3-4 destroyed waves).
Enemy types
Depending on level, the game spawns different units, the higher is the level of battle the harder they are to destroy.
  |
 |
 |
 |
 |
 | ||
Level 1 - (1.0 - 2.3)
|
Light Medium Intermediate Heavy Air Support |
M22 M8 HMC M5A1 M3 Lee A-36 |
A13 Mk II Crusader II Crusader III Valentine I Beaufort Mk VIII |
T-26 BT-7 T-70 T-28 Yak-2 KABB |
Pz.35(t) Pz.III F Pz.IV E Pz.III J1 Do 17 Z-7 |
Chi-Ha Kai Ho-I Chi-He Ro-Go Ki-45 tei |
AMC.35 (ACG.1) H.39 D2 S.35 Potez 633 |
Level 2 - (2.7 - 3.7)
|
Light Medium Intermediate Heavy Air Support |
M24 M10 GMC M4 M4A5 F4U-1D |
Cromwell V Cromwell I Sherman II Churchill III Hurricane Mk IIB/Trop |
T-28E T-50 T-34 (1942) KV-1 (L-11) IL-2M (1943) |
Pz.III J1 Pz.III L Pz.III M ▀Pz.Kpfw. Churchill Bf 110 G-2 |
▅M24 Chi-Nu Chi-He Chi-Nu II D4Y2 |
AMX-13 (FL11) ▄M10 GMC ▄M4A1 ARL-44 (ACL-1) ▄A-35B |
Level 3 - (4.0 - 5.0)
|
Light Medium Intermediate Heavy Air Support |
M4A2 M18 GMC M4A1 (76) W M6A1 P-47D-28 |
Achilles Sherman II Sherman Firefly Churchill VII Firebrand TF Mk IV |
T-34 (1942) T-34E STZ KV-1S KV-85 Su-6 (AM-42) |
8,8 cm Flak 37 Sfl. Pz.IV G Pz.IV H Tiger H1 Me 410 B-1/U2 |
Chi-To Chi-Ri II ▅M4A3 (76) W ▅Heavy Tank No.6 A7M2 |
M4A1 (FL10) M4A4 (SA50) ARL-44 (ACL-1) ▄M4A3E2 ▄F6F-5N |
Level 4 - (5.3 - 6.3)
|
Light Medium Intermediate Heavy Air Support |
M41A1 M4A3 (76) W M26 T26E1-1 AD-2 |
Charioteer Mk VII Comet I Centurion Mk 1 Black Prince Sea Fury FB 11 |
PT-76B T-34-85 IS-1 IS-2 (1944) Su-6 (M-71F) |
Waffenträger Panther D Tiger H1 Tiger II (P) Fw 190 F-8 |
▅M41A1 ST-A1 ST-A2 ▅Heavy Tank No.6 J2M3 |
AMX-13 Lorraine 40t AMX M4 ARL-44 S.O.8000 Narval |
Level 5 - (6.7-8.0)
|
Light Medium Intermediate Heavy Air Support |
T92 M46 M47 T32 F-86F-25 |
Centurion Mk 10 Caernarvon Conqueror Chieftain Mk 3 Attacker FB 1 |
Object 906 T-44-100 T-54 (1947) IS-3 IL-28Sh |
Ru 251 M48A2 C Leopard I Tiger II (H) Me 262 A-2a |
▅M41A1 Type 61 STB-2 Type 74 (E) F-86F-30 ▅ |
AMX-13-90 AMX-50 (TOA100) AMX-30 (1972) AMX-50 Surbaissé M.D.450B Barougan |
|
|
|
 |
|
|
  | ||
Level 6 - (8.3+)
|
Light Medium Intermediate Heavy Air Support Air Cover |
T95E1 M60A1 RISE (P) IPM1 M1A2 Abrams F-84B-26 M247 |
VFM5 Chieftain Mk 10 Olifant Mk.2 Challenger 2 (2F) Venom FB.4 Chieftain Marksman |
Object 685 T-72A Т-90А T-80BVM MiG-17 ZSU-23-4 |
TAM KPz-70 Leopard 2A4 Leopard 2A6 ◊MiG-15bis Gepard |
Type 74 (C) Type 90 Type 90 (B) Type 10 F-86F-30 ▅ Type 87 |
SK-105A2 AMX-40 Leclerc Leclerc SXXI M.D.450B Barougan AMX-30 S DCA |
Ikv 91-105 Challenger Mk.3 Leopard 2A5 Leclerc F-84B-26 Gepard |
Strategies
For both modes:
- Don't shy away from expensive ammo. Ammo is free in this mode.
- Try to bring vehicles at the top of each BR segment - they tend to have better guns.
Air Assault Mode
General Advice
- Make sure to shoot down all the bombers in a wave. Often players think teammates will take care of the remaining bombers, therefore no one is doing it and one or two will get through and damage the base.
- Never waste your time going after planes that have already dropped their ordnance on the target. Enemy planes that are still carrying bombs are given a blinking red/yellow icon, whereas empty ones do not blink. The only exception to this rule is when you are sure the game is lost.
- Similarly, do not waste time going after out-of-control targets either. They may appear still alive, but their abnormal attitude or speed should make it clear they will not reach the target.
- Try to prioritize bombers: the damage they inflict is much more compared to attackers or fighters. They also drop bombs from further away. (Do be careful around the extra turrets.)
- Maximize your time in the air. If you are low on SL and have to use the airfield, press J (on PC) to leave the aircraft after a successful landing. You can then respawn at the air point with a discount, saving time for climbing. (You cannot use the air spawn with a fully intact plane, however.)
- Target the further-away waves if one enemy wave already has enough teammates shooting at it.
- Try tracer belts. They will not make you more visible to AI, but you will be able to hit from further away.
- Bind and use the "reload" key. Ammo is free, and you don't want to miss out on the action due to lack of ammo.
- Make the best use of head-on engagements. Head-ons are often more effective since you can hit the pilot easily: you can usually take out two at a time. Enemy AI planes do not use their forward-facing "offensive guns", making such engagements safer than chasing ones.
- Gunpods may be more useful than missiles, but bring you into the range of bomber turrets.
- Be sure to destroy the first round of howitzers before they get the base to low health - a second wave of howitzers may spawn.
- In Air Assault with High BR aircraft:
- You can use some guided AGMs, especially TV-guided ones, to shoot down aerial targets. To do this, it is suggested to configure the game buttons so that you can lock the TV in third person. In particular, those that are very effective are: AGM-65 (Family), Kh-29 (Family) or RB 75. Remember that they are not anti-aircraft missiles, so they don't turn much or are fast. To guarantee hits with this weapon, the best way to use them is to send them against the bots in a Head on, start the launches close to 8~12 km away (depending on the model of the missile and the speed of your plane). About TV Guided AGMs:
- They tend to keep the target locked to the TV, evading the interference suffered by radars, due to airplane clustering.
- They usually have a higher TNT charge than Air-to-Air missiles, which will guarantee you extra assists and kills due to shrapnel and explosions.
- Their reloading is separate from Air-to-Air missiles. So they usually load in time for the next wave.
- You can use the fire and forget pattern, after the target is locked and the missile is launched you can lock on a new target and perform a new launch
- They tend to be sensitive to climate conditions, so if there is a lot of cloud, the missile may not lock.
- When ground targets appear it is suggested to try to deal with them as quickly as possible. If you have a jet with a lot of payload capacity, such as a Phantom, in many situations it is worth ejecting and changing the secondary armament configuration to rockets or bombs (if it is a the Phantom best configuration is rocket). Then just launch a massive rocket or bomb attack on ground targets to deal with the situation quickly.
- You can use some guided AGMs, especially TV-guided ones, to shoot down aerial targets. To do this, it is suggested to configure the game buttons so that you can lock the TV in third person. In particular, those that are very effective are: AGM-65 (Family), Kh-29 (Family) or RB 75. Remember that they are not anti-aircraft missiles, so they don't turn much or are fast. To guarantee hits with this weapon, the best way to use them is to send them against the bots in a Head on, start the launches close to 8~12 km away (depending on the model of the missile and the speed of your plane). About TV Guided AGMs:
 Berlin

 Norway

 Ruhr
Ruhr

 Sicily

 Stalingrad

 Tunisia

 Zhengzhou

- Feel free to take more Incendiary ammunition, as Japanese planes ignite easily.
Ground Assault Mode
General Advice
It is recommended to bring vehicles with a good to decent rate of fire, and high damage. Armour may be helpful, but one shouldn't rely too much on it. Speed is also helpful for manoeuvring, especially on Ardennes, but slow tanks can still perform decently well. High penetration is optional: vehicles with low penetration are advised to flank.
Make sure at least one vehicle in your lineup is capable of reliably penetrating the heavy tanks that spawn - moving weakspots are hard to hit. Churchills in particular should be noted due to their impressive frontal and side armour, combined with the fact that only a few 3.7 tanks are able to reliably penetrate the Churchill III from a distance.
Smoke Grenades & Smoke Shells
Shooting smoke shells or using smoke grenades around bots inside the square is heavily unadvised. It prevents other players from spotting and shooting AI. When using smoke grenade to take cover, it is recommended to back out of other teammates' lines of fire first. If the player is unable to retreat in such situation, it is recommended to consider respawning instead of using smoke grenades.
Fighters and Attackers
When getting the option to use a plane, it is unadvised to use it right away. AI aircraft don't generally pose a serious threat compared to AI tanks. Even if the team lacks a SPAA to shoot the planes down, it still is heavily unadvised for a player to spawn a fighter during a "heavy" wave. It is more suited to spawn a bomber or an attacker in such situation while leaving the task of killing the enemy planes for a "lighter" wave. Attack aircraft are also generally less effective than heavy bombers (bombs are generally more effective than rockets and guns). One should consider saving the points instead for a bomber.
Helicopters
Level 6 (8.3+) offers players the choice of using helicopters alongside their ground vehicles. While helicopters can be very effective at destroying ground vehicles, they remain vulnerable to either AI's tanks' machine guns or by SPAA which can spawn repeatedly and, as mentioned previously, they open fire from a considerable range. Due to the SPAA's stationary nature, it is advised to use guided Anti-Tank missiles to deal with SPAAs while one manoeuvres their helicopter to avoid fire. However due to the low ammunition count of ATGMs, this tactic can pose a problem when it comes to attacking tanks, as such it is advised to use unguided rockets, which helicopters can bring plentiful of, as well as Armour-Piercing ammunition for cannons to engage tanks. Helicopters are also able to reload without the need of returning to the airfield, such reload is affected
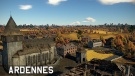
Ardennes
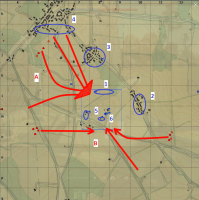
Ardennes offers a lot of options and cover: such advantages make it a favourite among players.
- Location 1 is a heavily recommended spot. It provides good hull-down cover as well as offering tanks flexibility in engagements due to its close proximity with the base.
- Location 2 is recommended for countering the eastern B waves.
- Locations 3 and 4 are able to counter the A northern waves, however players may find it more difficult to reach such position as well as not providing enough flexibility in engagements due to its remote location from the base.
- Location 5 is recommended to counter the western waves, however players can be left exposed to enemies coming from the southeast.
- Location 6 is only recommended if the player's vehicle has a strong turret armour in order to take advantage of the hull-down position.
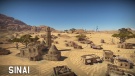
Sinai
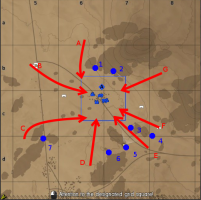
Unlike Ardennes, Sinai is considered among the hardest maps among players. Cooperation is crucial due to the open terrain.
- Locations 5, 6, and 7 are heavily recommended since they can cover the most possible waves. It is also recommended to spawn as soon as possible at the start of the match due to the short time given to get to these places before the first wave: in case a player is unable to find cover when the first wave spawns, it is likely to get quickly sniped by the enemy tanks.
- Players that prefer to play safer or are unable to reach these locations on time, are recommended to go to location 1. However, the rocks nearby the base can become a nuisance when shooting at the enemy. Such place can also take very few players at the same time.
- Locations 2, 3, and 4 are very situational: due to the limited cover, players are advised to often relocate from such positions based on where the enemy waves are coming from.
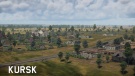
Kursk
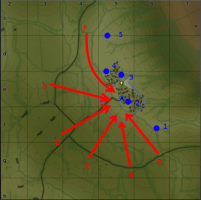
Unlike other maps, enemies in Kursk only comes in a 180° arc instead of from all directions. However, the map offers very little cover outside of the base, therefore most of the advised locations are positioned inside the base.
- Location 1 allows players to counter A, B, and C paths while remaining hull-down.
- Location 5 is advised to flank the F path.
The other locations are defensive places. However, if the player's vehicle cannot penetrate enemies frontally, they are advised to charge out at the AI once they approach the base.
Mozdok
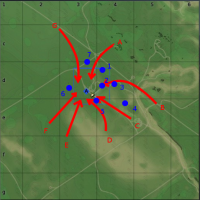
Unlike Kursk, Mozdok offers a lot of cover for players to spread out, as such they are advised to take advantage of positions outside the base.
- Location 1 is strategically recommended to counter enemies coming from the North: in particular A, B, and G paths.
- Location 2 is the most versatile location. It will counter C and D, as well as allowing players to shoot at enemies coming from A, B, and G once they reach the base.
- Locations 3, 4, and 5 are situational, depending on where the enemies spawn. They are very exposed in some directions and should only be used as needed. Location 5 in particular is useful for countering D, E, and F.
- Location 6 is for countering E and F, they allow players to counter the north and southwestern paths quickly.
- Location 7 can be useful with enemies coming from A or G, however it leaves players exposed to enemies spawning at B or C.
Japan
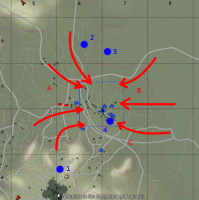
Due to the open nature of the map, Japan is also considered among the hardest maps. However, unlike Sinai, the lack of considerable armour on Japanese tanks provides an advantage for players.
- The western waves (A) can be countered by having people at Locations 1, 2, and 3 . Locations 2 and 3 can also effectively counter the north-eastern waves (B).
- The southeastern wave (C) cannot be adequately dealt with from any of those locations, although from location 3, players can engage some of the tanks depending on the size of both the player’s and enemy’s tanks. Location 4 is heavily recommended to counter the southeastern wave. Players are also advised to prioritize that wave for air strikes.
- The eastern flank is a lot more open in nature, therefore there is no recommended location to effectively counter it.
Maginot Line
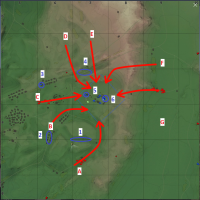
- Usually, enemies coming from path A pose serious threat, however players can effectively use location 1 to counter enemies coming down this path. This location also provides cover and allows players to go hull down against all the other waves, however players may require to shoot at moving targets over 1 km in order to maximize the use of this place against waves D, E, F, and G.
- Locations 2 and 3 are considerably difficult to reach, however they can provide decent cover with buildings. Players can effectively counter B and C from such position.
- Location 4 is the northern counterpart of 1. It is an excellent ambush location and can cover all the paths with exception of the A path.
- Location 5 incorporates excellent cover, through a channel dug in between some mounds, as well as being reasonably close to the base. Players using slow tanks are advised to use such position. However, enemies coming from G may pose a threat to players..
- The bunker in location 6 provides excellent cover. Its location inside the cap circle allows player to effectively resupply the player, as such it is a heavily recommended spot for players utilizing vehicles with an autoloader. However, players will have to change their position around the bunker according to the waves.
 Fulda Gap
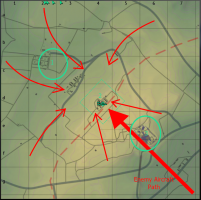
- Location 1 provides excellent cover, and can be used to engage and get flanking shots on the waves above the dotted red line. However, such location prevents players from engaging enemies coming from the south or southeast section of the map.
- The base, located at location 2, provides decent cover. However players will require a gun with high penetration in order to penetrate heavily armoured enemies such as Leopards 2A5 or M1A2.
- Location 3 lies directly underneath the flightpath of the enemy fighters, F-84s, equipped with Tiny Tims. It is the ideal location for SPAAs. It also is an excellent countering position for enemies coming from the south.
Media
- Videos