T-44-100
OLD‑WIKI.WARTHUNDER.COM (DEFUNCT)
Description
The T-44 was developed as the successor of the legendary T-34 tank, and although it was much superior, it retained the same 85 mm cannon. A 122 mm gun was fitted in some prototypes, but this was deemed unsatisfactory. Thus, an upgraded version was developed with the 100 mm D-10T. Testing began in October 1944 for this upgrade at the Ural Tank Factory, and different cannons were tested, like the D-10TK and the LB-1. The new armament meant a modified turret with its ring diameter increased, with increased weight and increased armour in the turret as well as armour panels in the sides. The results of the so called T-44B were excellent and the army saw a lot of potential in the design, and even though the T-44-100 didn't reach serial production, two prototypes were constructed, and the army wanted a design with the same characteristics, but more modern, reliable and versatile. Thus, the T-54 was created, and further development of the T-44 was stopped.
The T-44-100 was introduced in Update 1.57 "Battle March", and is a fast, manoeuvrable with low profile tank that should be played as a brawler, flanker, and ambusher, it's a jack of all trades. The tank's speed is quite good for its rank (compared with previous version T-34-85 and Panther variants) and its gun can compete with the 88 mm gun of the Tiger II in terms of the amount of explosive and shell velocity. However, the increased penetration and internal damage is balanced by the fact that it's slow to reload. This tank isn't suitable for front-line roles because of the lack of armour and gun depression. Moreover, the T-44-100 has a fast reverse speed, making it more of a "shoot-and-scoot" vehicle. The armour isn't very thick, however, it does have the potential to bounce some shots, however at its BR it can be easily penetrated by APDS and HEAT shells found on the MBTs that start to become more common at rank V.
General info
Survivability and armour
Armour type:
- Rolled homogeneous armour (Hull, Turret roof)
- Cast homogeneous armour (Turret)
| Armour | Front | Sides | Rear | Roof |
|---|---|---|---|---|
| Hull | 90 mm (64°) Front glacis 90 mm (44°) Lower glacis |
75 + 6 mm | 45 mm (19°) Upper 30 mm (73°) Lower |
15 mm |
| Turret | 120 mm (9-58°) Turret front 110 mm (7-63°) Gun mantlet |
100 mm (12-21°) | 75 mm (10°) | 15 mm |
| Cupola | 90 mm | 90 mm | 90 mm | 15 mm |
Notes:
- Suspensions wheels and tracks are 20 mm thick.
- There are tracks giving additional 18 mm of armour on the lower back of the turret.
- Spaced armour is put on the side that gives an additional 6 mm.
- Belly armour is 30 mm thick.
The armour is enough to stop APHE shots from WW2 tanks like the Tiger II and latest Sherman versions aside from the M-51. Against modern MBTs like the M48 and Centurions, it won't be able to resist hits by HEAT or APDS shells. Its more armoured area is the turret, with a shape and angle that increases the chances of bouncing shots.
Mobility
| Game Mode | Max Speed (km/h) | Weight (tons) | Engine power (horsepower) | Power-to-weight ratio (hp/ton) | |||
|---|---|---|---|---|---|---|---|
| Forward | Reverse | Stock | Upgraded | Stock | Upgraded | ||
| Arcade | Expression error: Unexpected * operator. | 806 | Expression error: Unexpected round operator. | __.__ | |||
| Realistic | 460 | Expression error: Unexpected round operator. | __.__ | ||||
With a powerful engine, its mobility is one of the best at rank V. Even when compared to MBTs like the T-54 and M48, its good reverse speed and acceleration make it capable of hit and run tactics, and it will easily escape from enemies or dangerous situations.
Modifications and economy
The first modifications you should get are Parts and FPE. After you get those, you can grind what you want. It's recommended to get the modifications of the categories Firepower and Protection first. Because it's a medium tank, you should also get the Mobility modifications Filters, Transmission, and Engine as fast as possible.
Armaments
Main armament
The 100 mm D-10T is one of the best guns at its BR, however, it has a very slow reload for its BR, even with an Aced crew. Its best shell is BR-412D, with good penetration values for an APHE shell, and while its angled performance is not the best, it is still very capable and has enough explosive filler to one-shot most enemies.
| 100 mm D-10T | Turret rotation speed (°/s) | Reloading rate (seconds) | |||||||||||
|---|---|---|---|---|---|---|---|---|---|---|---|---|---|
| Mode | Capacity | Vertical | Horizontal | Stabilizer | Stock | Upgraded | Full | Expert | Aced | Stock | Full | Expert | Aced |
| Arcade | 36 | -3°/+18° | ±180° | N/A | 23.8 | 32.9 | 40.0 | 44.2 | 47.1 | 13.65 | 12.08 | 11.13 | 10.50 |
| Realistic | 14.9 | 17.5 | 21.3 | 23.5 | 25.0 | ||||||||
Ammunition
| Penetration statistics | |||||||
|---|---|---|---|---|---|---|---|
| Ammunition | Type of warhead |
Penetration @ 0° Angle of Attack (mm) | |||||
| 10 m | 100 m | 500 m | 1,000 m | 1,500 m | 2,000 m | ||
| BR-412 | APHE | 218 | 212 | 189 | 164 | 142 | 124 |
| BR-412B | APHEBC | 218 | 215 | 201 | 184 | 169 | 155 |
| BR-412D | APCBC | 239 | 236 | 220 | 202 | 185 | 170 |
| BR-412P | APCR | 224 | 216 | 186 | 153 | 127 | 105 |
| OF-412 | HE | 27 | 27 | 26 | 24 | 23 | 21 |
| Shell details | ||||||||||||
|---|---|---|---|---|---|---|---|---|---|---|---|---|
| Ammunition | Type of warhead |
Velocity (m/s) |
Projectile mass (kg) |
Fuse delay (m) |
Fuse sensitivity (mm) |
Explosive mass (TNT equivalent) (g) |
Ricochet | |||||
| 0% | 50% | 100% | ||||||||||
| BR-412 | APHE | 895 | 15.88 | 1.2 | 19 | 100.1 | 47° | 60° | 65° | |||
| BR-412B | APHEBC | 895 | 15.88 | 1.2 | 19 | 100.1 | 48° | 63° | 71° | |||
| BR-412D | APCBC | 887 | 15.88 | 1.2 | 19 | 100.1 | 48° | 63° | 71° | |||
| BR-412P | APCR | 1,050 | 8.53 | - | - | - | 66° | 70° | 72° | |||
| OF-412 | HE | 900 | 15.6 | 0.2 | 0.1 | 1,460 | 79° | 80° | 81° | |||
| Smoke shell characteristics | ||||||
|---|---|---|---|---|---|---|
| Ammunition | Velocity (m/s) |
Projectile mass (kg) |
Screen radius (m) |
Screen deploy time (s) |
Screen hold time (s) |
Explosive mass (TNT equivalent) (g) |
| 3D3 | 880 | 15.6 | 16 | 5 | 25 | 50 |
Ammo racks
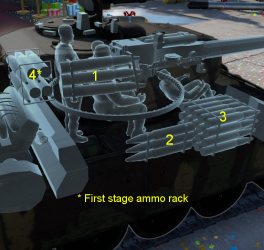
| Full ammo |
1st rack empty |
2nd rack empty |
3rd rack empty |
4th rack empty |
Visual discrepancy |
|---|---|---|---|---|---|
| 36 | 34 (+2) | 31 (+5) | 11 (+25) | 1 (+35) | No |
Notes:
- Shells are modeled individually and disappear after having been shot or loaded.
- Rack 4 is a first stage ammo rack. It totals 10 shells and gets filled first when loading up the tank.
- This rack is also emptied early: the rack depletion order at full capacity is: 4 - 1 - 2 - 3.
- Simply not firing when the gun is loaded will move ammo from racks 1-3 into rack 4. Firing will interrupt the restocking of the ready rack.
Machine guns
| 12.7 mm DShK | ||||
|---|---|---|---|---|
| Mount | Capacity (Belt) | Fire rate | Vertical | Horizontal |
| Pintle | 250 (50) | 600 | -10°/+60° | ±180° |
| 7.62 mm DT | ||||
|---|---|---|---|---|
| Mount | Capacity (Belt) | Fire rate | Vertical | Horizontal |
| Coaxial | 1,890 (63) | 600 | N/A | N/A |
Usage in battles
General Gameplay
The T-44-100 is a very versatile tank for its Battle Rating of 7.0. When fully upgraded, it's extremely mobile and decently fast, which allows it to go on flanks and set up ambushes to make full use of its 100 mm gun. This gun can penetrate many tanks frontally, although often you have to look for weak spots. Luckily, most of the time that you penetrate an enemy, it will destroy it in one shot, due to the explosive nature of the available shells. Having said that, it's best to make your way behind the enemy lines throughout any game, and then clean them up for your team. Moreover, you have 3 crew members in the turret, and if an APHE shell penetrates anywhere, or someone penetrates the turret side, you are most likely dead in one shot, so protect your turret.
Arcade Battles
In Arcade, the T-44-100 can make use of many sniping positions on almost all maps. The improved mobility and speed should be used to confuse the enemies and keep your position unknown (i.e. change cover often, move around the map carefully; if needed retreat to your spawn to repair and plan ahead). The mobility will also help you in any stand-offs because you can keep moving your hull and your turret randomly to increase the chances of enemy shells bouncing and hitting only your cannon barrel or track (allowing you to take your time and return fire).
Don't over-angle your hull because side armour is not thick enough to block most shots. You will have to practice this yourself.
Rushing objective points is also a valid tactic in Arcade, although it's best to pick points with the most cover because you shouldn't get shot as stated previously. When there are enemies occupying the capture point, it's a good idea to avoid obvious routes and try to snipe the enemies from afar or flank them, because they will always have an advantage on you. If your tank is fully upgraded, you can try rushing in and causing panic, although there is no guarantee that you will survive through that (your team usually pushes in at that point, and most of the time you get the capture point in the end).
Lastly, just try to confuse your enemies by any means. Make it look like you are going around the left side, then when you can't see enemy tags - turn around and go around the right side; or you can try shooting machine guns into the distance by tapping the space bar, and some enemies may think that that was your shot (machine gun tracers are only marginally smaller than main gun tracers), and they will push out into your line of sight. There are many small strategies you can make use of in Arcade because your tank is so responsive - just try stuff!
Realistic Battles
The gameplay is slower in Realistic, and the T-44-100 will be outmatched by early Leopards and other fast vehicles (AUBL74, M50 Ontos, Ru 251 etc) in terms of mobility. You should play with more caution, and your main strategies should be: ambushes, flanks and medium-range sniping. To begin with, ambushing is a very successful strategy, and it can be employed in almost every map. You should find a piece of cover around the middle of the map, and look over the main pathways that the enemy team is likely to take (e.g. rubble around B point on Stalingrad, or the passage from B to C on Tunisia, etc). Also, don't forget you can ambush enemy flankers - they will often over-extend, and if you expect that to happen you can set up anti-flank ambushes for them.
When flanking with the T-44-100, you need to be cautious of enemy flankers. Always look around, and try to cover your sides. If a capture point is being captured by the enemies, don't rush in, rather go from cover to cover and try to spot the enemy on the capture point first. That way you will have the advantage over them. If the capture point is in a hilly area, peak over the hill slightly sideways (don't go straight-on), because your side armour will be more angled than the lower plate, and also you are less likely to be knocked out by a single shot if spotted.
Peaking with your side does help with depression as well, but only on shallow hills, on steep hills, you will not be able to get a shot on target without exposing your whole tank. Also, don't try to do this when the enemy sees you, because this strategy needs time to be set-up.
Lastly, sniping will feel easier with the D-10T gun, and at Battle Rating 7.0 extremely fast rounds are uncommon, so you will stand a chance in most medium and long-range engagements. Make sure to use a rangefinder, and aim for hits, not for 100% penetrations, because at long ranges luck plays a bigger role. After every 3-4 shots, try to change your position - it's best to move forward and find cover, but moving sideways will also help. This way enemies will not be able to explicitly focus fire on you.
Moving from T-44 to T-44-100
You will see new enemies, and the gameplay changes quite a bit when uptiered. The biggest drawback you will experience is the lack of stabilizer, which makes it harder to play reactively (heavy tanks and tanks with stabilizers will be able to get their guns ready faster than you).
Don't try to penetrate everything up-front, even though the gun has improved significantly. You can score some penetrations through weak spots on some enemies, but the amount of times you will bounce and be destroyed straight after is bigger. Take your time to learn what enemies are easy to penetrate (American M46s, German Leopards, Soviet T-54s, British Centurions, etc.), and what tanks will take time and effort to outplay (Conqueror, Maus, T32, etc.).
Overall, don't get a false sense of security and ability to handle everything, because quite the opposite happens - most tanks can easily penetrate you, while their armour is increased and can be awkward.
The Stock Grind
When grinding the first modifications, Arcade Battles might be more fun, because of faster-paced gameplay and the ability to see all threats. Now, it's a priority to research Parts and FPE, and it may also be a good idea to activate 3-5 universal vehicle back-ups to be able to respawn twice in one match (although it is probably a better idea to wait for the T-54 '47 to use them).
General tips for the stock grind are:
- When playing against German Leopards - you can penetrate them frontally, and there are many of them, so take advantage of this.
- Most medium tanks you can penetrate through the turret ring, but it's a gamble sometimes.
- If an enemy tries to angle, shoot at the front side that they're showing because it usually has negligible armour
- Play the objectives - they award points, and if you stay to defend them, you will be able to get some easy hits on those who try to get it back (by ambushing them).
- You can also set up ambushes before the objective so that enemies will push past you and you can shoot their sides.
- Push with your teammates, but let them take the hits, then poke out and take a shot or two.
Specific Enemies Worth Noting
Against certain enemies, the recommended tactics are:
- T26E1-1: Hull and lower glacis
- T29: The lower glacis and turret ring
- T95: Commander cupola. Recommend to flank it due to its low speed.
- Tiger II (H) and Tiger II (H) Sla.16: shoot at turret cheeks (thin part so you should aim carefully), the lower glacis, there is a transmission (only shoot this when the Tiger II is facing you directly). If successful in flanking the Tiger II, shoot either back of the turret or the part below the turret.
- Panther II: watch for their manoeuvre, shoot at turret cheek, hull (directly facing only) and lower glacis (directly facing only).
- Leopard I: shoot anywhere, but avoid getting hit
- Jagdtiger: Shoot the lower glacis when it is facing you head on, that will disable the transmission, proceed to shoot its sides. If you have the opportunity, flanking it immediately is recommended.
- Centurion Mk 3: Hull and lower glacis
- FV4202: Lower glacis and turret
- Caernarvon: Turret ring and its thin lower glacis (one shot and it will blow up). Hit the side turret as well to knock out the fighting crew.
- Tortoise: Never shoot the lower glacis, shoot the machine gun position (the upper left side), this can knock out at least 3 crew members.
Pros and cons
Pros:
- Very manoeuvrable when fully upgraded. Good top speed, acceleration and reverse
- Low profile, so you won't get spotted easily
- Good frontal armour. Many rounds can bounce
- Side skirts provide spaced armour
- Powerful 100 mm D-10T gun and APCBC rounds with good post-penetration damage
- 12.7 mm DShK machine gun provides effective anti-aircraft defence and saves main gun ammo when facing soft targets like SPAAs
Cons:
- Quite weak turret armour. The turret cheeks are weak points
- 3 of 4 crewmen are in the turret, so it's easy to be knocked out by a single shot
- Big ammo rack next to your driver in the front
- Only -3° of gun depression
- Long reload time, even with an aced crew
History
Development
The T-44 started development in the Autumn of 1943 at the Stalin Ural Tank Factory No. 183, with the objective of creating a tank that is superior to the T-34. The requirement was that it have the same mobility as the T-34, but with more armour on it. In November, chief designer A. A. Morozov presented the T-44's design and model, called Object 136 as a prototype. The first prototype was completed on January the next year and two more in February. The first two prototypes are armed with the 85 mm D-5T gun with the designation T-44-85, while the last had a 122 mm D-25-44T cannon similar to the one on the IS-2 tank (Though differing from one-piece ammunition and better muzzle brake) designated the T-44-122. Overall, the design allowed the T-44 to be much more protective in armour thickness when compared to the T-34 while remaining a lower profile. Trials with the first prototypes began in February 1944. The T-44 with the 122 mm gun was deemed impractical in the trials and was discontinued while the T-44 with the 85 mm gun went on to further development. Improvements and changes went into the design until it was accepted in November 1944, where it was placed into service of the Soviet Red Army. Production started in 1944 at Factory No. 75 and continued building until 1947 with about 1,823 units produced.
Despite the T-44's superiority over the T-34 tank, it used the same gun, the 85 mm ZiS-S-53, as its main armament. It was requested that a larger armament be placed onto the T-44 instead for increased firepower. Testing began at October 1944 for this upgrade at the Ural Tank Factory, with the T-44 armed with the 100 mm to be called the T-44B (or the T-44-100). Two prototypes were made for the T-44-100 in February 1945, one with a D-10TK gun and another with the LB-1 gun. The T-44-100, compared to the original T-44, had its turret ring diameter increased, thicker armour overall, and increased weight.
Test results
The T-44-100 trials in March and April resulted in the positive performance of the T-44-100. The performance the T-44B gave convinced the army that the design had potential and was to not instantly be put into production and instead wait for the entire tank design to be modernized before starting production. Thus, only two working prototypes were made before the entire tank design went into an overhaul. The resulting tank from this development was the T-54 main battle tank. This tank was accepted while all further development on the T-44 stopped.
Media
- Skins
- Images
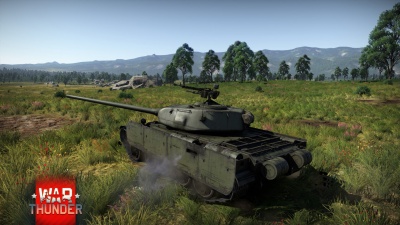
The T-44-100 unveiled to the world
- Videos
See also
Links to the articles on the War Thunder Wiki that you think will be useful for the reader, for example:
- reference to the series of the vehicles;
- links to approximate analogues of other nations and research trees.
External links
| Kharkov Design Bureau for Mechanical Engineering named after A. A. Morozov | |
|---|---|
| Light Tanks | |
| BT-5 | BT-5 · RBT-5 |
| BT-7 | BT-7 · BT-7M · BT-7A (F-32) |
| Medium Tanks | |
| T-34-76 | T-34 (Prototype) · T-34 (1940) · T-34 (1941) · T-34 (1st Gv.T.Br.) · T-34 (1942) · T-34E STZ · T-34E |
| T-34-57 | T-34-57 · T-34-57 (1943) |
| T-34-85 | T-34-85 (D-5T) · T-34-85 · T-34-85E |
| T-34-100 | T-34-100 |
| T-44 | T-44 · T-44-100 · T-44-122 |
| Main Battle Tanks | |
| T-54 | T-54 (1947) · T-54 (1949) · T-54 (1951) |
| T-64 | T-64A (1971) · T-64B |
| Export/Captured | |
| T-34 | ▀T 34 747 (r) · ▄T-34 · ▄T-34-85 · ␗T-34 (1943) · ␗Т-34-85 (S-53) |
| T-54 | ▄T-54 |
| See Also | Uralmashzavod · Uralvagonzavod |
| USSR medium tanks | |
|---|---|
| T-28 | T-28 (1938) · T-28 · T-28E |
| T-34-76 | T-34 (Prototype) · T-34 (1940) · T-34 (1941) · T-34 (1st Gv.T.Br.) · T-34 (1942) · T-34E STZ · T-34E |
| T-34-57 | T-34-57 · T-34-57 (1943) |
| T-34-85 | T-34-85 (D-5T) · T-34-85 · T-34-85E |
| T-34-100 | T-34-100 |
| T-44 | T-44 · T-44-100 · T-44-122 |
| T-54 | T-54 (1947) · T-54 (1949) · T-54 (1951) |
| T-55 | TO-55 · T-55A · T-55AM-1 · T-55AMD-1 |
| T-62 | T-62 · T-62M-1 |
| T-64 | Object 435 · T-64A (1971) · T-64B |
| T-72 | T-72A · T-72AV (TURMS-T) · T-72B · T-72B (1989) · T-72B3 · T-72M2 Moderna |
| T-80 | T-80B · T-80U · T-80UD · T-80UK · T-80UM2 · Т-80U-Е1 · T-80BVM · Object 292 |
| T-90 | Т-90А · T-90M |
| Trophies/Lend-Lease | |
| Germany | ▂T-III · ▂T-V |
| Great Britain | ▂МК-IX "Valentine" |
| USA | ▂M3 Medium · ▂M4A2 |