T-34 (Sweden)
OLD‑WIKI.WARTHUNDER.COM (DEFUNCT)
| This page is about the medium tank T-34 (Sweden). For other versions, see T-34 (Family). |
Description
The ▄T-34 is a rank Swedish medium tank with a battle rating of (AB), (RB), and (SB). It was introduced in Update "Fire and Ice". This T-34 is a 1941 model, captured by the Finnish army during the Continuation War. It is almost completely identical to the Soviet T-34 (1941), except that it lacks the ability to equip add-on armour.
General info
Survivability and armour
Armour type:
- Rolled homogeneous armour (Hull, Turret)
- Cast homogeneous armour (Driver's hatch, Machine gun mount)
| Armour | Front (Slope angle) | Sides | Rear | Roof |
|---|---|---|---|---|
| Hull | 45 mm (60°) Front glacis 40 mm (1-73°) Machine gun ball mount 45 mm (60°) Driver's hatch 100 mm (5-35°) Welded glacis joint 45 mm (60°) Lower glacis |
40 mm (40°) Top 45 mm Bottom |
40 mm (49°) Top 40 mm (47°) Bottom |
20 mm |
| Turret | 45 mm (3-75°) Turret front 45 mm (2-78°) Gun mantlet |
45 mm (30°) | 45 mm (30°) | 15 mm |
Notes:
- Suspension wheels and tracks are 20 mm thick.
The T-34's armour, even though only 45 mm thick on the front, is angled at 60°, which increases its effective thickness and the ability to ricochet or bounce enemy shells. Never let your enemies see your sides, as they are thinner, less angled and your enemies can easily penetrate it. The turret is still 45 mm thick, but much less angled. If your enemy penetrates your turret with APHE shells, you're a goner. Always angle your armour.
The T-34 has a crew of 4 men packed tightly together, and one shot could incapacitate a few crew members. The ammunition is conveniently stored below the tank, making it difficult to detonate. If you carry a decreased ammunition load, preferably 15-30 shells, the enemy would have a hard time detonating your ammo. However, shrapnel from a HE shell shot below you can be dangerous, especially when you encounter a Ho-Ro, for example. The engine is the module most of your opponents will target. Parts and FPE should be researched to be able to survive the shots targeted at your engine. However, your quite low rate of fire (~9 sec reload stock) will give your enemies a second, final blow.
Mobility
The tank's mobility is impressive due to the very generous hp/ton ratio the engine provides to the medium tank. The wide tracks also help with traction across softer ground, so the T-34 (1941) is less likely to be bogged down in more wet terrain like in the map Jungle.
Exploit the T-34 (1941)'s mobility with its highly-angled hull armour to wreck havoc in the enemy lines by breaking through and marauding their controlled zones.
| Game Mode | Max Speed (km/h) | Weight (tons) | Engine power (horsepower) | Power-to-weight ratio (hp/ton) | |||
|---|---|---|---|---|---|---|---|
| Forward | Reverse | Stock | Upgraded | Stock | Upgraded | ||
| Arcade | Expression error: Unexpected * operator. | 775 | Expression error: Unexpected round operator. | __.__ | |||
| Realistic | 442 | Expression error: Unexpected round operator. | __.__ | ||||
Modifications and economy
Armaments
Main armament
The T-34 (1941)'s 76 mm F-34 is overall better gun compared to the preceding L-11 gun, with much better armour-piercing characteristics, shell muzzle velocity, and faster reload time. The F-34 gun essentially makes the 76 mm-armed T-34 a menace in lower rank battles by being able to penetrate even heavy tanks with a well-placed hit.
Of the three armour-piercing shells available, the two most recommended shells to bring to destroy enemy tanks is the APHEBC BR-350B (MD-8 fuze) and the APBC BR-350SP shells. Though the BR-350A (MD-5 fuze) has more explosive filler for post-penetration damage, the lower penetration values mean that this potential is useless if the shell can't penetrate the enemy tank's armour, hence the BR-350B is recommended for a balance in armour-piercing potential and post-penetration damage. The APBC presents the best penetration values, but does not have any explosive filler inside, so it is best to keep them in reserve in case the T-34 (1941) encounters one of the few troublesome vehicles it struggles to penetrate.
| 76 mm F-34 | Turret rotation speed (°/s) | Reloading rate (seconds) | |||||||||||
|---|---|---|---|---|---|---|---|---|---|---|---|---|---|
| Mode | Capacity | Vertical | Horizontal | Stabilizer | Stock | Upgraded | Full | Expert | Aced | Stock | Full | Expert | Aced |
| Arcade | 77 | -5°/+30° | ±180° | N/A | 23.8 | 32.9 | 40.0 | 44.2 | 47.1 | 8.97 | 7.94 | 7.31 | 6.90 |
| Realistic | 14.9 | 17.5 | 21.2 | 23.5 | 25.0 | ||||||||
Ammunition
| Penetration statistics | |||||||
|---|---|---|---|---|---|---|---|
| Ammunition | Type of warhead |
Penetration @ 0° Angle of Attack (mm) | |||||
| 10 m | 100 m | 500 m | 1,000 m | 1,500 m | 2,000 m | ||
| BR-350A (MD-5 fuse) | APHEBC | 87 | 85 | 77 | 69 | 62 | 55 |
| BR-350SP | APBC | 99 | 96 | 87 | 76 | 66 | 58 |
| BR-350B (MD-8 fuse) | APHEBC | 96 | 94 | 84 | 74 | 64 | 56 |
| OF-350M | HE | 10 | 10 | 10 | 10 | 10 | 10 |
| Sh-354T | Shrapnel | 35 | 34 | 30 | 26 | 22 | 19 |
| Shell details | ||||||||||||
|---|---|---|---|---|---|---|---|---|---|---|---|---|
| Ammunition | Type of warhead |
Velocity (m/s) |
Projectile mass (kg) |
Fuse delay (m) |
Fuse sensitivity (mm) |
Explosive mass (TNT equivalent) (g) |
Ricochet | |||||
| 0% | 50% | 100% | ||||||||||
| BR-350A (MD-5 fuse) | APHEBC | 662 | 6.3 | 1.2 | 14 | 150 | 48° | 63° | 71° | |||
| BR-350SP | APBC | 655 | 6.5 | - | - | - | 48° | 63° | 71° | |||
| BR-350B (MD-8 fuse) | APHEBC | 655 | 6.5 | 0.9 | 14 | 100.1 | 48° | 63° | 71° | |||
| OF-350M | HE | 680 | 6.2 | 0.05 | 0.1 | 621 | 79° | 80° | 81° | |||
| Sh-354T | Shrapnel | 618 | 6.44 | 1.2 | 14 | 85 | 62° | 69° | 73° | |||
| Smoke shell characteristics | ||||||
|---|---|---|---|---|---|---|
| Ammunition | Velocity (m/s) |
Projectile mass (kg) |
Screen radius (m) |
Screen deploy time (s) |
Screen hold time (s) |
Explosive mass (TNT equivalent) (g) |
| D-350A | 680 | 6.45 | 13 | 5 | 20 | 50 |
Ammo racks
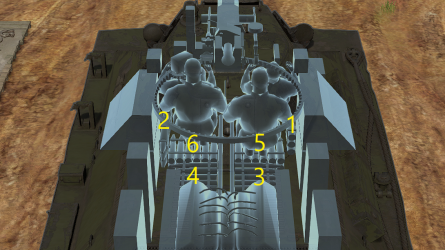
| Full ammo |
1st rack empty |
2nd rack empty |
3rd rack empty |
4th rack empty |
5th rack empty |
6th rack empty |
Visual discrepancy |
|---|---|---|---|---|---|---|---|
| 77 | 75 (+2) | 69 (+8) | 53 (+24) | 37 (+40) | 19 (+58) | 1 (+76) | No |
Notes:
- Shells are modelled as sets of two and disappear when the last shell in the set is loaded.
- Rack 2 is considered a single ammo rack for ease of understanding, due to it being 3 sets of shells shared between the two visible ammo racks.
- Carrying 69 (+8) shells will keep the sides of the hull clear of ammo.
Machine guns
A standard coaxial machine gun. The only major difference the DT has compared to other nation's machine gun armament is the magazine-fed system. While this means the firing time between reloading is shorter, reload time is also shorter to get the weapon back into action.
| 7.62 mm DT | ||||
|---|---|---|---|---|
| Mount | Capacity (Belt) | Fire rate | Vertical | Horizontal |
| Coaxial | 2,898 (63) | 600 | N/A | N/A |
Usage in battles
The T-34 (1941) is one of the most well-rounded medium battle tanks at its rank, along with the German Pz.IV F2 and United States M4 Sherman tanks. The sloped armour, great acceleration with good speed and 76.2 mm cannon make it a force to be reckoned with especially against inexperienced players, meanwhile when facing experienced players, however, it can become scrap metal pretty fast. Compared to the 1940 version, the 1941 gets a better 76.2 mm cannon which greatly improves the penetration power but still keeps the 1940 model turret. At distance, the sloped armour is efficient at blocking shells from enemy tanks with relatively short and small-calibre cannons even some long barrel and high calibre guns can also have trouble penetrating on the sloped armour if used well. Even with its sloped armour advantages, a T-34 is a relatively easy tank to knock out specifically with a well-placed shot. With the crew operating in a compact space around the turret, which is located in the centre of the tank where it is a very limited space to operate in makes it an easy tank to knock out the crew with a single blow from a shell with a good amount of high explosive filling. Also, be mindful of the T-34's turret. It is a weak spot and can be easily penetrated by an enemy shell and will with ease knock out the tank and its crew.
- Urban Combat
T-34s in urban combat are a lethal machine combined the sloped armour with its speed and manoeuvrability combined with the 76.2 mm F-34 makes it excel in close-quarter combat against most enemy tanks it will face in battle. Its short barrel will do excellent against most enemy armour, with well-placed shots in close range battles. In urban battles, the T-34 is a great hit and run tank, offering great acceleration. At slow speed, it can also be highly lethal but advance with care. It takes a while for the barrel to stop shaking when going to halt from full speed, which is a drawback if directly facing an enemy tank, which can appear suddenly from around the street corners or sitting and covering other roads that exist in the city. It is recommended when advancing, use slow speed to reduce that shaking and which allows for better engagement to get that enemy to be knocked out.
- Open Fields
Open fields are not the optimal combat situation for the T-34 1941 with its crew being relatively close to each other makes it prone to being a one-hit kill and an easy target for tanks like Pz IV F.2, StuG III F, Na-To, and M10 GMC which can easily score a hit from far away. Utilize the acceleration, relative good speed and wide tracks to advance around on most terrain till a position where the gun can reliably penetrate enemy armour with a good well placed shot and knock the enemy threat out. Be aware of the surroundings there can be an enemy threat everywhere which can easily knock the T-34 from the side or a hit to the fragile turret.
Common opponents:
- M4, M4A2 - The T-34's 76 mm gun cannot penetrate the welded hull M4/M4A2 reliably from the front, while the 75 mm gun on the M4/M4A2 can penetrate the T-34's turret and disable or cripple it. They do have very weak lower side hull armour (only 38 mm) that can be overmatched by the 76 mm APHEBC round if exposed, and the flat areas on the turret can also be penetrated fairly reliably if they can be hit. Generally avoid head-on engagements, especially if the M4 is hull-down.
- M4A1, Sherman II - Similar to the M4/M4A2, except that the cast hull is weaker than the welded hull on the M4/M4A2, and can be penetrated frontally. Otherwise, the same advice applies.
- Pz.IV F2, G, H, J - The Ausf. F2 variant is the first Panzer IV to mount a long-barrelled 75 mm gun. This gun is one of the most lethal mounted on any tank within the T-34's BR range, and it is easily capable of penetrating the T-34 at most ranges. The Ausf. F2 has very weak armour, however, and is something of a glass cannon. The Ausf. G, H, and J have up-armoured hulls that are quite difficult to penetrate, but their turrets are as weak as the one on the F2. The Ausf. J, in particular, has manual turret traverse and is very vulnerable to being flanked. Avoid long-range duels with them.
- Chi-Nu II - Essentially the Japanese counterpart to the German Panzer IV Ausf. F2.
- Churchill III, Pz.Kpfw. Churchill (Germany) - The 6-pounder gun on the Churchill will be hard-pressed to penetrate the sloped T-34 hull, but it can easily penetrate the turret and disable the turret crew. It is difficult to penetrate the frontal armour of the Churchill at long ranges. However, it is a slow, cumbersome heavy tank, and is easy to outflank and dispatch with shots to the side armour.
Pros and cons
Pros:
- Sloped 40-45 mm hull armour is effective at deflecting small/medium calibre shells
- Wide tracks and powerful engine brings great mobility, can keep up with light vehicles like M24
- 76 mm cannon's great damage can one-shot most common foes like M4, T-34
- Relatively fast turret traverse allows it to deal with multiple targets or flankers confidently
- Small profile, harder to get spotted & shot at
- Large fuel tanks next to the engine can protect it by absorbing some shells
Cons:
- -7 km/h reverse is slow, can put the player in a fatal situation
- -5° gun depression doesn't allow it to perform well in mountainous terrain
- Lacklustre penetration (99 mm max) makes well-armoured targets (KV-1, Churchill I, T14, etc) hard to kill
- Cramped crew locations, very easy to get one-shot by tanks using shells with explosive filler (eg. M24, T-34)
- Max 3.5x gunsight zoom makes distant engagement challenging
History
The T-34 first entered Finnish service in 1941, during the Continuation War against the Soviet Army following the invasion of the USSR by the Nazis. Following the Battle of Tuullos on 4 September 1941, the Finnish Heavy Tank Platoon received the first captured T-34 in Finnish use.
By 1942, there were three captured T-34s in Finnish service, and by 1944 the Finns succeeded in buying and capturing many more T-34s, greatly boosting their armored capabilities.
The Finns experimented with modifications to some of their early T-34s, including installing a 'pepper-pot' muzzle brake on the first tank, a modification not seen on any other T-34.
Media
- Skins
See also
- Related development
External links
Paste links to sources and external resources, such as:
- topic on the official game forum;
- other literature.
| Sweden medium tanks | |
|---|---|
| Strv m/42 | Lago I · Strv m/42 EH · Ikv 73 · Strv m/42 DT · Pvkv IV |
| Centurion derivatives | Strv 81 · Strv 81 (RB 52) · Strv 101 · Strv 104 · Strv 105 |
| Strv 103 | Strv 103-0 · Strv 103A · Strv 103С |
| Strv 121/122 | Strv 121 · Christian II · Strv 122A · Strv 122B PLSS · Strv 122B+ |
| Other | Sherman III/IV · T 80 U |
| Finland | |
| WWII | ▄T-28 · ▄T-34 · ▄Pz.IV · ▄T-34-85 |
| Post War | ▄Comet I · ▄Charioteer Mk VII · ▄T-54 · ▄T-55M · ▄T-72M1 · ▄Leopard 2A4 · ▄Leopard 2A6 |
| Norway | Leopard 1A5NO2 |