FV4202
OLD‑WIKI.WARTHUNDER.COM (DEFUNCT)
Description
The FV4202 is a rank British medium tank with a battle rating of (AB), (RB), and (SB). It was introduced in Update 1.63 "Desert Hunters". As the prototype of the Chieftain, it features the heavy sloping armour of the Chieftain on the chassis of a Centurion tank.
The FV4202 gives the player an excellent insight into what to expect from the rank IV and V medium tanks of the British ground forces. It features heavily sloped frontal armour and a powerful high penetrating cannon. The FV4202 is relatively mobile for its armour and weight, which can be used to put pressure on the enemy. When on the move, mind the turret armour and the lower frontal glacis, as these are the FV4202's greatest weak spots.
General info
Survivability and armour
Armour type:
- Rolled homogeneous armour
- Cast homogeneous armour (Turret)
| Armour | Front | Sides | Rear | Roof |
|---|---|---|---|---|
| Hull | 51.2 mm (70°) Front glacis 74.8 mm (46°) Lower glacis |
51.2 (13°) + 13 mm | 31 mm (2°) Upper 31 mm (51°) |
27.2 mm |
| Turret | 170-200 mm (0-60°) | 89.6 mm | 92.6 mm | 60 mm |
| Cupola | 59.5 mm | 59.5 mm | 59.5 mm | 60 mm |
Notes:
- Suspension wheels and tracks are 20 mm thick.
- The front of the turret is heavily sloped and varies in thickness, being the thickest on the sides of the gun at 240 mm
- The turret ring is 200 mm
Aiming for the LFP (Lower Frontal Plate), with an effective thickness of around 150 mm, is probably the easiest place to go for when targeting the FV4202 from the front. By doing so, you are taking out both the driver and ammo. Aiming for the plate under it to take out the transmission and possibly the driver is also an option from the front. If your tank has a more powerful gun, aiming for the upper cupola or weak spots such as the gun mantlet or armour cheeks is possible. Alternatively, the turret ring is fairly exposed and only 200 mm thick; a penetration here will often lead to a kill. Thanks to the FV4202's thick turret roof, shooting there with HE is usually ineffective.
When encountering the FV4202 from the side, the skirt armour and tracks can sometimes catch a shot or two. Instead, aim for the side of the turret if that's a possibility. 3 of the 4 crew members are located in the turret, and a penetration will likely kill two and destroy the gun's breech, leading to a kill or eliminating their ability to return fire. Key ammo racks are located beside the driver and directly below the turret; aim here when able for an easy kill. The engine deck only has a thin 8 mm plate of armour: aim here while piloting an aircraft.
Mobility
| Game Mode | Max Speed (km/h) | Weight (tons) | Engine power (horsepower) | Power-to-weight ratio (hp/ton) | |||
|---|---|---|---|---|---|---|---|
| Forward | Reverse | Stock | Upgraded | Stock | Upgraded | ||
| Arcade | Expression error: Unexpected * operator. | 790 | Expression error: Unexpected round operator. | __.__ | |||
| Realistic | 451 | Expression error: Unexpected round operator. | __.__ | ||||
Modifications and economy
Armaments
Main armament
| 84 mm 20pdr OQF Mk.I | Turret rotation speed (°/s) | Reloading rate (seconds) | |||||||||||
|---|---|---|---|---|---|---|---|---|---|---|---|---|---|
| Mode | Capacity | Vertical | Horizontal | Stabilizer | Stock | Upgraded | Full | Expert | Aced | Stock | Full | Expert | Aced |
| Arcade | 50 | -10°/+20° | ±180° | Two-plane | 17.14 | 23.72 | 28.80 | 31.85 | 33.88 | 8.19 | 7.25 | 6.68 | 6.30 |
| Realistic | 10.71 | 12.60 | 15.30 | 16.92 | 18.00 | ||||||||
Ammunition
| Penetration statistics | |||||||
|---|---|---|---|---|---|---|---|
| Ammunition | Type of warhead |
Penetration @ 0° Angle of Attack (mm) | |||||
| 10 m | 100 m | 500 m | 1,000 m | 1,500 m | 2,000 m | ||
| Shot Mk.1 | APCBC | 232 | 229 | 216 | 201 | 187 | 173 |
| Shot Mk.3 | APDS | 384 | 380 | 363 | 343 | 324 | 306 |
| Shell Mk.1 | HE | 15 | 15 | 15 | 15 | 15 | 15 |
| Shell details | ||||||||||||
|---|---|---|---|---|---|---|---|---|---|---|---|---|
| Ammunition | Type of warhead |
Velocity (m/s) |
Projectile mass (kg) |
Fuse delay (m) |
Fuse sensitivity (mm) |
Explosive mass (TNT equivalent) (kg) |
Ricochet | |||||
| 0% | 50% | 100% | ||||||||||
| Shot Mk.1 | APCBC | 1,000 | 9.1 | - | - | - | 48° | 63° | 71° | |||
| Shot Mk.3 | APDS | 1,430 | 3.22 | - | - | - | 75° | 78° | 80° | |||
| Shell Mk.1 | HE | 600 | 7.5 | 0.2 | 0.1 | 1.13 | 79° | 80° | 81° | |||
| Smoke shell characteristics | ||||||
|---|---|---|---|---|---|---|
| Ammunition | Velocity (m/s) |
Projectile mass (kg) |
Screen radius (m) |
Screen deploy time (s) |
Screen hold time (s) |
Explosive mass (TNT equivalent) (g) |
| 20pdr Shell SS Mk.1 | 250 | 9.3 | 9 | 5 | 20 | 50 |
- Shot Mk. 1 is available stock, and features up to 232 mm of penetration. It's a fine stock shell, with no notable qualities. Like most other British rounds, it is solid shot.
- Shot Mk. 3 is a Tier 2 modification, and features up to 384 mm of penetration. Being APDS, it has smaller post-penetration capability, but is highly likely to penetrate targets within your battle rating.
Ammo racks
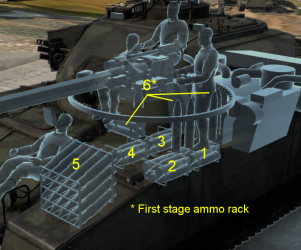
| Full ammo |
1st rack empty |
2nd rack empty |
3rd rack empty |
4th rack empty |
5th rack empty |
6th rack empty |
Visual discrepancy |
|---|---|---|---|---|---|---|---|
| 50 | 45 (+5) | 39 (+11) | 34 (+16) | 29 (+21) | 9 (+41) | 1 (+49) | No |
Notes:
- Shells are modelled individually and disappear after having been shot or loaded.
- Rack 6 is a first stage ammo rack. It totals 8 shells and gets filled first when loading up the tank.
- This rack is also emptied early: the rack depletion order at full capacity is: 6 - 1 - 2 - etc. until 5.
- Simply not firing when the gun is loaded will move ammo from racks 1 to 5 into rack 6. Firing will interrupt the restocking of the ready racks.
Machine guns
| 7.62 mm L3A1 | ||||
|---|---|---|---|---|
| Mount | Capacity (Belt) | Fire rate | Vertical | Horizontal |
| Coaxial | 7,500 (250) | 500 | -10°/+20° | N/A |
Usage in battles
The FV4202 has sloped frontal armour, a well-rounded and thickly armoured turret and a powerful 84 mm gun with access to APDS ammunition. The first thing that you may notice when you first get the FV4202 is that the stock 20-pdr gun is far more effective than the stock 17-pdr gun, since you start with APCBC ammunition, which is far more effective than the 17-pdr's purely AP stock rounds. This makes it far more forgiving than tanks like the Centurion MK1 or the Challenger. When fighting in a low rank game, it can be a game-changing tank. It can easily take out Tiger I and Panther tanks at long range whilst remaining resistant to enemy fire. Even Tiger II tanks are vulnerable to the 84 mm gun, though their gun poses a big threat to you, especially at long range. When you get up-tiered, you will face far more challenging enemies. At this battle rating, you can face the Jagdtiger, Leopard I, IS-6, IS-3, IS-4M and the T-54 (and even the Maus if you're playing realistic). These are all highly resistant to your APDS (even from the side in the IS-3/IS-4M case), and have extremely potent armament.
When you get up-tiered, the weaknesses of the FV4202 start to show. To start, it has a very poor reverse speed. As a British tanker, you will have experience with similar issues from vehicles with the Cromwell chassis, but the FV4202 has nowhere near the mobility, so it is difficult to quickly escape from a bad situation as it was with Cromwell-based tanks. The frontal armour is thin and so particularly vulnerable to high-calibre HE shells (apart from the rather resilient turret roof). Furthermore, although thickly armoured, the turret has some flat parts which are easily penetrated by many tanks of the BR. Finally, the tank has only four crew members, three of whom are in the turret. A turret penetration can take out the entire turret crew and destroy the tank.
Tactics
Hull down - Due to the good gun depression and strong turret armour, the FV4202 performs well in a hull down position, where only the turret is visible to the enemy. Some maps are better for this tactic than others. It involves finding a favourable spot overlooking a capture point or a clear field of fire, setting up a good defensive position and taking out enemies that come into your sights. This way you will be a lot more difficult to destroy as enemies can only get glancing shots on your sloped and rounded turret.
Sniping - With APDS, the 84 mm is a very precise and accurate gun. Therefore, it is effective at taking out targets at long range. It is extremely satisfying sniping enemy tanks at the other end of the map. This is a good tactic for the FV4202, where you can hang back, retain the effectiveness of your armour and pick off enemy tanks at your leisure. Just ensure to change position every few shots to avoid getting bombed or knocked out by another tank. When you get down tiered, Tigers, Panther, IS-1/2 and T-34s can be leisurely picked off at range while you remain largely immune to their hits.
Frontline tank - Particularly when down tiered, the FV4202 makes an excellent front-line vehicle. Its main gun can counter any threat, particularly Tiger I and Panther Tanks, whilst its heavily sloped armour and strong turret allows it to bounce some hits. This allows you to push capture points and take out enemy tanks on the move with your stabilizer. Be careful not to overextend, the FV4202 is very vulnerable from the sides. Instead, you should get to a convenient place and then initiate a hull down tactic.
Specific enemies worth noting
- Tiger II (P)/(H) - With its BR, the FV4202 is more than likely to see a Tiger II in the field. If encountered in the front, aim for the cheeks of the turret, the right side to knock out the gunner and render the Tiger II unable to fire. Use this opportunity to withdraw for a better vantage point for more capable tanks to destroy the Tiger II, or for the enemy Tiger to make another mistake and get shot by the FV4202 again. Avoid getting hit by the Tiger II's 88 mm gun. It will be able to penetrate you at long range, and a hit will most likely knock you out.
- IS-2 (IS-2 (1944)) - Another common enemy heavy tank. If it is the regular IS-2, the 20-pounder can easily penetrate the hull armour and the turret cheeks (right side again for the gunner). The mod. 1944 is more complicated due to its improved frontal armour so it is important to be able to target the turret cheeks to knock out its fighting capability. Like the Tiger II, the IS-2 has a very powerful main gun. A direct hit will almost certainly destroy the FV4202 in one hit.
- T29 - American heavy tank capable of outright destroying the FV4202. Frontal glacis and turret armour near impenetrable in the front. Aim for the lower glacis or even a glancing shot on the turret side for a chance to penetrate the armour.
- Tortoise - This heavily armoured vehicle prevents the FV4202 from penetrating its frontal armour, the only weak point being the commander's location and that is not a good place as the 20-pounder does not have a lot of post-penetration damage. Best case is to simply withdraw and attack it from the sides.
- Panther II - Its frontal armour can be penetrated by the APDS shot on the 20-pounder. The Panther II comes with the famous 88 mm KwK43 gun, so caution is needed. To disable or knock out this vehicle, you can hit the right side of its frontal glacis or hit it on the right side of the turret to make sure it doesn't fire back.
- IS-6 - The IS-6 is one of the most challenging vehicles that you face at this rank. It is fast, very well armoured and has a powerful gun. Even though it is a premium, it is very common. You will face it often. It can easily bounce the 84 mm APDS from the front and even the sides. If angled properly, the IS-6 is very difficult to displace. It is not invincible, though. Firing at it from high ground can reduce the effectiveness of its angled armour and HEAT-fs is good for penetrating its armour, so working closely with other tanks is important.
- Maus - The very sight of a Maus on the battlefield can be enough to make some players turn tail and run. It is an extremely menacing opponent to face on the battlefield, and its huge 128 mm gun will have no trouble taking you out of the game. Even the 75 mm coaxial gun can damage your main gun and tracks, if not penetrate the FV4202 from the side. Luckily, the Maus is not invincible. With APDS you can penetrate the turret cheeks and side armour relatively easily, but every so often your rounds will simply pass through the massive superstructure without doing very much damage. The internal layout of the Maus is quite complex and is lined with extra 20 mm plates of armour, protecting crew members and modules from internal shrapnel. Destroying the Maus in one shot is extremely difficult, so it is typically best to retreat after a successful hit.
- Jagdtiger - The Jagdtiger is armed with the same devastating 128 mm gun as the Maus, which is absolutely deadly if it hits you. Couple this with formidable frontal armour and you have a very dangerous opponent. Try to flank this opponent or hit the flat superstructure on the left and right of the main gun.
Pros and cons
Pros:
- Decent mobility for the size
- Heavy punching 84 mm 20-pounder "Quick-firing" gun can penetrate most enemies seen at its BR
- Very strong sloped frontal armour able to withstand most shells fired at the FV4202
- Resistant to Soviet 85 mm and German 88 mm KwK36 cannons at long range
- Has a stabilizer which allows for accurate fire on the move
- Has a low profile compared to other British tanks of the same rank, such as the Centurion Mk 3
- Unlockable APDS shell for heavier targets
Cons:
- Weak side armour
- Overall thin armour yet sloped
- Lower front plate is generally weak and most penetrative hits will take out the driver and ammo rack
- Poor reverse speed
- A part of the soft turret armour is near a flat weak point
- Vulnerable to air attacks from planes with heavier guns as engine roof armour is lacking
- Although a small target, there is an 89 mm weak spot right above the gun: shots penetrating here may knock out the turret crew
- The cupola on top of the turret is a deadly weak spot: one penetration from APHE will take you out
- Is only equipped with solid shot ammunition, with no explosive filler. The APDS lacks post-penetration damage and spalling shrapnel.
History
Describe the history of the creation and combat usage of the vehicle in more detail than in the introduction. If the historical reference turns out to be too long, take it to a separate article, taking a link to the article about the vehicle and adding a block "/History" (example: https://wiki.warthunder.com/(Vehicle-name)/History) and add a link to it here using the main template. Be sure to reference text and sources by using <ref></ref>, as well as adding them at the end of the article with <references />. This section may also include the vehicle's dev blog entry (if applicable) and the in-game encyclopedia description (under === In-game description ===, also if applicable).
Media
- Skins
- Videos
See also
Links to the articles on the War Thunder Wiki that you think will be useful for the reader, for example:
- reference to the series of the vehicles;
- links to approximate analogues of other nations and research trees.
External links
Paste links to sources and external resources, such as:
- topic on the official game forum;
- other literature.
| Leyland Motors Limited | |
|---|---|
| Cruiser Tanks | |
| Tank, Cruiser, Comet I (A34) | Comet I · Comet I "Iron Duke IV" |
| MBTs | |
| Centurion | FV4202 |
| Cheiftain | Chieftain Mk 3 · Chieftain Mk 5 · Chieftain Mk 10 |
| Britain medium tanks | |
|---|---|
| Valentine | Valentine I · Valentine IX · Valentine XI |
| Cromwell | Cromwell I · Cromwell V · Cromwell V (RP-3) |
| Cromwell derivatives | Challenger · Avenger · Comet I · Comet I "Iron Duke IV" · Charioteer Mk VII |
| Centurion | Centurion Mk 1 · Centurion Mk.2 · Centurion Mk 3 · Centurion Mk.5 AVRE · Centurion Mk 10 · Centurion Action X · FV4202 |
| Vickers MBT | Vickers Mk.1 · Vickers Mk.3 · Vickers Mk.7 |
| Chieftain | Chieftain Mk 3 · Chieftain Mk 5 · Chieftain Mk 10 |
| Challenger 1 | Challenger Mk.2 · Challenger Mk.3 · Challenger DS |
| Challenger 2 | Challenger 2 · Challenger 2 (2F) · Challenger 2 TES · Challenger 2 OES · Challenger 2E · Challenger 2 Black Night |
| Challenger 3 | Challenger 3 TD |
| Australia | A.C.I · A.C.IV · Centurion Mk.5/1 |
| South Africa | Olifant Mk.1A · Olifant Mk.2 · TTD |
| India | Vijayanta · Bhishma TWMP |
| Israel | ▄Sho't Kal Dalet |
| Jordan | Khalid |
| Sweden | ▄Strv 81 (RB 52) |
| USA | Grant I · Sherman II · Sherman Firefly · Sherman IC "Trzyniec" |