ST-A1
OLD‑WIKI.WARTHUNDER.COM (DEFUNCT)
| This page is about the Japanese medium tank ST-A1. For other versions, see ST-A2 and ST-A3. |
Description
The ST-A1 was Japan's first indigenous tank design after the war, being the first prototype towards the later Type 61 MBT. It was mainly based on the M46 Patton, carrying the 90 mm M3 cannon capable of firing HEAT-FS to defeat contemporary Soviet armour.
It was introduced along with the initial Japanese Ground Forces tree in Update 1.65 "Way of the Samurai". The ST-A1, similar to most Japanese tanks, is lightly armoured. Combined with the tight placement of crew, modules, and ammo, the ST-A1 is easily taken out in a single shot. The ST-A1 can serve as a sniper or flanker (although it does not have the best speed), however, full utilization of the terrain is essential for survival - due to its powerful gun and low profile, the tank is able to fire off long-range shots without exposing itself. The excellent reverse speed should also be taken advantage of to quickly retreat into cover.
General info
Survivability and armour
Armour type:
- Rolled homogeneous armour
- Cast homogeneous armour (Turret)
| Armour | Front | Sides | Rear | Roof |
|---|---|---|---|---|
| Hull | 75 mm (52°) Front glacis 75 mm (47°) Lower glacis |
25 mm (45°) Top 25 mm Bottom |
15 mm (15-44°) Top 15 mm Bottom |
15 mm |
| Turret | 75 mm (5-55°) Turret front 50 mm (8-65°) Gun mantlet |
40 mm (16-32°) | 25 mm (7-10°) | 15 mm |
| Cupola | 40 mm | 40 mm | 40 mm | 15 mm |
Notes:
- Suspension wheels and tracks are 20 mm thick.
When facing the ST-A1, the left side of the turret holds the gunner and commander whereas the right side holds the ammunition. A well-placed shot into the turret will result in a catastrophic explosion or a possible double crew knock out with a solid shot. If unable to disable the gunner, the breech which is the largest thing in the turret will do as a target due to the repair time is close to one minute (or less depending on the crew skills) giving enough time for the attacker to reload and finish off the tank.
However, in arcade battles, if all of turret crew members knocked out, the "last stand" is very forgiving and the tank seems to soak up damage as if gunner is not even present in the turret. As long as the vehicle doesn't take full ammunition load and spends all of their pre-loaded ammunition, the turret can tank AP and HEAT shots while only likely to lose the gun breech. This makes the tank extremely hard to destroy from a distance, especially from the left side as long as the hull is not hit. Caution must be taken with the turret to avoid being shot directly with APHE or HESH. Close range combat with multiple tanks should be avoided.
Mobility
| Game Mode | Max Speed (km/h) | Weight (tons) | Engine power (horsepower) | Power-to-weight ratio (hp/ton) | |||
|---|---|---|---|---|---|---|---|
| Forward | Reverse | Stock | Upgraded | Stock | Upgraded | ||
| Arcade | Expression error: Unexpected * operator. | 775 | Expression error: Unexpected round operator. | __.__ | |||
| Realistic | 442 | Expression error: Unexpected round operator. | __.__ | ||||
Its offroad speed is about (AB/RB) 40/33 km/h forward and -18/-15 km/h backwards, and its top speed is 50/45 forward and -20/-17 backwards, reached by driving in one direction for a long time.
Suspension of ST-A1 allows it to stay on rather high hills, but without mobility upgrades it will still slide off them eventually. It also cannot rush steep hills even in Arcade mode, even at maximum speed, unless you researched everything (And even then it may slide back down at the last moment).
Modifications and economy
Armaments
Main armament
| 90 mm M3A1 | Turret rotation speed (°/s) | Reloading rate (seconds) | |||||||||||
|---|---|---|---|---|---|---|---|---|---|---|---|---|---|
| Mode | Capacity | Vertical | Horizontal | Stabilizer | Stock | Upgraded | Full | Expert | Aced | Stock | Full | Expert | Aced |
| Arcade | 40 | -10°/+13° | ±180° | N/A | 22.85 | 31.62 | 38.40 | 42.47 | 45.18 | 9.75 | 8.63 | 7.95 | 7.50 |
| Realistic | 14.28 | 16.80 | 20.40 | 22.56 | 24.00 | ||||||||
While gun performs at an acceptable level at its battle rating, the module "Adjustment of fire" should be the first module upgraded as well as the available ammunition upgrades. The base ammunition is solely armour-piercing and low quality at that, so it is unsuited to fight other tanks from long range, unlocking other shells will provide the tank operator harder hitting shells.
Progression goes as follows:
- Stock
- Able to fight light tanks and some medium tanks within about 500 m. Without upgrades, the main gun tends to miss a lot and even if you hit the target the round may ricochet. Attacking heavy tanks is really not recommended with the default ammunition due to the poor quality and low damage.
- APHE and adjustment of fire
- Able to fight heavy tanks of your own battle rating like the IS-2 or Tiger II (P) by firing at their frontal turret weak spot at relatively close range and snipe certain medium tanks, although anything of higher battle rating like Centurion Mk 3 should not be attacked directly due to their protective armour. Many tanks will still bounce your long-range shots, because APHE flies at a high angle since 700 m, and in up-tier, the rounds will not affect any of the heavy tanks. However, you can take flanking snipe routes and use your high-level zoom to snipe them from great distance into their sides where the armour is weaker and with APHE, unlike normal AP, will definitely destroy their entire tank for you as long as it penetrates.
- APCR and elevation mechanism
- Many will be puzzled by a tank which carries into battle two different APCR rounds. Though the M304 and M332 rounds have different masses, they effectively do the same amount of damage. The larger M304 is a blunt force shell and due to its weight, the main gun must be angled up to ensure the heavy shell reaches its target. Unfortunately, with the higher angle of attaching, the shell does lose some penetration power. The M332, on the other hand, is a smaller mass round, however, it can be fired more like a rifle round almost level at the target. This smaller round impacts its targets at a higher velocity breaching heavily armoured tanks from longer distances with a minimal chance of ricochet. With the smaller mass comes smaller damage, but because of this, the M304 and M332 are doing roughly the same damage. It may still knock out cramped-quarter tanks with a single shot if you shoot straight through the middle of them or aim for the crew specifically. Most of enemy heavy SPGs and some uptier superheavies will still ignore your shots and attempt to knock you out with a single shot in return so you will find yourself constantly using both APHE and APCR, trying to adapt to your current enemy.
- HEATFS
- With M348 unlocked, you can now simply destroy T-44 by firing at the left of their tank (right for you if head-on) and IS-2 by firing straight at the middle of their hull. You also can destroy all the enemy SPG and heavy tanks which were bullying you this entire time from any range, for example, you can destroy a Jagdtiger with two shots by crew knockout, destroy T32E1 which is normally a pain to hit into hull weak spot with APHE even with X16 zoom, and, if playing AB, you can now destroy the superior Leopard I without any issues. It's worth remembering though, that certain rare tanks like Centurion Mk.5 AVRE and T95 are highly resistant to HEAT or just damage in general, requiring you to aim very well or retreat, and HEAT often explodes if touches anything on its flight path, so kinetic shells are still required.
At all progression stages it is important to remember that your engine deck blocks your gun from depressing to -10 degrees and any tank with low profile can exploit this weakness, if they have to.
Ammunition
| Penetration statistics | |||||||
|---|---|---|---|---|---|---|---|
| Ammunition | Type of warhead |
Penetration @ 0° Angle of Attack (mm) | |||||
| 10 m | 100 m | 500 m | 1,000 m | 1,500 m | 2,000 m | ||
| M318 shot | APBC | 175 | 173 | 161 | 147 | 135 | 123 |
| M82 shot | APCBC | 185 | 182 | 169 | 155 | 142 | 130 |
| M304 shot | APCR | 287 | 281 | 259 | 234 | 211 | 191 |
| M332 shot | APCR | 291 | 286 | 264 | 240 | 217 | 197 |
| M348 shell | HEATFS | 305 | 305 | 305 | 305 | 305 | 305 |
| M71 shell | HE | 20 | 20 | 18 | 17 | 16 | 16 |
| Shell details | ||||||||||||
|---|---|---|---|---|---|---|---|---|---|---|---|---|
| Ammunition | Type of warhead |
Velocity (m/s) |
Projectile mass (kg) |
Fuse delay (m) |
Fuse sensitivity (mm) |
Explosive mass (TNT equivalent) (g) |
Ricochet | |||||
| 0% | 50% | 100% | ||||||||||
| M318 shot | APBC | 853 | 10.98 | - | - | - | 47° | 60° | 65° | |||
| M82 shot | APCBC | 853 | 10.91 | 1.2 | 14 | 137.2 | 48° | 63° | 71° | |||
| M304 shot | APCR | 1,021 | 7.62 | - | - | - | 66° | 70° | 72° | |||
| M332 shot | APCR | 1,165 | 5.7 | - | - | - | 66° | 70° | 72° | |||
| M348 shell | HEATFS | 853 | 6.5 | 0.05 | 0.1 | 926.17 | 65° | 72° | 77° | |||
| M71 shell | HE | 823 | 10.55 | 0.2 | 0.1 | 1,210 | 79° | 80° | 81° | |||
| Smoke shell characteristics | ||||||
|---|---|---|---|---|---|---|
| Ammunition | Velocity (m/s) |
Projectile mass (kg) |
Screen radius (m) |
Screen deploy time (s) |
Screen hold time (s) |
Explosive mass (TNT equivalent) (g) |
| M313 | 821 | 10.7 | 9 | 5 | 20 | 50 |
Ammo racks
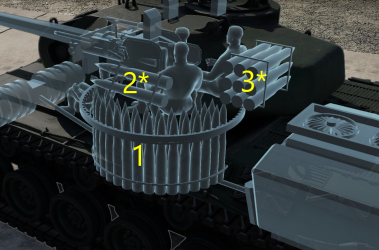
| Full ammo |
1st rack empty |
2nd rack empty |
3rd rack empty |
Visual discrepancy |
|---|---|---|---|---|
| 40 | 12 (+28) | 10 (+30) | 1 (+39) | No |
Machine guns
The machine guns of ST-A1 can be used to destroy super light SPG like M56 and 12 mm MG is capable of destroying AUBL/74 and similar vehicles. They also can be used to fire at planes, though the damage is minimal.
Despite of them being useful, it's better to rely on your main gun first, as light vehicles at BR of 6.3 are capable of dishing out unexpected fatal damage and they should be destroyed the very moment you spot them.
| 12.7 mm M2HB | ||||
|---|---|---|---|---|
| Mount | Capacity (Belt) | Fire rate | Vertical | Horizontal |
| Pintle | 800 (200) | 577 | -10°/+30° | ±180° |
| 7.62 mm M1919A4 | ||||
|---|---|---|---|---|
| Mount | Capacity (Belt) | Fire rate | Vertical | Horizontal |
| Coaxial | 4,500 (250) | 500 | N/A | N/A |
Usage in battles
As the ST-A1 is Japan's first tank for a new era of tank development, it shows the same gameplay issues as the Chi-Ha. The weak armour, the slow to mediocre turret rotation speed, quite a long hull and high drop-rate of shells.
But its not just all negatives, the mobility is good for what it is, has adequate gun depression and the ST-A1 even comes with HEAT like the Chi-Ha, this time in the form of M348 HEATFS researchable as tier IV modification.
Other than the similarities to the Chi-Ha, the ST-A has its own factors good and bad which should be kept in mind when playing. From the very good reverse speed, great zoom factor, the additional .50 cal as roof mount and many shell options to large ammo racks that are bound to be set off, the elevated engine deck not allowing to shoot behind the tank.
Gameplay
The plan is simple and similar to the Chi-Ha & other early Japanese medium tanks, you want to stay either near or behind your allies and not rush forward, you can't take much damage, but you can deliver a punch. Pre-aim the turret and guide the enemy tanks into the sights as the rotation speed isn't of the fastest.
The further you are from your enemy the better for the inadequate armour, The ST-A comes with an amazing zoom factor and allows for clear sniping, but do keep in mind the shell drop-off are rather high.
Before you have your hands on the HEATFS, the safest bet is to exploit the flanks of the enemy, especially when starting with only AP, frontal penetrations won't happen reliable with the tanks the ST-A faces, try aiming for ammo racks, put a solid round into cramped crew members while trying to get the M82 shot and back up into cover or behind corners as the crew reloads the shell.
After unlocking the M82 APHE, placing shots is less important, once it penetrates, it's most likely to blow up good. It will come at the cost of the extra penetration, but when aiming for the sides, extra penetration isn't required. It's still a good idea to bring some AP shells with the tank just in-case you have to fight in a frontal engagement and the APHE fails to penetrate.
With the HEATFS finally unlocked, you can fully make use of the punches you can deal and the zoom you have, help your allies out with the toughest of enemies and simply frontally penetrate them.
Pros and cons
Pros:
- Vehicle body is thin and low = small front profile
- Adequate gun depression of -10°
- 90 mm gun that allows for combat against contemporary medium tanks
- .50 cal machine gun allows for AA defence
- Good speed, OK mobility
- Very good reverse speed
- Access to HEATFS shells
- Has x16 zoom as maximum with competition generally using x8 at best
Cons:
- Elevated engine deck prevents rear gun depression
- Large ammo rack all over the turret, especially left side (Aiming right side), if you take more than 29 shells and don't spend the "first stage" rack fast
- Inadequate hull raw armour of 75 mm at the front, relies on slopes and bounces for resistance against shots
- Even more inadequate turret armour of around 40-75 mm overall
- Gun sub-par against the heavy tanks like the Tiger II
- Miserable accuracy without modifications; even short range shots are quite difficult
- High drop-rate of shells make long-range engagements difficult
- 15 mm of armour on top of the turret and engine deck make it easy to penetrate for Strafing Air and Artillery
History
Once Japan acknowledged defeat in World War II, its military institutions had to be reformed with new systems and production methods. The country was prohibited from having an official military, and was instead permitted to create a paramilitary national police force. During this time they used American tanks lent to them by the US. Later, as the Korean war intensified, the United States allowed Japan to have its own defense force in the face of increased tensions. By the mid 50s, it became clear that the Self-Defense Force required their own tank development to fit the terrain of the country. New lightweight Japanese tanks were planned to be compact and manoeuvrable, making them able to be transported cross-country through mountainous terrain. The vehicles borrowed from the main armament of the American 90 mm calibre gun, familiar and favoured by War Thunder players as the main armament of the American M46 and M47 tanks.
To fulfill the military's requirements, tank designers offered several promising projects, the first of which was the ST-A1. The tank ended up quite compact, with a height of only 2.2 m. This allowed it to have excellent cover abilities, with a cast turret and traditional Japanese tank layout: the engine installed behind the transmission. Two finished vehicles of this model were built. Despite the fact that the ST-A1 series did not continue, it was a starting point for the future of Japanese tank development.
- From Devblog
Media
- Skins
See also
- Related development
- Other vehicles of similar configuration and role


External links
| Japan medium tanks | |
|---|---|
| Type 97 | Chi-Ha · Chi-Ha Kai · Chi-Ha Kai TD · Chi-Ha Short Gun |
| Type 1 | Chi-He · Chi-He (5th Regiment) · Ho-I |
| Type 3 | Chi-Nu · Chi-Nu II |
| Type 4 | Chi-To · Chi-To Late |
| Type 5 | Chi-Ri II |
| Type 61 MBT | ST-A1* · ST-A2* · ST-A3* · Type 61 |
| Type 74 MBT | ST-B2* · Type 74 (C) · Type 74 (E) · Type 74 (F) · Type 74 (G) |
| Type 90 MBT | Type 90 · Type 90 (B) · Type 90 (B) "Fuji" |
| Type 10 MBT | TKX (P)* · TKX* · Type 10 |
| Other | Ka-Chi |
| USA | ▅M4A3 (76) W · ▅M47 |
| *Prototype | |