Chieftain Marksman
OLD‑WIKI.WARTHUNDER.COM (DEFUNCT)
| This page is about the British SPAA Chieftain Marksman. For other versions, see Chieftain (Family). |
Description
The Marconi Electronic Systems Chieftain Mk.10 Marksman (shortened to Chieftain Marksman) was one of the available chassis for the GEC Marconi Marksman turret system based on the British FV4201 Chieftain. The intention of Marconi Marksman was an anti-aircraft system solution by utilizing the existing fleets of obsolete tanks and upgrade them with a twin 35 mm turret, comparable to the Bundeswehr's Gepard and JGSDF's Type 87. The version based on Chieftain Mk 5 using Leyland L60 Mark 8A engine was tested by the British Army; the vehicle was not adopted by British Army but the turret system has been exported to Finland as the ItPsV 90 with T-55AM and Leopard 2A4 chassis.
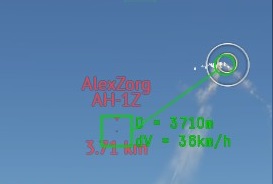
Introduced in Update 1.79 "Project X" as the earliest radar SPAA in British tech tree. Since Update 1.87 "Locked On", the radar also allows you to lock your turret to follow a specific target and to see a "true" targeting reticle, which will guarantee a hit up to 3 km range and, on some occasions even further, even if you don't have any modifications, unless the enemy aircraft changes course. It is very important to change the keybinding of the radar lock key (default "alt + F"), as radar won't reliably lock on to targets, due to "mouse pointer" mode from "alt" button.
General info
Survivability and armour
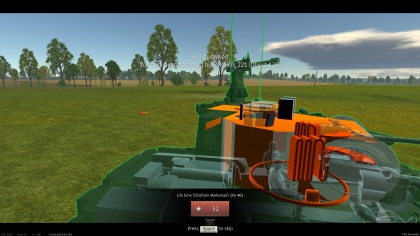
The Chieftain chassis is fairly well protected against frontal attacks by light vehicles. The turret protection, however, is not great - it will stop most heavy machine-gun fire at close range, but any chemical shell of high calibre could cause overpressure damage and just implode it in a single hit. Overall, tank feels almost like the FV4005 with slightly more armour on turret.
Do not show the lower front plate to the enemy's tanks, as it's considerably weaker. Despite having better armour for hull, the Marksman is extremely slow for it, so keeping the enemy away from this vehicle is the key to making the most of the armour it have, even though most opponents will only fire at its turret.
Generally, if turret doesn't break in a single hit, the crew is taken out in such order: Firstly the enemy does a precise shot at the bottom-left (vehicle's right) of the turret to take out the gunner, then fires at the opposite to take out tank commander.
Turret may tank 20 mm autocannon shots, but only at about 1.2 km range, which is an acceptable duel range for the Marksman. Any non-stock combat SPAA's and light tanks, though, will breach it with no effort even from 3 km away.
Armour type:
| Armour | Front (Slope angle) | Sides | Rear | Roof |
|---|---|---|---|---|
| Hull | ___ mm | ___ mm Top ___ mm Bottom |
___ mm | ___ - ___ mm |
| Turret | ___ - ___ mm Turret front ___ mm Gun mantlet |
___ - ___ mm | ___ - ___ mm | ___ - ___ mm |
| Cupola | ___ mm | ___ mm | ___ mm | ___ mm |
Notes:
Mobility
| Game Mode | Max Speed (km/h) | Weight (tons) | Engine power (horsepower) | Power-to-weight ratio (hp/ton) | |||
|---|---|---|---|---|---|---|---|
| Forward | Reverse | Stock | Upgraded | Stock | Upgraded | ||
| Arcade | Expression error: Unexpected * operator. | 1,178 | Expression error: Unexpected round operator. | __.__ | |||
| Realistic | 672 | Expression error: Unexpected round operator. | __.__ | ||||
Modifications and economy
Armaments
Main armament
The Marksman has an extremely fast turning turret, so any incoming plane or light vehicle can be targeted fast.
Guns converge at about 1.2 km range without "Adjustment of Fire" modification and about 1.8 km with it. This makes firing at close range enemy vehicles very impractical, due to half of already low ammunition count being wasted. However, it's very convenient for firing at moving targets, including light tanks and jets, as the two separate autocannons increase the probability of a hit. It may feel like the guns are similar to the Falcon's when fired, but due to them being 35 mm, shells will tear off plane wings even in one hit, and it's easy to hit them even with stock gun from 1.8 km range without wasting too much ammo due to radar assistance. Lightly-armoured vehicles get destroyed in about 30 shots at worst.
The guns can disable both tracks of the enemy vehicle at once at 300 m distance if facing the enemy's front. This allows the Marksman to escape and ask teammates to finish off the threat.
Due to the belt limitations, the optimal playstyle is much less aggressive than the Falcon; however, the APDS belt is no joke, as every shell in it can penetrate about 100 mm of armour up to 500 m and up to 60 mm at 2,000 m at 30°. Laser rangefinder also ensures that Marksman volleys hit enemy tanks without failure. As such, weaker side armour on most rank V+ vehicles of all nations can be threatened by the Marksman from almost any range, and it only brings much more pain to light vehicles from afar. Only Soviet tanks have decent enough armour on nearly all vehicles to negate its firepower in optimal weapon range.
Guns still overheat in about 10 seconds and can put the Marksman out of fighting capability for half a minute. Avoid spray-and-pray tactics and let the cannons cool down at least for a bit between volleys.
| 35 mm Oerlikon KDA (x2) | Turret rotation speed (°/s) | Reloading rate (seconds) | ||||||||||||
|---|---|---|---|---|---|---|---|---|---|---|---|---|---|---|
| Mode | Capacity (Belt) | Fire rate | Vertical | Horizontal | Stabilizer | Stock | Upgraded | Full | Expert | Aced | Stock | Full | Expert | Aced |
| Arcade | 500 (230) | 550 | -10°/+85° | ±180° | Two-plane | 79.3 | 109.7 | 133.2 | 147.3 | 156.7 | 1.30 | 1.15 | 1.06 | 1.00 |
| Realistic | 53.5 | 63.0 | 76.5 | 84.6 | 90.0 | |||||||||
Ammunition
There are two Ammunition belts, which are also split into 2 (one for each gun): the main belt and secondary belt.
The Marksman can take 460 shells for the main belts and 40 for secondary, which is barely enough for one engagement. This may be insulting, but it's necessary for survival. Unlike with the Falcon, when ammo for the main belt runs out, the second belt of pure anti-air or anti-armour rounds can be used as self-defence during restock on a capture point. Also, there won't be a need wait for the reload once the ammo restock is complete, as the Marksman is ready to fight nearly instantly.
Note that the DM23 APDS belt can only be a secondary belt. There is also a difference in effective range between normal belt and APDS belt. For some reason, AP-I shells can only fly up to 3km away and even radar will refuse to help aiming them past that range. This does not happen with APDS, allowing to snipe even as far as 5 km, at which range even radar itself is barely capable of keeping up the lock on. The APDS belt is also completely invisible, allowing to suddenly snipe any aircraft that doesn't have RWR.
Rearming of the belts takes 20 seconds, but it can only do two belts at once (regardless of the belt type). The implication is, if any one cannon overheated and the belts are no longer homogeneous, you can get both belt types for that one gun at once, but the tank will be stuck using just one cannon from then on.
- Default: API-T* · HEI-T*
- DM11A1: HEI-T* · HEI-T* · HEI-T* · API-T*
- DM13: API-T* · API-T* · API-T* · HEI-T*
- DM23: APDS
| Penetration statistics | |||||||
|---|---|---|---|---|---|---|---|
| Ammunition | Penetration @ 0° Angle of Attack (mm) | ||||||
| 10 m | 100 m | 500 m | 1,000 m | 1,500 m | 2,000 m | ||
| HEI-T* | 11 | 11 | 9 | 8 | 6 | 5 | |
| API-T* | 68 | 66 | 57 | 47 | 39 | 32 | |
| APDS | 127 | 125 | 118 | 110 | 102 | 95 | |
| Shell details | ||||||||||||
|---|---|---|---|---|---|---|---|---|---|---|---|---|
| Ammunition | Velocity (m/s) |
Projectile mass (kg) |
Fuse delay (m) |
Fuse sensitivity (mm) |
Explosive mass (TNT equivalent) (g) |
Ricochet | ||||||
| 0% | 50% | 100% | ||||||||||
| HEI-T* | 1,175 | 0.55 | 0.1 | 0.1 | 204 | 79° | 80° | 81° | ||||
| API-T* | 1,175 | 0.55 | 1.2 | 9 | 37.4 | 47° | 60° | 65° | ||||
| APDS | 1,400 | 0.38 | - | - | - | 75° | 78° | 80° | ||||
Ammo racks
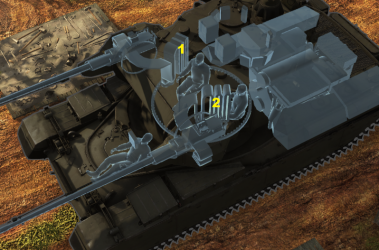
| Full ammo |
1st rack empty |
2nd rack empty |
Visual discrepancy |
|---|---|---|---|
| 3 | __ (+__) | __ (+__) | __ |
Optics and night vision
| Chieftain Marksman Optics | ||||||
|---|---|---|---|---|---|---|
| Type of optic | Magnification | Night Vision Devices | ||||
| Image Intensifier | Thermal Imager Resolution |
Notes | ||||
| Resolution | Light Mult | Noise Level | ||||
| Gunner's Sight | X3 - X10 | N/A | N/A | N/A | Not Fitted | |
| Commander's View | X3 - X10 | N/A | N/A | N/A | Not Fitted | |
| Driver's View | X1 / 3PV | 800X600 | _ | high | Not Fitted | Only useable with tier 2 upgrade |
Use night vision to avoid hostile tanks or to fight them at close range at night. The image intensifier is not installed for gunner or commander, so be cautious when shifting between third person and other views during night.
While Chieftain Marksman gun convergence can allow its user to fire at targets in 3-rd person view and still hit a target, you have to use sniper scope to increase accuracy of radar aim, but keep sensor guidance errors in mind during this.
Commander sight can be used in AB/RB to fire weapons at super long range while only exposing the radar and optics, as otherwise "sniper optics" are located lower on cannon level. This does not make fighting much safer in general as the radar is still exposed, but can sometimes help when fighting tanks on high ground.
Rely mostly on radar when firing at night, but do not forget to reduce zoom and check, if lock-on is stable, as it may wobble around the target at times.
Radars
The Chieftain Marksman is equipped with a Marconi S 400 search and tracking radar, mounted on top of the turret, at the rear. The radar system lacks track while scan but can find and track targets in a full 360° area around the turret (instead of just to the front of the turret). This radar also can lock onto anything it spotted by selecting targets on radar display and then pressing lock on button in third person view to save time (the turret turns towards the target on its own). This radar can be chaffed, so target should be destroyed before it can disrupt the lock.
If you want to use radar to specifically try and "find" a target that is too far away to see, or do not want to alert the entire enemy air force of your existence, you can try to stop radar dish by using "change radar search mode" (not bound by default) and specifically look towards the direction aircrafts are expected to come from (the enemy airfield, for example). If the radar happens to detect them, they will appear on the radar screen, and you can lock onto them. However, the use of this option is severely limited due to the fact that planes rarely move in a straight line, so even if you try to snipe them from 4 km range, it will likely result in a miss, so the default search mode is generally better.
| Marconi S 400 - Target Detection Radar | ||||
|---|---|---|---|---|
| Maximum Detection Range |
Minimum Detection Range |
Max Azimuth Scan Angle |
Max Elevation Scan Angle |
Minimum relative speed |
| 12,000 m | 1,000 m | 360° | -10°/+90° | 15 m/s (54 km/h) |
| Marconi S 400 - Target Tracking Radar | ||||
| Maximum Tracking Range |
Minimum Tracking Range |
Azimuth Tracking Angle |
Elevation Tracking Angle |
Minimum relative speed |
| 10,000 m | 100 m | 360° | -10°/+87° | 15 m/s (54 km/h) |
Usage in battles
Follow the team's push and take some nice fortified position with sight on the capture point, destroying any scout vehicles that attempt to get close while looking for planes. Conducting both actions at once is crucial to not only deny the enemy a recon point but also for self-preservation to keep the Marksman protected. Fighting at a distance will be best to minimize convergence distance to avoid wasting ammunition on the lead. Vertical traverse of cannons is almost instant, so that should not be a concern when shifting from ground to air target. As the main belt's ammo runs out, move closer to the capture point to rearm. With this tactic, use the secondary belt only for self-defence on the capture point, or if it's really necessary for a teammate's survival.
Alternatively, you could go straight for capture point defence and unload secondary belts onto every passing plane, light tank, SPAA and poorly armoured MBT, then immediately rearm. Since your guns convergence is 1-2 km depending on upgrades, there is little chance that any vehicle which is travelling in a straight line can dodge your double cannon lead. However, don't expect to successfully push away medium tanks, if your belt isn't APDS, and it's very likely that the enemy's return fire will heavily damage or overpressure you, as capture points rarely provide any cover, so move out and use your main belt, when forced to.
Using radar-assisted aim is advised since it's more accurate and can lead to hits at over 3 km range. To conserve ammo, however, do not just blindly follow it, especially in arcade, as arcade mode aircraft tend to dodge direct shots - do some short bursts around it. If you are standing on a frontline, remember that the Marksman is very tall and it is not rare for some tankers to get annoyed by your presence and try to shoot the radar off the turret, even if the turret itself is almost entirely behind cover and attack achieves nothing else, so try to move somewhere remotely safe if you are expecting an air raid.
In arcade mode your combat ability is severely limited, due to many maps being 2 x 2 km wide at best, so on such maps you could try to train your crew with very high "keen vision", then try to camp enemy base entrances across the map, using the fact that your shells have little penetration falloff over distance, laser rangefinder assistance and slight armour angling. This would require great map knowledge, though. If you do not have map knowledge or are quickly bored, try to follow some medium tanks and attack whoever tries to flank or got distracted by them, but be ready to suffer consequences if you fail. As soon as enemy planes or attack helicopters appear, destroy them.
On big maps in arcade mode, keep in mind, that every sniper tank on enemy team might try to shoot in your direction, as soon as they are done destroying medium tanks, or if hostile light tank "scout" you. It is very hard to snipe planes from spawn on such maps, so try to secure some "trench line" in form of a hill, which you can use to follow your team even under sniper fire. Snipe lightly-armoured tanks back, if they expose themselves. Having high "keen vision" greatly helps at this as well.
Some enemies to be concerned about:
- Soviet tanks: Avoid them as much as possible. With the gun convergence and reduced movement speed, it will not be easy to defeat them in a duel, as their frontal armour is almost always impenetrable, even for APDS belt. Detrack them and communicate with teammates to finish them off. Sometimes their medium tank drivers are very arrogant and underestimate the Marksman, due to how rarely it is spaded and do not immediately turn their frontal armour towards it, thinking that you cannot destroy them anyway - punish them by shredding their tank with APDS belt, or by firing AP belt into generally weak side-bottom part of their tank.
- Maus: It's invulnerable. Best not to show up in parts of that map it controls.
- Centauro: This is the epitome of all tanks the Marksman wants to shoot at - it is mobile, can reach and flank your position in a minute and has scouting as well. Fortunately, it also has the armour of a light tank, so if you see it out of cover, drop your lock on and fire at it, before it hides away.
- Helicopters: While helicopters are slow and may look like an easy target, they can change direction of flight and throw off radar aim or try to drop altitude, avoiding shots from over two kilometres away, so keep checking where it is trying to turn or roll, instead of just firing at the radar aiming reticle. Also, due to the Marksman's cannon convergence, try to keep them away from you or spread shots horizontally, as it is not rare to only cut off weapon pylons off attack helicopter, but fail to actually disable its gunner/co-pilot, so if after critical hit on a helicopter or setting it on fire ATGM still flies directly at your SPAA, it is better to hide behind something. Any ATGM helicopters are best destroyed with a short burst of APDS before they can spot and evade you. The radar will keep your aim true, so don't worry about accuracy during movement too much. After a certain point, helicopters acquire 8 km range ATGMs and outclass you entirely, which is when you have to swap to the next generation SPAA, especially in RB.

Pros and cons
Pros:
- Guns produce a great effect upon shell contact on target, requiring only one or two hits to down a plane
- Can fire effectively at longer ranges than Falcon and has laser rangefinder with radar guidance on top of that
- Compared to Gepard and Type 87 has relatively easy time shooting down planes even without use of a sniper scope
- Secondary belts and near-instant reload allows for safer rearms compared to the Falcon and the M163 Vulcan
- Has a stable radar system with full 360° target tracking - it rarely ever needs to be manually locked on
- Unlike the latter ZA-35, can lock-on with radar display and lock through some trees, at the cost of triggering radar warning systems
- Due to how tall this SPAA is, the APDS belt can breach weak spots of some tanks which rely on angled armour in a downtier
Cons:
- Low mobility - it can't outrun most of its opponents and moving around the map at its rank can be a challenge in itself, eventually becomes obsolete because of this
- LFP is a weak spot even for some light tanks, turret is lightly-armoured and is a big target for rockets and other explosives - keeping 1.3 km distance is crucial when fighting light tanks and other SPAA
- Due to very tall profile it is an easy target, when compared to other SPAAs of the rank. it is hard to never show it to medium tanks or SPGs in order to avoid being destroyed by overpressure
- The cannon's convergence makes the Marksman weaker in close combat, as it can only hit targets with one gun at short range
- Ammunition count is low, firing in 20-30 shot bursts is almost a must
- APDS ammo is now put into a separate belt, which may be inconvenient to use with a low ammunition capacity
- Slower rate of fire than other SPAA
- Radar system lacks track while scan and has relatively poor range
- Still does not have gunner night vision, although radar mostly compensates for that (can cause problems at pitch black maps of 9.0+)
- Main belt can only be radar-guided at up to 3 km range, ATGM sniper helicopters like Alouette (Family) can simply outrange it, unless APDS is unlocked
History
Development
In the mid to late 1960s, the second generation of main battle tanks were becoming the focal point of armoured warfare. Main battle tanks were vulnerable to air attack and the British Army lacked anti-air defences capable of keeping up with MBT formations. Two prototype anti-aircraft turrets were mounted to a Chieftain hull; the Marconi Defence Systems Marksman and a Royal Ordnance turret named 'Sabre'.[1]
The Marconi Electronic Systems turret atop the Chieftain hull was fitted with twin Oerlikon 35 mm cannons effective at up to 4,000 metres distance. Intended targets were low-flying aircraft and attack helicopters, however, APDS ammunition would allow the Marksman the opportunity to engage even substantially armoured ground targets. Using a primary surveillance radar in conjunction with automated detection, tracking, and firing systems, the Marksman could engage multiple targets just 6 seconds after first detecting them.[2]
Legacy
Neither of the two anti-air turret variants were adopted by the British Army following their trials, but valuable information was gathered, which would influence the future of the British Army's air defence doctrines. The Marksman turret would be operationally used in small numbers by the Finnish Defence Forces; initially mounted onto a T-55 hull and in recent years retrofitted onto the Leopard 2A4 hull.[3]
Devblog
With the development of more effective modern weapon systems, deployed from aircraft capable of flying at very high speeds and low altitudes, mobile ground troops were more susceptible to air attack than ever. The British Marconi Electronic Systems company came to the same conclusion during the early 1980s and began independently developing the Marksman project after realizing how little work was being done in the field of modern SPAA development. The concept of the Marksman project wasn't the development of an entirely new vehicle, but rather of a modern anti-air platform that could be fitted to a wide range of suitable military vehicles, even non-British ones. Naturally, the platform had to be capable of dealing with the most modern threats, such as high-speed attack aircraft and helicopters. In order to achieve this, Marconi engineers gave the Marksman a highly advanced radar detection and targeting system and paired it up with twin 35 mm Oerlikon KDA cannons in a similar fashion as found on the German Flakpanzer Gepard.
The testing of the first construction prototype was done on the chassis of the Chinese Type 59 tank. This decision was primarily made in an effort to optimize the platform for use on similar Chinese machines in order to attract potential customers using Chinese vehicles. In 1984, further tests were conducted, only this time around, using chassis of British vehicles such as the Centurion, Chieftain and Challenger 1. However, in order to further increase the number of vehicles that could potentially fit the Marksman platform, Marconi developed several adapters that allowed the platform to be fitted on hulls with a turret ring diameter smaller or in excess of 1,840 mm. However, as even newer, more capable aircraft weapon systems were developed during the 1980s which could easily destroy such SPAAs, the Marksman system became more or less obsolete before it was even deployed. Due to this, the primary expected customer - the British Armed Forces - didn't show any interest in adopting a conventional SPAA system, such as the Marksman. Only a limited number of Marksman systems was employed by the Finnish army on their ItPsv 90 SPAAs, which were retired from active service in 2010 and replaced with Leopard 2 Marksman conversions which are still in service today.
Media
- Skins
- Videos
See also
- Related development
- Chieftain (Family)
- ItPsV Leopard - Same Marksman turret
- Other vehicles of similar configuration and role


External links
References
- ↑ Griffin, R. (2001) Chieftain. Marlborough: The Crowood Press, p. 149.
- ↑ Dunstan, S. (1989) The Chieftain Tank. London: Arms and Armour Press, p. 45-6.
- ↑ (2015) MAAVOIMIEN LIIKKUVUUDEN JA TULIVOIMAN ROLL OUT PANSSARIPRIKAATISSA. Finnish Defence Forces. Available at: https://web.archive.org/web/20151005155147/http://www.puolustusvoimat.fi/wcm/a2748e00495d6be1a9e0a98833fba23b/Toimintanaytoksen_materiaalitiedot_5%2B8%2B2015.pdf?MOD=AJPERES (Accessed: October 29, 2022).
| Britain anti-aircraft vehicles | |
|---|---|
| Crusader AA | Crusader AA Mk I · Crusader AA Mk II |
| Wheeled | Staghound AA · AEC AA |
| Radar SPAAG | Chieftain Marksman |
| Missile SPAA | Stormer AD · Stormer HVM |
| Other | Light AA Mk I · Falcon |
| Canada | Skink · ADATS (M113) |
| South Africa | Ystervark · Bosvark · ZA-35 |