Bosvark
Wheeled ground vehicles
OLD‑WIKI.WARTHUNDER.COM (DEFUNCT)
Description
During the South African Border war, the Popular Movement for the Liberation of Angola (MPLA) utilized ZU-23-2 anti-aircraft guns against the South African Defense Forces (SADF). Designed by the Soviet Union, these anti-aircraft guns were also found to be very effective against infantry and light vehicles. The SADF would seize enough of these guns to partially utilize them as regular weapons in their army. In the early 1990s, the SAMIL-100 Kwêvol armoured cargo truck was selected by the Armaments Corporation of South Africa as a carrier for captured ZU-23-2 turrets, which were redesignated by the SADF as the GA-6. The Bosvark would fill the gap left behind by the earlier Ystervark, which was removed from frontline service in 1991.
Introduced in Update "Fire and Ice", the Bosvark is relatively fast and manoeuvrable for its size. Players can easily set up ambushes by hiding near buildings and waiting for unsuspecting enemy aircraft to fly low, making them an easy target. It is, however, larger than other SPAA vehicles at its tier, and many of its personnel are unprotected. As a result, it is critical for this vehicle to remain as hidden and unnoticed as possible until it is time to strike. A short burst from the Bosvark's autocannons can readily bring down any aircraft during battles. Players should keep in mind that the 23 mm ZU-23-2 will quickly deplete its ammunition and has a relatively long reload time, so it is recommended to not fire this weapon for longer than a few seconds at a time. Despite having access to armour-piercing ammunition belts, the armour penetration capability is insufficient to deal with the majority of tanks encountered during fights. Combined with the lack of weapon traverse towards the front section of the vehicle, it is not recommended to use the Bosvark in direct combat with enemy ground vehicles.
General info
Survivability and armour
The Bosvark's crew are under imminent threat when facing almost any type of enemy fire. The ZU-23-2 turret features an open-air, unshielded design that leaves the gun crew exposed. If explosions occur near the vehicle, there is a very high chance that those two crewmembers will be heavily wounded or knocked out. Machine guns and autocannons will also knock these crewmembers out easily.
The driver, commander and loader are located in the front of the vehicle. While being situated in an enclosed cabin, they are only protected from light weapons like rifle-caliber machine guns due to the cabin's relatively thin armour.
As a result of its light protection, it is highly recommended to remain hidden and unnoticed when using this vehicle. In the case that the vehicle is attacked, with five crewmembers spread out across a long chassis, it is possible for one of the general crew stations to be completely knocked out while the other station remains unharmed. Players can take advantage of this by hiding the cabin behind solid cover when exposing the gun crew to engage the enemy.
Armour type:
- Structural steel (chassis)
- Rolled homogeneous armour (cabin, weapon platform, bonnet)
- Bulletproof glass (windshield, )
| Armour | Front (Slope angle) | Sides | Rear | Roof |
|---|---|---|---|---|
| Chassis | 2 mm (38°) Bumper
4 mm (0°) Grille 10 mm (0°) Fascia |
10 mm (0°) Storage 30 mm (0°) Frame |
4 mm (0°) Bumper
10 mm (0°) Tires |
2 mm (88°) Bonnet
10 mm (90°) Weapon Platform |
| Cabin | 10 mm (15°) Cabin 60 mm (15°) Windshield |
10 mm (10°) Cabin
10 mm (54°) Lower Cabin 6 mm (10°) Doors 60 mm (10°) Windows |
10 mm (10°) Cabin | 10 mm (90°) Cabin |
Notes:
- Wheels are 10 mm thick
Mobility
| Game Mode | Max Speed (km/h) | Weight (tons) | Engine power (horsepower) | Power-to-weight ratio (hp/ton) | |||
|---|---|---|---|---|---|---|---|
| Forward | Reverse | Stock | Upgraded | Stock | Upgraded | ||
| Arcade | Expression error: Unexpected * operator. | 447 | Expression error: Unexpected round operator. | __.__ | |||
| Realistic | 279 | Expression error: Unexpected round operator. | __.__ | ||||
Despite its size, the Bosvark is rather mobile with a relatively high maximum forward speed and decent engine power that allows players to get to positions easily. With this mobility in mind, after players have engaged an enemy, it is advised to reposition as soon as possible to avoid retaliation. In emergencies, the Bosvark can even use its speed to rush and decap or fully capture enemy points, as long as said points are completely uncontested. Being a wheeled vehicle, however, it will be slowed down when traveling on non-solid surfaces such as mud, snow and sand. Traversing maps along paved or dirt roads will allow the vehicle to maintain high speeds.
Unfortunately, the Bosvark is much slower in reverse. It is highly recommended to stop and check open fields and around corners to see if the area is clear to move through. If caught by enemy fire, the vehicle will have a difficult time reversing out of it at a speed of 9 km/h, especially because of its size.
Size is also a factor to consider in mobility as the Bosvark is a very long and wide vehicle. The large unfolded side platforms may clip obstacles such as trees and fences while manoeuvring and can prevent the vehicle from entering narrow passageways. Additionally, the Bosvark may not be able to enter small tunnels and other areas with low ceilings as its tall cabin may impact the lowest point. It is important to note that the Bosvark has a very large turn radius, which can make it very difficult to turn around in urban environments.
Modifications and economy
One recommended order of research is as follows, with a focus on upgrades for improved anti-aircraft ability:
- Improved Parts and Improved FPE: These are very high priority modifications and will significantly increase the ability to return to combat when essential components are damaged by enemy fire.
- HEFI-T Belts: As the Bosvark is primarily an SPAA vehicle, ammunition belts consisting mostly of 23 mm high explosive incendiary ammunition can be a high priority for it. Although the Default ammunition is powerful, these belts can help to destroy enemy aircraft in fewer shots. This is especially useful keeping the Bosvark's short ammunition belts in mind. It is recommended to utilize this belt as the main ammunition type after research has been completed.
- Horizontal Drive, Elevation Mechanism and Adjustment of Fire: Although the ZU-23-2 turret is already fairly quick to traverse, these modifications will allow the turret to traverse even faster. Adjustment of Fire will make the twin cannons more accurate.
- General Mobility: Since SPAAs generally do not need to travel far to fight, it is okay to research mobility upgrades later. Most of these modifications, especially Engine and Filters will increase the vehicle's handling and top speed.
- Brake System and Suspension: Unless required to research to gain access to the above modifications, players may give these modifications lower priority than other Mobility upgrades as their benefits, when equipped, will not greatly affect the Bosvark's performance due to its design and role.
- Crew Replenishment: This modification will increase survivability, although with the large but vulnerable crew, players may find that they either don't need to replenish a crewmember or their vehicle is destroyed before needing to do so. Because of this, players may choose to research this modification later than the other Protection upgrades.
- Artillery Support: The ability to call artillery can be useful offensively to damage or destroy vehicles in capture points or defensively when vehicles are a threat to the Bosvark. It is important to note that enemy vehicles will have to be in a radial vicinity of the player for them to call an artillery strike. This radius will vary with crew skills and may not be a high priority for the Bosvark as an SPAA vehicle located towards the rear of the battlefield.
- API-T: Belts consisting mainly of Armour Piercing, Incendiary Tracer belts are useful against ground targets. However, this may not be as useful to the Bosvark because of its role and design. The long reload of the ZU-23-2 will make it difficult for the Bosvark to switch belts to counter different targets. Since the Default ammunition belt contains an equal mixture of HE and AP, this can be used as the vehicle's emergency anti-armour belt until API-T is researched at a later stage.
Armaments
Main armament
| 23 mm ZU-23 (x2) | Turret rotation speed (°/s) | Reloading rate (seconds) | ||||||||||||
|---|---|---|---|---|---|---|---|---|---|---|---|---|---|---|
| Mode | Capacity (Belt) | Fire rate | Vertical | Horizontal | Stabilizer | Stock | Upgraded | Full | Expert | Aced | Stock | Full | Expert | Aced |
| Arcade | 700 (50) | 800 | -10°/+90° | ±180° | - | 52.8 | 73.1 | 88.8 | 98.2 | 104.5 | 13.00 | 11.50 | 10.60 | 10.00 |
| Realistic | 35.7 | 42.0 | 51.0 | 56.4 | 60.0 | |||||||||
Ammunition
- Default: API-T · HEF-I
- HEFI-T: HEF-I · HEFI-T · HEF-I · API-T
- APIT: API-T · API-T · API-T · HEFI-T
| Penetration statistics | |||||||
|---|---|---|---|---|---|---|---|
| Ammunition | Penetration @ 0° Angle of Attack (mm) | ||||||
| 10 m | 100 m | 500 m | 1,000 m | 1,500 m | 2,000 m | ||
| HEF-I | 6 | 6 | 4 | 3 | 2 | 2 | |
| API-T | 51 | 48 | 36 | 26 | 18 | 13 | |
| HEFI-T | 6 | 6 | 4 | 3 | 2 | 2 | |
| Shell details | ||||||||||||
|---|---|---|---|---|---|---|---|---|---|---|---|---|
| Ammunition | Velocity (m/s) |
Projectile mass (kg) |
Fuse delay (m) |
Fuse sensitivity (mm) |
Explosive mass (TNT equivalent) (g) |
Ricochet | ||||||
| 0% | 50% | 100% | ||||||||||
| HEF-I | 980 | 0.18 | 0.1 | 0.1 | 28.49 | 79° | 80° | 81° | ||||
| API-T | 970 | 0.19 | - | - | - | 47° | 60° | 65° | ||||
| HEFI-T | 970 | 0.19 | 0.1 | 0.1 | 20.02 | 79° | 80° | 81° | ||||
Ammo racks
| Full ammo |
1st rack empty |
2nd rack empty |
3rd rack empty |
4th rack empty |
5th rack empty |
6th rack empty |
Visual discrepancy |
|---|---|---|---|---|---|---|---|
| 14 | __ (+__) | __ (+__) | __ (+__) | __ (+__) | __ (+__) | __ (+__) | __ |
Usage in battles
One recommended strategy is to set up ambush positions by hiding near buildings and waiting for unsuspecting enemy aircraft to fly low, making them an easy target. It is, however, larger than other SPAA vehicles as well as many other vehicles at its rank which may aid enemies in spotting this vehicle from the ground or in the air.
A quick burst of fire from the 23 mm ZU-23-2 autocannons can easily bring down any aircraft. However, as the ammunition is limited in each belt and the reload time is long, the Bosvark is unable to fire for extended periods of time. If the vehicle is in a safe position and there is less than half of the ammunition left, it is recommended to empty the remaining ammunition in order to reload full belts.
While this vehicle has access to armour-piercing ammunition belts, the armour penetration capability is insufficient to deal with many ground targets encountered during battle, especially if they feature moderate to heavy armour.
Pros and cons
Pros:
- Fast vehicle, capable to relocate as needed because of the chassis' high forward speed
- Powerful, fast-firing 23 mm cannons
- Large crew size and spread increase survivability
- Enclosed cabin can protect crew members from light machine guns
- Relatively civilian appearance can trick enemies into overlooking the vehicle in urban environments
Cons:
- Large vehicle; difficult to conceal and manoeuvre in enclosed areas
- Lightly armoured; susceptible to machine guns and explosive weapons
- Cannons deplete the magazine capacity quickly (50 rounds per gun) and has long reload times
- Cabin and storage boxes block forward traverse of the weapon
- Relatively slow reverse speed
- Wheeled configuration reduces mobility off-road
History
Devblog
During the South African Border War, lasting throughout the 1960s up until the late 1980s, the South African Defence Force (SADF) managed to capture large quantities of ZU-23-2 towed anti-air guns. Being in popular use by Angolan forces, the SADF used these guns primarily for base defences and training. After the war these guns were no longer required and put into storage.
In the early 1990s however, the SADF sought to mount the newly purchased ZU-23-2 on a mine-resistant chassis. Shortly after, ARMSCOR identified the SAMIL-100 transporter as a suitable platform and modified it to house the ZU-23-2.
The first prototype underwent testing in April 1991 and serial production followed by the end of the year. Surprisingly the ZU-23-2 gun was meant to be used in the ground support role, rather than primarily in the anti-air role.
Bosvark, as it became known, entered service with the 10 Air Defence Artillery Regiment of the South African National Defence Force (SANDF). The Bosvark is yet to see combat action and is only operated by the SANDF.
Media
- Skins
 Market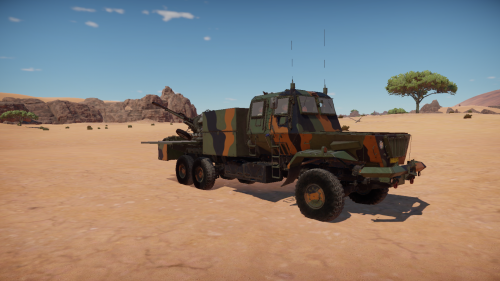
See also
Vehicles of similar configuration and role:
Vehicles with similar weapon systems:
External links
| Britain anti-aircraft vehicles | |
|---|---|
| Crusader AA | Crusader AA Mk I · Crusader AA Mk II |
| Wheeled | Staghound AA · AEC AA |
| Radar SPAAG | Chieftain Marksman |
| Missile SPAA | Stormer AD · Stormer HVM |
| Other | Light AA Mk I · Falcon |
| Canada | Skink · ADATS (M113) |
| South Africa | Ystervark · Bosvark · ZA-35 |