Crusader AA Mk I
OLD‑WIKI.WARTHUNDER.COM (DEFUNCT)
| This page is about the British SPAA Crusader AA Mk I. For other variants, see Crusader (Family). |
Description
The Crusader III Anti-Aircraft Mark I is the first anti-air modification of the Crusader III, which is the third variant of the A15 Crusader cruiser tank family. The original 57 mm Ordnance QF 6-pounder was replaced with a 40 mm Bofors anti-aircraft gun in an open-topped turret with an autoloader and automated turret. The crew consisted of four people: the commander, the gunner, the loader, and the driver. Beginning with the Normandy landing, the Crusader III Anti-Aircraft Mark I was issued to artillery light anti-aircraft regiments, but they were withdrawn from service soon after D-Day due to Allied air superiority and a lack of Luftwaffe targets, necessitating much fewer anti-aircraft platforms.
Introduced in Update 1.55 "Royal Armour", the Crusader III Anti-Aircraft Mark I is an interesting anti-aircraft vehicle that is also capable of carrying out anti-tank roles. Despite its anti-aircraft designation, the Crusader III Anti-Aircraft Mark I struggled in this duty. The 40 mm Bofors anti-aircraft gun fires slowly with low-velocity ammunition, making it difficult to target fast-moving enemy aircraft. Nonetheless, a single hit will frequently cripple any adversary aircraft. As a result, it is critical to hide and wait for an ideal moment before opening fire on an enemy aircraft. It can also act as an anti-tank weapon. This vehicle's armour-piercing ammunition can penetrate the frontal armour of light and medium tanks, as well as the side or rear armour of some heavy tanks. Due to the low post-penetration damage, you will need to target more than one section of an enemy tank to successfully destroy it.
General info
Survivability and armour
Armour type:
- Rolled homogeneous armour
| Armour | Front | Sides | Rear | Roof |
|---|---|---|---|---|
| Hull | 20 mm (33°) Front plate 9 mm (85°) Front glacis 20 mm (27°, 61°) Joint plate 20 mm (65°) Lower glacis 18 mm (1°) Driver's Port |
14 + 14 mm | 14 mm (14°), 12 mm (51°) Rear plate 14 mm (44-46°) Engine grille |
7 mm |
| Turret | 30 mm (36°) | 12 mm (14-15°) | 12 mm (19°) | N/A |
Notes:
- Suspension wheels and tracks are 15 mm thick.
Mobility
| Game Mode | Max Speed (km/h) | Weight (tons) | Engine power (horsepower) | Power-to-weight ratio (hp/ton) | |||
|---|---|---|---|---|---|---|---|
| Forward | Reverse | Stock | Upgraded | Stock | Upgraded | ||
| Arcade | Expression error: Unexpected * operator. | 483 | Expression error: Unexpected round operator. | __.__ | |||
| Realistic | 301 | Expression error: Unexpected round operator. | __.__ | ||||
Modifications and economy
Armaments
Main armament
| 40 mm Bofors L/60 | Turret rotation speed (°/s) | Reloading rate (seconds) | ||||||||||||
|---|---|---|---|---|---|---|---|---|---|---|---|---|---|---|
| Mode | Capacity (Belt) | Fire rate | Vertical | Horizontal | Stabilizer | Stock | Upgraded | Full | Expert | Aced | Stock | Full | Expert | Aced |
| Arcade | 160 (8) | 120 | -6°/+70° | ±180° | N/A | 35.22 | 48.75 | 59.20 | 65.47 | 69.65 | 0.65 | 0.57 | 0.53 | 0.50 |
| Realistic | 23.80 | 28.00 | 34.00 | 37.60 | 40.00 | |||||||||
Ammunition
- Default: AP-T · FI-T* - These work fine, a hit on an aircraft means certain death for it and still is able to hurt ground vehicles, especially if it is side into the side of a enemy tank. These would be a good ammunition belt to deal with a variety of situations the Crusader can find itself in.
- Mk.II: FI-T* - These mean certain death for aircraft, what should be used for AA work.
- M81A1: AP-T - These are the worst belts against airplanes. however, they are able to hurt ground vehicles especially if it is side into the side of a enemy tank. If you plan on killing tanks load this and flank, since side shots are almost a necessity.
| Penetration statistics | |||||||
|---|---|---|---|---|---|---|---|
| Ammunition | Type of warhead |
Penetration @ 0° Angle of Attack (mm) | |||||
| 10 m | 100 m | 500 m | 1,000 m | 1,500 m | 2,000 m | ||
| Mk.II | FI-T* | 9 | 8 | 7 | 6 | 5 | 4 |
| M81A1 | AP-T | 72 | 69 | 58 | 46 | 37 | 29 |
| Shell details | ||||||||||||
|---|---|---|---|---|---|---|---|---|---|---|---|---|
| Ammunition | Type of warhead |
Velocity (m/s) |
Projectile mass (kg) |
Fuse delay (m) |
Fuse sensitivity (mm) |
Explosive mass (TNT equivalent) (g) |
Ricochet | |||||
| 0% | 50% | 100% | ||||||||||
| Mk.II | FI-T* | 874 | 0.83 | 0.1 | 0.1 | 63 | 79° | 80° | 81° | |||
| M81A1 | AP-T | 875 | 0.88 | - | - | - | 47° | 60° | 65° | |||
Ammo racks

| Full ammo |
Ammo type |
1st rack empty |
2nd rack empty |
3rd rack empty |
4th rack empty |
5th rack empty |
Visual discrepancy |
|---|---|---|---|---|---|---|---|
| 20 160 |
Clips Rounds |
15 (+5) 120 (+40) |
10 (+10) 80 (+80) |
5 (+15) 40 (+120) |
1 (+19) 8 (+152) |
0 (+20) 0 (+160) |
Yes |
Notes:
- Ammunition is organised in clips of 8 rounds.
- The visual discrepancy concerns racks and clips: racks 1 to 4 are modeled as 9 clips containing 4 rounds while rack 5 is a clip of 4 rounds. In-game, racks 1 to 4 contain 5 clips of 8 rounds and rack 5 contains a clip of 8 rounds.
- Racks disappear after you've fired all shells in the rack.
Usage in battles
Despite being an SPAA vehicle, the Crusader struggles in an AA role. The gun is slow firing and fires at quite a low velocity, meaning that you will struggle to target fast moving enemy aircraft. Granted, a single hit will often spell doom for an enemy aircraft. Therefore, it is important to hide and wait for an opportune moment to open fire on an enemy aircraft. A low flying aircraft within 1km, flying at low speed, should be easier to hit. However, higher ranked and faster planes will can be a much harder target to his with the slow turret traverse for tracking and the slow fire rate of the gun.
The Crusader AA Mk I can play in a style similar to gun-centric IFVs at higher BRs. The gun is not dissimilar in performance to the gun on the Churchill I, and thus is perfectly serviceable for performing duties in the anti-tank role. With the AP belts equipped and with the use of high mobility, it is relatively easy to disable anything short of a heavy tank from the front (with the exception of a few tanks that're encountered in uptiers). You are quite dangerous to Panzers especially, as side-on it is possible to destroy them two or three well-placed shots. Avoid playing the vehicle in this role in uptiers against USSR however, as the gun in not powerful enough to penetrate or even disable KV-1s and T-34s. Be especially aware of the French heavy tanks, too, as their armour is deceptively thick. The 2C and 2C bis can be engaged with caution, as the 40mm cannon can dispatch them quickly at extremely close-range. On the contrary, do not attempt to engage either B1s, as their in practice is nigh-impossible to penetrate.
Pros and cons
Pros:
- Good mobility and top speed of the Crusader chassis
- 40 mm Bofors autocannon can heavily damage aircraft if the Mk.II shell contacts
- Tall turret offers good protection to the gunnery crew from machine guns up to 20 mm cannons
- AP shells have enough power to penetrate some tank armour
Cons:
- Very little armour, especially the AA turret
- Cannon slot in front turret armour allows machine gun bullets to go through and injure/kill the crew
- Against attacker and bombers, 40 mm cannon is not a one-hit kill and repeated hits are necessary
- Exposed top leave crew vulnerable
- Slow rate of fire and poor muzzle velocity
- Limited ammo, which could be a problem since the gun requires leading of shots
History
Development
In 1938, the General Staff of the British Army requested for a cruiser tank that was lighter and more affordable than the heavier A16 cruiser design developed by Nuffield Mechanizations & Aero. One of these designs was the designation Tank, Cruiser Mk.V based off the A13 cruiser tanks, named the "Covenanter", and Nuffield was invited to become part of its development team, but they refused due to interest in developing their own cruiser tank. Their tank was designated the Tank, Cruiser Mk.VI Crusader and fell under the General Staff specification of A15. The Crusader was a parallel design to the Covenanter, but was ready six weeks earlier than the Covenanter despite starting at a later time. The Crusader was adopted into service with the British Army in 1941 and the 5,300 units were manufactured between 1940 to 1943.
Design
The Crusader features a new design that differs from its cruiser tank predecessors. The Christie suspension system on the Crusader had five road wheels for it instead of the usual four, which improves weight distribution of the increased 20 ton weight of the Crusader compared to the 14 tons of the A13 cruisers. The engine, steering system, and cooling system on the Crusader was different as well, but the Covenanter and Crusader use the same main turret. The polygonal shape of the turret gives the crew inside more room for the turret ring diameter.
The Crusader Mk I and Mk II were equipped with the 2-pounder, which was aimed by the gunner inside with a padded shaft that allows them to elevate the gun by simply adjusting his own height. Later in the war where an up-gun of the tank armament was necessary and newer tanks such as the Cromwell was delayed, the Crusader was upgraded into the Crusader Mk III variant with a 6-pounder instead, which restricted turret space, requiring the turret crew to be reduced from three to two. These saw first action the Second Battle of El Alamein in October 1942.
Combat usage
The Crusader first saw action at North Africa, right after the British had been pushed back to the Egyptian border by Axis forces. The Crusaders were part of the huge shipment in the Malta Convoys to reequip the British forces there. Enough Crusaders arrive that the entire 6th Royal Tank Regiment was refitted with them, which joined up with the 2nd Royal Tank Regiment to form the 7th Armoured Brigade "Desert Rats". The brigade's first action was in Operation Battleaxe, though it was delayed due to adapting the tanks for the desert environment. The operation, which called for the relieve of the siege of Tobruk in June, was initiated in June to which 11 Crusader tanks were lost to anti-tank guns, plus many more to mechanical faults. While more Crusader tanks came in to reinforce the cruiser tank forces, there were never enough to supply the continuously expanding armoured units as 7th Brigade was combine with the 7th Hussars, the 2nd Armoured Brigade was added to the 7th Armoured Division, and the 8th Hussars was combined with the 4th Armoured Brigade. Overall, the Crusaders proved effective in the North African Campaign, the Crusader was faster than any tanks on the opposing side and the 2-pounder was lethal to the Panzer III, but the tank suffered from its thin armour, mechanical problems in the desert, and the growing deficiency of the 2-pounder, which didn't have enough range to destroy farther tanks. The Crusader design also caused the ammo racks on the tank to easily ignite due to unprotected racks and shot traps on the turret design. Anti-tank guns continue to be the main reason the Crusader units suffer losses, rather than to enemy tanks.
By the end of 1941, only the 2nd Armoured Brigade retained the Crusaders, the rest of the other tank units were being refitted with better tanks, such as the M3 Grant medium tank from the American Lend-Lease. Crusader units were also refitted with the more powerful Crusader Mk III with the 6-pounder, which improved the Crusader's ability to destroy the gradually stronger German tanks. After General Bernard Montgomery took command of the British Army in 1942, more British tank units were reequipped with the Grant and M4 Sherman tanks while the Crusaders were relegated from the front-lines to "light squadrons" meant to flank the enemy and attacked at its exposed sides. When the British 1st Army engaged the Axis at Tunisia, some tank regiments still use Crusaders mixed in with Valentine tanks. These units in the 26th Armoured Brigade, code named "Blade Force", worked alongside the 78th Infantry Division as an independent armoured column. During Tunisia, the 1st Army was already converting the tank regiments into Shermans, but the 8th Army continued to use the Crusaders for much longer, which would see use at the Battle of Wadi Akarit and Mareth Line.
After the North African Campaign, the Crusaders no longer saw any use in the front-lines and were used in other roles such as gun tractors with 17-pounders or anti-aircraft mounts such as the Crusader AA Mk I and Mk II Some Crusader tanks equipped the tank regiments that stayed back at the British Homelands such as the 11th Armoured Division.
The AA Tank Mk 1 was issued to artillery light anti-aircraft regiments starting with the landing in Normandy, but the Mark I's were withdrawn from service soon after D-Day due to the Allied air supremacy and lack of Luftwaffe targets meaning significantly fewer anti-aircraft weapons ended up being required.
Survivors
About 21 Crusaders still exist intact in various parts of the world. The most notable places with the Crusaders are South Africa with 8 known survivors, a running Crusader Mk III at Bovington Tank Museum at England, and an anti-aircraft version at Musée des Blindés in France.
Media
- Skins
- Images
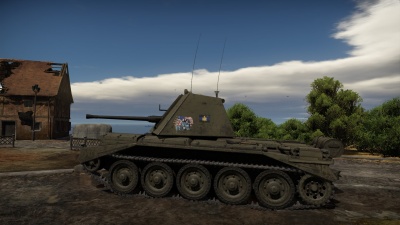
Crusader AA Mk I in Normandy map

See also
External links
- [Devblog] Crusader AA Mk.I and Crusader AA Mk.II
- [Tanks-Encyclopedia] Cruiser Mk.VI Crusader (Web Archive)
| Nuffield Mechanizations and Aero Limited | |
|---|---|
| Cruiser Tanks | |
| Tank, Cruiser, Mk III (A13 Mk I) | A13 Mk I · A13 Mk I (3rd R.T.R.) |
| Tank, Cruiser, Mk IV (A13 Mk II) | A13 Mk II · A13 Mk II 1939 |
| Tank, Cruiser, Mk VI, Crusader (A15) | Crusader II · Crusader "The Saint" · Crusader III |
| Tank Destroyers | Tortoise |
| SPAAs | Crusader AA Mk I · Crusader AA Mk II |
| Export | ▄Crusader Mk.II |
| Britain anti-aircraft vehicles | |
|---|---|
| Crusader AA | Crusader AA Mk I · Crusader AA Mk II |
| Wheeled | Staghound AA · AEC AA |
| Radar SPAAG | Chieftain Marksman |
| Missile SPAA | Stormer AD · Stormer HVM |
| Other | Light AA Mk I · Falcon |
| Canada | Skink · ADATS (M113) |
| South Africa | Ystervark · Bosvark · ZA-35 |