M4A3E2 (France)
OLD‑WIKI.WARTHUNDER.COM (DEFUNCT)
| This page is about the heavy tank M4A3E2 (France). For other M4 Shermans, see M4 Sherman (Family). For other uses, see M4 (Disambiguation). |
Description
The ▄Assault Tank M4A3E2 Jumbo was mainly issued to US Army Forces due to low production numbers. France operated a large number of M4A3E2 tanks in the early post-war period, since at this time the US wanted to get rid of all of its surplus military vehicles. However, a single M4A3E2 is known to have been issued to the French 1st Armoured Division, serving as the headquarters for the 2nd Squadron of the 2nd African Chasseur Regiment.
It was introduced in Update 1.75 "La Résistance". This is a Jumbo provided to the Free French Forces by Americans. The M4A3E2 is a regular Sherman medium tank but with much-improved armour. Originally intended to be used as a breakthrough tank to attack enemy positions, in War Thunder it features frontal armour to fight Tiger tanks and their 88mm cannons. When efficiently angled, it can also hold against the 75mm cannon of the Panther. The tank however suffers from a poor firepower for units BR, using the same M3 Gun of the Sherman, although this means that it also has a vertical stabilizer. Overall, is a very good heavy tank when used properly, since its gun is not the best, it's more capable at close quarters combat.
General info
Survivability and armour
Armour type:
- Rolled homogeneous armour (hull, turret roof, cupola roof)
- Cast homogeneous armour (turret, cupola, gun mantlet, transmission housing, MG port)
| Armour | Front (Slope angle) | Sides | Rear | Roof |
|---|---|---|---|---|
| Hull | 63.5 + 38.1 mm (47°) Front glacis 25.4 + 34 mm MG port 114.3-139.7 mm (cylindrical) Transmission housing |
76.2 mm Top 38.1 mm Bottom |
38.1 mm (10°) Upper plate 38.1 mm (7°) Lower plate 38.1 mm (24°) Lower glacis |
63.5 + 38.1 mm (42°) Front glacis 19.5 mm Centre 19.5 mm (8°) Rear - Centre 19.5 mm (24°) Rear - Sides |
| Turret | 152.4 mm (0-52°) Turret front 177.8 mm (4-60°) Gun mantlet |
152.4 mm (4-42°) | 152.4 mm (0-79°) | 63.5 mm (28°) Front 25.4 mm Centre |
| Cupola | 51 mm (conical) | 51 mm Outer ring 25.4 mm Centre | ||
Notes:
- Suspension wheels are 15 mm thick, while bogies are 10 mm thick and tracks are 20 mm thick.
- Belly armour is 25.4 mm thick.
- Hull underside right above the tracks are 9.5 mm thick.
The M4A3E2 Jumbo presents very little frontal weak spots in an engagement. It is best to try and force the Jumbo to try and angle his vehicle towards the player or his allies. An angle more than 30 degrees can expose the much weaker lower side hull armour in the suspension that is only 38.1 mm thick. With a powerful enough gun, a round can penetrate this area and damage the crew, or even set off the ammunition all cluttered up on the bottom of the tank.
If a frontal engagement is unavoidable and are unfortunately armed with guns unable to penetrate through the front glacis, there are only two areas that are viable. First is the machine gun port, which is one of the areas that is not layered with the extra 38.1 mm added on top of the base armour. Guns like the Panzer IV 75 mm KwK40 guns that are unable to cleave through the front glacis can push their luck in this area, with small "sweet spots" that the round can pass through. Another way to attack the M4A3E2 in this scenario is exploiting a shot-trap in the gun mantlet. The small corner flaps on the bottom corners of the gun mantlet have a tendency to deflect rounds downwards onto the 19.5 mm hull roof armour. While this will be left to the ricochet chances, it is still possible and can be used if no other scenarios are favourable.
Mobility
| Game Mode | Max Speed (km/h) | Weight (tons) | Engine power (horsepower) | Power-to-weight ratio (hp/ton) | |||
|---|---|---|---|---|---|---|---|
| Forward | Reverse | Stock | Upgraded | Stock | Upgraded | ||
| Arcade | Expression error: Unexpected * operator. | 646 | Expression error: Unexpected round operator. | __.__ | |||
| Realistic | 442 | Expression error: Unexpected round operator. | __.__ | ||||
Modifications and economy
In Tier I, Parts and Horizontal Drive should of course be the prioritized modules for repairs and turret traverse speed. These two will also unlock Tier II modifications and grant access to the very vital FPE and M61 shot, the former for preservation against fires and the latter to improve damage in the battlefield.
Then in Tier III, Crew Replenishment should be obtained for crew survival improvement and the APCR T45 shot for improved armour-piercing power. After that, everything else could be done at one's own priorities, but Engine should be invested for better automotive performances and M89 for the smoke capabilities.
Armaments
Main armament
| 75 mm M3 | Turret rotation speed (°/s) | Reloading rate (seconds) | |||||||||||
|---|---|---|---|---|---|---|---|---|---|---|---|---|---|
| Mode | Capacity | Vertical | Horizontal | Stabilizer | Stock | Upgraded | Full | Expert | Aced | Stock | Full | Expert | Aced |
| Arcade | 104 | -10°/+25° | ±180° | Vertical | 19.4 | 26.9 | 32.6 | 36.1 | 38.4 | 6.50 | 5.75 | 5.30 | 5.00 |
| Realistic | 14.3 | 16.8 | 20.4 | 22.6 | 24.0 | ||||||||
Ammunition
- M72 shot - AP - Solid shot, stock shell. An armour-piercing shell with acceptable penetration but poor post-penetration damage.
- M48 shell - HE - A low-velocity shell useful against soft targets, in particular when hitting an open-topped vehicle. Harmless against any enclosed vehicle with more than 10 mm of armour.
- M61 shot - APCBC - A capped armour-piercing shell with a better penetration than the M72 thanks to its ballistic cap and a good post-penetration damage thanks to its explosive filler.
- T45 shot - APCR - Subcalibre round with high penetration but only on flat surfaces, with a high muzzle velocity but a poor post-penetration damage potential.
- M89 - Smoke shell - A very low-velocity shell deploying a smoke screen on impact, useful to blind enemy vehicles that are too remote for you to disable so that you can progress towards objectives.
| Penetration statistics | |||||||
|---|---|---|---|---|---|---|---|
| Ammunition | Type of warhead |
Penetration @ 0° Angle of Attack (mm) | |||||
| 10 m | 100 m | 500 m | 1,000 m | 1,500 m | 2,000 m | ||
| M72 shot | AP | 91 | 88 | 78 | 67 | 57 | 49 |
| M48 shell | HE | 10 | 10 | 10 | 10 | 10 | 10 |
| M61 shot | APCBC | 104 | 102 | 93 | 84 | 75 | 68 |
| T45 shot | APCR | 139 | 135 | 121 | 105 | 91 | 79 |
| Shell details | ||||||||||||
|---|---|---|---|---|---|---|---|---|---|---|---|---|
| Ammunition | Type of warhead |
Velocity (m/s) |
Projectile mass (kg) |
Fuse delay (m) |
Fuse sensitivity (mm) |
Explosive mass (TNT equivalent) (g) |
Ricochet | |||||
| 0% | 50% | 100% | ||||||||||
| M72 shot | AP | 619 | 6.3 | - | - | - | 47° | 60° | 65° | |||
| M48 shell | HE | 463 | 6.3 | 0.2 | 0.1 | 666 | 79° | 80° | 81° | |||
| M61 shot | APCBC | 618 | 6.79 | 1.2 | 14 | 63.7 | 48° | 63° | 71° | |||
| T45 shot | APCR | 868 | 3.81 | - | - | - | 66° | 70° | 72° | |||
| Smoke shell characteristics | ||||||
|---|---|---|---|---|---|---|
| Ammunition | Velocity (m/s) |
Projectile mass (kg) |
Screen radius (m) |
Screen deploy time (s) |
Screen hold time (s) |
Explosive mass (TNT equivalent) (g) |
| M89 | 259 | 3 | 9 | 5 | 20 | 50 |
Ammo racks
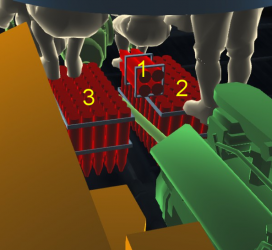
| Full ammo |
1st rack empty |
2nd rack empty |
3rd rack empty |
Visual discrepancy |
|---|---|---|---|---|
| 104 | 100 (+4) | 50 (+54) | 0 (+104) | No |
Notes:
- As they are modelled by sets of 2, shells disappear from the rack only after you've fired both shells in the set.
- Floor left rack only: 50 (+54) shells.
Machine guns
| 12.7 mm M2HB | ||||
|---|---|---|---|---|
| Mount | Capacity (Belt) | Fire rate | Vertical | Horizontal |
| Pintle | 600 (200) | 577 | -10°/+30° | ±60° |
The roof-mounted M2HB .50 cal heavy machine gun is very good at knocking out tracks, punching through lightly armoured vehicles and shooting down low-flying aircraft. Use it sparsely because of its low ammo count.
| 7.62 mm M1919A4 | ||||
|---|---|---|---|---|
| Mount | Capacity (Belt) | Fire rate | Vertical | Horizontal |
| Coaxial | 3,000 (250) | 500 | N/A | N/A |
The small calibre of the M1919A4 machine gun makes it largely ineffective against all armoured vehicles but the ones with an open compartment. It still can be used to ping targets as a rangefinding help or to mow down minor obstacles blocking your line of sight.
Usage in battles
The M4A3E2 is best in assaulting enemy positions with allies. Its great mobility for a heavy tank, especially with its armour, makes it a vehicle able to charge into battle and take anything head-on with confidence. It can act as a bullet magnet against enemy tanks more worried about the M4A3E2, diverting fire that would've gone to more vulnerable teammates. Though the 75 mm gun's AP performance is not suited to the type of enemies expected at the BR, it can still harass enemies and the gun is lethal enough that enemies will be forced to show their front armour towards the Jumbo else a 75 mm penetrates their side armour. Their focus on the Jumbo can allow allies to move around and eliminate them. During all this, take care not to overangle and show the lower side armour too much as this will allow vehicles to penetrate through down there and damage modules, even the ammunition storage if they are lucky.
Another role the M4A3E2 is good in is as a flanker. Due to its great mobility as a heavy tank, the M4A3E2 Jumbo can manoeuvre like a medium tank around the battlefield. This is also beneficial to the 75 mm gun as it would permit the M4A3E2 a chance to attack the weaker side armours of enemy vehicles. Once flanking around and finding a prime position in a fire angle right into an enemy chokepoint, minimize exposure to anything but the front armour and the M4A3E2 can remain a formidable obstacle to all opponents. Take care not to be outflanked by enemy players aware of the M4A3E2 position.
Due to the M4A3E2 Jumbo having a slightly higher battle-rating than the other M4 Shermans at 4.7, it can be up-tiered against tanks such as the Panther D and Tiger H1, meaning its 75 mm cannon starts becoming less effective. For this reason, it is advisable to take the T45 APCR ammo into battle once unlocked, at least enough to take on the armoured targets the Jumbo will face.
Enemies worth noting:
The Soviet 85 mm can be a threat, so caution is advised when going up against tanks armed with the 85 mm, such as the T-34-85, SU-85, and IS-1. The Jagdpanzer 38(t) and Jagdpanzer IV can be tricky when facing off against them. Their frontal armour are too thick and sloped for the 75 mm M3 gun to have any effect on it. For these two targets, it is advised to target their tracks and transmission and then flank for a side shot, where the armour is much weaker. Also, the Dicker Max wields a 105 mm that can penetrate the front plate of the M4A3E2 Jumbo, so caution is advised against those as well. Finally, there is one common opponent from the Soviet/Chinese tree: IS-2. Its 122 mm gun can easily penetrate the Jumbo, regardless of angle and distance. To destroy it, shoot at it when it's reloading or is unaware of your presence. For the 1943 model, aim at the cupola or the curved part of its hull armour that blends into the side. It has only 4 crew so killing all the turret crew (3, which is easy) will destroy it. For the 1944 model, only aim at the turret or the cupola as its hull is very strong.
Pros and cons
Pros:
- Decent 75 mm gun with APCR rounds
- High rate of fire for main gun
- Excellent gun depression
- Very strong turret armour from all sides, very good at hull down position
- Very good at leading a spearhead towards a capture point where it can provide cover to weaker allied tanks with more powerful guns
- Excellent frontal armour, about 101 mm thick
- Excellent all around turret armour, average 152 mm thick
- Can absorb a lot of damage
- Better mobility than the Russian KV-1 and the British Churchill
- Equipped with gun stabilizer, making it more accurate at moving and when preparing a shot after moving
- Good acceleration
- Incredibly tough when angled
- Wide tracks enable it to have a decent off road mobility, unlike other previous Sherman models
- Learning curve from previous Sherman variant will help a lot at mastering this tank
Cons:
- 75 mm gun lacks penetration against heavy tanks
- It needs allies support to be effective in battle as it cannot deal serious damage on its own
- Armour weak spot above the gun mantlet (63.5 mm @ 60°)
- Small bottom corners on M4A3E2 gun mantlet can serve as shot traps
- Side armour better than normal, but still weak (76.2 mm), but the lower side hull armour is even worse (38.1 mm)
- Very thin rear armour
- Inability to compound angle greatly due to very weak lower side hull armour that would be penetrated
- Tall profile makes it a bigger target
- Bad off-road manoeuvrability
- Low top speed of 35 km/h
- Reverse speed is bad
- Hull MG is a weak spot
History
French service
Due to the low numbers of M4A3E2 issued to the ETO, most went towards the US Army units. However, there is one known M4A3E2 that was issued to the French 1st Armoured Division (Division Blindée (DB)), an unusual case as most of the M4A3E2 inventory was headed to the Twelfth United States Army Group, whereas the French 1st DB was with the US Sixth Army Group. Information is not well known about this sole M4A3E2, but it served in the headquarter platoon of the 2nd Squadron of the 2nd African Chasseur Regiment (2e régiment de chasseurs d'Afrique). On 16 April 1945, lieutenant Amédée de Falgayrac, commander of the 1st platoon in the 2nd Squadron, was killed by shrapnel at Ortenberg, Germany. The M4A3E2 was then renamed Lt Falgayrac a few days later in honour.
The French did obtain a number of M4A3E2 surplus for use in the post-war period.
Media
- Skins
- Videos
See also
- Other M4A3E2 vehicles in the game
External links
| France heavy tanks | |
|---|---|
| B1 | B1 bis · B1 ter |
| 2C | 2C · 2C bis |
| ARL-44 | ARL-44 (ACL-1) |
| AMX-50 | Somua SM · AMX-50 Surbaissé · AMX-50 Surblindé |
| USA | ▄M4A3E2 |