M4A3 (105)
OLD‑WIKI.WARTHUNDER.COM (DEFUNCT)
| This page is about the American medium tank M4A3 (105). For other M4 Shermans, see M4 Sherman (Family). For other uses, see M4 (Disambiguation). |
Description
Though the M4 Sherman entered service with a 75 mm cannon, it was believed that the M4 Sherman platform could also be used to lob larger high-explosive shells in a direct-fire role. As such, work quickly began on a 105 mm howitzer mount for the M4 Sherman, with first tests starting on an M4A4E1 platform. Awkward ergonomics within the tank turret and an unbalanced turret design delayed proper tests of the howitzer-armed tank until February 1943. US soldier experiences overseas, namely in the Italian Theater, validated the need for a howitzer-armed Sherman as troops coming across heavy fortifications had to rely on the M7 Priest for their artillery guns, which was poorly suited for the direct fire role. The howitzer-armed M4 Sherman was approved for use and production started in February 1944 to be ready for the Normandy invasion, with the chosen chassis being the M4 (105) and M4A3 (104). Chrysler Corporation was contracted to produce all howitzer-armed tanks and helped produce a total of 4,680 units, with 2,539 being the M4A3 (105) HVSS. These tanks would see use not only in the European Theater but also in the Pacific Theater and even after World War II in the Korean War.
Introduced alongside the American ground tree in Update 1.45 "Steel Generals", the M4A3 (105) is a surprising beast where it is at in the ranks. Although the 105 mm relies only on chemical rounds in high-explosives and HEAT to do damage, the opponents the M4A3 (105) can face mostly have relatively thin armour spots that the explosive rounds can do significant damage on. The late-generation M4 Sherman design means that the M4A3 hull is of a single-slope design, which actually gives the tank relatively good frontal protection against the enemies it can face, with the armour able to go up to 100 mm in effective thickness. Finally, the use of a M4A3 chassis with its better engine power and HVSS design means it rides along the battlefield smoothly, giving it relatively good mobility and a stable platform for a faster stop-n-shoot tactic, though not as smooth as a 75 mm-armed M4 Sherman at this rank as the M4A3 (105) does not have a stabilizer. The M4A3 (105) can be a weapon to strike fear into the enemies, especially when used in a coordinated fashion with the rest of the team.
General info
Survivability and armour
The M4A3 (105) has certain flaws that can be exploited quite well. First of all, the howitzer armament means that the shell travels in a low-velocity, meaning the M4A3 (105) will be unlikely to engage at a long distance. Another is the fact that the M4A3 (105)'s gun has a long reload and a slow traverse speed, meaning it is also not very good in a close-range encounter. Despite these flaws, the M4A3 (105) is a formidable foe with its armament. The HE and HEAT shell the 105 mm can dish out has a real possibility to knock out friendly crew and teammates, if not absolutely destroying light tanks. These high-explosives can also break tracks easily, causing the player tank to be immobilized and exposed not only to the M4A3 (105), but to the other enemies as well, and the M4A3 (105) will most likely not be alone.
To engage the M4A3 (105), try not to engage its frontal armour if in a tank with BR lower than 3.7. Its frontal armour, despite what most will say about the Sherman's armour, is quite formidable and can deflect most incoming enemy round from light and medium tanks. This is why it is recommended to bring high-velocity guns like the 3-inch on the M10 or the long 75 mm on the later Panzer IV. If it can't be engaged from the front, manoeuvre to its side and rear armour, as these armour plates are extremely vulnerable to even 37 mm guns. When manoeuvring around the M4A3 (105), try not to expose the tank for a prolonged time and move faster than the M4A3 (105)'s slow turret traverse rate (though beware that the M4A3 can compensate this slow turn by turning the entire body). If fast enough, a tank could also move past the 105 mm low-velocity shell and mess up the enemy's lead. This will eventually lead to a good shot on the M4A3's weak points. Another simpler and less mobile way is to lie in wait in a tank destroyer such as the StuG III for the M4A3 to move right into the TD's line of fire, giving a clean shot to a vulnerable armour part. A good shot on a general part of the hull can ignite one of the many ammo racks strewn around the interior.
Armour type:
- Rolled homogeneous armour (Hull, Turret roof)
- Cast homogeneous armour (Turret, Transmission area)
| Armour | Front (Slope angle) | Sides | Rear | Roof |
|---|---|---|---|---|
| Hull | 63.5 mm (47°) Front glacis 63.5-107.9 mm (5-56°) Transmission area |
38.1 mm | 38.1 mm (22°) Top 38.1 mm (13-44°) Bottom |
19.5 mm |
| Turret | 76.2 mm (3-67°) Turret front 88.9 mm (3-86°) Gun mantlet |
50.8 mm (2-69°) | 50.8 mm (2-66°) | 25.4 mm |
| Cupola | 63.5 mm | 63.5 mm | 63.5 mm | 25.4 mm |
Notes:
- Suspension wheels are 15 mm thick, bogies are 10 mm thick, and tracks are 20 mm thick.
- Lower part of the hull (transmission housing) is 107.9 mm thick
- A small patch on the turret front right side is thinner (50.8 mm) than the rest (76.2 mm).
Mobility
| Game Mode | Max Speed (km/h) | Weight (tons) | Engine power (horsepower) | Power-to-weight ratio (hp/ton) | |||
|---|---|---|---|---|---|---|---|
| Forward | Reverse | Stock | Upgraded | Stock | Upgraded | ||
| Arcade | Expression error: Unexpected * operator. | 775 | Expression error: Unexpected round operator. | __.__ | |||
| Realistic | 442 | Expression error: Unexpected round operator. | __.__ | ||||
Modifications and economy
"Parts", "FPE" and "M67 shot" are key modules. Focus then on Firepower improvements, and "Artillery Support". After that, all mobility upgrades are welcomed.
Armaments
Main armament
| 105 mm M4 | Turret rotation speed (°/s) | Reloading rate (seconds) | |||||||||||
|---|---|---|---|---|---|---|---|---|---|---|---|---|---|
| Mode | Capacity | Vertical | Horizontal | Stabilizer | Stock | Upgraded | Full | Expert | Aced | Stock | Full | Expert | Aced |
| Arcade | 66 | -10°/+35° | ±180° | N/A | 5.7 | 7.9 | 9.6 | 10.6 | 11.3 | 13.00 | 11.50 | 10.60 | 10.00 |
| Realistic | 3.6 | 4.2 | 5.1 | 5.6 | 6.0 | ||||||||
Ammunition
| Penetration statistics | |||||||
|---|---|---|---|---|---|---|---|
| Ammunition | Type of warhead |
Penetration @ 0° Angle of Attack (mm) | |||||
| 10 m | 100 m | 500 m | 1,000 m | 1,500 m | 2,000 m | ||
| M1 shell | HE | 27 | 27 | 27 | 27 | 27 | 27 |
| M67 shot | HEAT | 130 | 130 | 130 | 130 | 130 | 130 |
| Shell details | ||||||||||||
|---|---|---|---|---|---|---|---|---|---|---|---|---|
| Ammunition | Type of warhead |
Velocity (m/s) |
Projectile mass (kg) |
Fuse delay (m) |
Fuse sensitivity (mm) |
Explosive mass (TNT equivalent) (kg) |
Ricochet | |||||
| 0% | 50% | 100% | ||||||||||
| M1 shell | HE | 472 | 14.85 | 0 | 0.1 | 2.18 | 79° | 80° | 81° | |||
| M67 shot | HEAT | 381 | 13.14 | 0.05 | 0.1 | 1.61 | 62° | 69° | 73° | |||
| Smoke shell characteristics | ||||||
|---|---|---|---|---|---|---|
| Ammunition | Velocity (m/s) |
Projectile mass (kg) |
Screen radius (m) |
Screen deploy time (s) |
Screen hold time (s) |
Explosive mass (TNT equivalent) (g) |
| M84 | 457 | 14.9 | 20 | 5 | 25 | 50 |
Ammo racks
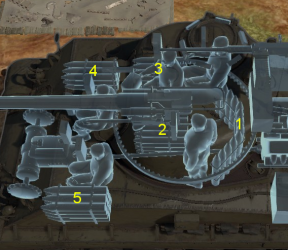
| Full ammo |
1st rack empty |
2nd rack empty |
3rd rack empty |
4th rack empty |
5th rack empty |
Visual discrepancy |
|---|---|---|---|---|---|---|
| 66 | 54 (+12) | 34 (+32) | 22 (+44) | 13 (+53) | 1 (+65) | No |
Notes:
- Racks disappear after you've fired all shells in the rack.
- To go into battle with the turret empty of ammo, pack 22 (+44) shells (racks 1 to 3 emptied).
Machine guns
| 12.7 mm M2HB | ||||
|---|---|---|---|---|
| Mount | Capacity (Belt) | Fire rate | Vertical | Horizontal |
| Pintle mount | 600 (200) | 576 | -10°/+30° | ±60° |
| 7.62 mm M1919A4 | ||||
|---|---|---|---|---|
| Mount | Capacity (Belt) | Fire rate | Vertical | Horizontal |
| Coaxial | 3,000 (250) | 500 | N/A | N/A |
Usage in battles
This tank plays best as a support tank, stay with other tanks that have better side armour while using the relatively thick front armour to soak a few shots. Use the HEAT rounds to penetrate most armour of the M4A3 (105)'s rank and above, and remember that the M4A3 (105) is no brawler, so staying in the front line too close to hostiles will most likely spell a K.O. by ammo or crew. This tank gun has a very low velocity, so make sure to compensate for a large amount of drop.
Having in mind the large calibre of this tank's main weapon, one can conclude that the HE shell (M1 shell) is big enough to dispatch some tanks. However, any armour larger than 28 mm won't let the explosion result in penetration. So for firing at strong armour plates, the HEAT shell (M67 shot) is required. It should be a top priority to research it. The HE shell will, however, be the most effective option whenever this Sherman's controller can find a suitably soft spot in the enemy vehicle's armour. Against soft vehicles, like most SPAA, the choice of ammunition for the main gun is fairly irrelevant, since a single shot should be enough to dispatch one of these, and remaining crew members can be taken down with one of the tank's 7.62 mm Browning machine guns, although HE is certainly the most effective at dishing out damage when armour is absent.
The HEAT round, unlike the HE one, has a tracer charge, which facilitates aiming. This is not critical, however, since the HE shell's sheer size allows for it to be seen without too much effort.
As with other Shermans, playing hull-down is highly beneficial. If you can't get in a full hull-down position, try to be partially climbed up against a hill, and use your great gun depression. With the additional 10 degrees of angle, your frontal armour becomes even stronger.
Tactics
The M4A3 (105) HVSS Sherman is a support tank, not a frontline brawler. Its adequate armour protection and a powerful gun put it on about the level of the M10 Tank Destroyer, but it has certain flaws and qualities that make it different than the usual Sherman tanks. Due to the 105 mm howitzer, knocking out the enemy crew in lightly armoured vehicles is a piece of cake. Aim for the enemy tank's lower turret to cause the most damage possible with the HE shells, as the HE shrapnel can be deflected down onto the hull roof and knock out the enemy crew. The 105 mm HE could also be aimed at the enemy tracks to blow it off, immobilizing the enemy. If none of the HE shells does damage to the target (which shouldn't happen most of the time), a well-placed HEAT shell, once unlocked, can easily set a tank aflame or blow up ammo stores. Don't get to close to enemy vehicles unless it is a limited traverse gun tank destroyer, in which case blow up its tracks with a HE that should do the trick.
A downfall of the M4A3 (105) is its average mobility, slow turret traverse, and slow reload. Therefore, it is recommended to stick to allied tanks like glue or rely on hit-and-run tactics. The low velocity makes long-range shots relatively difficult. Never stay in the sights of tanks such as the long-barreled 75 mm Pz.IV F2/G, StuG III F/G or T-34/KV-1. These tanks can penetrate the M4A3 (105)'s front armour, some more easily than others. Try not to get hit in the rear area as it will set the tank on fire and immobilize it, putting it in an extremely disadvantageous situation.
Enemies worth noting:
- LVT(A)(4)(ZiS-2): don't assume that you are indestructible in a downtier. If you see the giant boat-like chassis of a LVT but with a long cannon on top, be very careful. This LVT is able to penetrate your armour easily within 400 m, or if you are not angling the hull. To block its incoming shells, either angle your hull, be at a hull-down position or be >500 m away from it. While its shells can tear through your armour with ease, you can also effortlessly destroy it with your HEAT by causing overpressure. While you reload, don't forget to wiggle around in a patternless way to mess up its aim. Its gun traverse rather slowly, making it quite hard to keep up with moving targets.
- SU-122: this Soviet tank destroyer is dangerous as it fires devastating 122 mm HE shells. The overpressure will easily take out most if not all your crew with a good frontal hit. It can also penetrate you with HEAT even if you angle. It has the mobility to manoeuvre around quickly. Your HE shell can knock out its crew in return if it lands close to the crew compartment. Your HEAT shell can reliably penetrate its armour all round (excluding driver's hatch) if it is not angling.
- Pz.IV F2 & Pz.IV G: If you don't angle, the long-barreled Pz.IVs can frontally penetrate the M4 with their 7,5 cm KwK40 L/43 gun, even with the stock PzGr 39 APCBC ammunition.
Pros and cons
Pros:
- HE shells can cause serious damage even with a non-penetrating hit through overpressure mechanics
- HEAT shell option with approximately 130 mm of penetration at any range, making it able to take on even the KV-1 from the front
- Both HE and HEAT shells have a high chance of causing overpressure on lightly-armoured foes
- .50 cal machine gun on top can provide AA defence
- Good mobility
- HVSS suspension gives good cross-country mobility
- Wide tracks makes it easier to brake at high speeds and climb steep mountains
- Better sloped frontal armour that can withstand lots of punishment
- Smoke grenades and smoke shells are very useful for team support and self-protection
Cons:
- Poor ballistics, especially with HEAT shells, long-range fighting is not recommended, due to its extremely low muzzle velocity
- Slow reverse speed, retreating from dangerous situations may be a hassle
- Stock HE ineffective against heavily armoured tanks
- HEAT shell post-penetration damage is somewhat punctual, follow up shots may be required at times
- Often targeted due to the large 105 mm gun
- Side and rear armour are very weak in comparison to the front
- Very slow turret traverse rate, relies on turning hull to get gun onto targets away from turret front
- Poor stationary turning ability combined with slow turret traverse makes flanking enemies a dangerous foe
- Long reload time
- Only equipped with chemical shells (HE/HEAT) which require a different playstyle compared to kinetic shells (AP/APCBC)
History
The M4 Sherman were originally equipped with the 75 mm M3 cannon. Though the 75 mm was thought to be an overall effective gun, certain situations called for more destructive power. Enter the 105 mm M4 Howitzer, a mountable artillery piece for a tank. The army decided to arm the Shermans with these artillery pieces for a radical increase in explosive power. The first of its model was a M4A2 Sherman with its turret mounting the formidable cannon in the M52 mount, these Shermans were designated M4(105) and were accepted into service in February 1944. Later, M4A3 Shermans were also being converted into 105 mm with the name M4A3(105) When the HVSS was developed for the M4 Shermans by mean of the M4A3E8, the same was applied to the M4s with the 105 mm because of its increased weight, so an improved suspension would increase mobility. These Shermans were then designated to M4(105) HVSS or M4A3(105) HVSS and remained that way to the end of the war. The 105 mm Shermans were produced by Chrysler Corporation at the Detroit Tank Arsenal. 800 M4(105) and 841 M4(105) HVSS were produced from February 1944 to March 1945, and 500 M4A3(105) and 2539 M4A3(105) HVSS were produced in May 1944 to June 1945. This brings a total of 4680 Shermans with the 105 mm howitzer as its main armament during its production time.
After World War II ended, the M4A3E8 with the 76 mm cannon and 105 mm howitzer became the mainstay of the United States armoured forces as they were the most advanced version of the Shermans at the time. The M4 (105) are also quite good tank killers. Documents show that the HEAT rounds fired from the 105 mm has penetrated through a Panther's frontal armour, which could kill the crew. Even then, the sufficiently powerful high-explosive rounds could cause massive spalling inside tanks, harming the crew inside.
| Archive of the in-game description | |
|---|---|
|
In May 1944 the Detroit Tank Arsenal launched production of M4A3s equipped with 105 mm M4 howitzers. The modification happened similarly to the M4 (105) modernization, one of the most serious alterations of the tank's armament to be made. The upgraded turret boasted a 105 mm howitzer in place of the 76 mm cannon, making the tank capable of taking on many German models. Shermans with the 105 mm cannon did not have wet stowage. Instead, their ammunition was kept in dry stowages, meaning that the storage bins were kept in the center of the battle compartment. The Detroit Tank Arsenal produced 800 M4A3(105)s between February 1943 and September 1943, though the earlier models did not have a cupola. M4A3(105)s saw combat on the Western Front and in Italy between 1944 and 1945. | |
Media
- Skins
- Videos
See also
- Other vehicles of similar configuration and role
External links
- [Wikipedia] M4 Sherman
- [Tanks Encyclopedia] Medium Tank M4 Sherman
- [Manual] FM 17-76 - Crew Drill and Service of the Piece Medium Tank, M4 Series (105-mm Howitzer)
| USA medium tanks | |
|---|---|
| M2 | M2 |
| M3 | M3 Lee · ▃Grant I |
| M4 | M4 · Calliope · M4A1 · M4A1 (76) W · M4A2 · M4A2 (76) W · M4A3 (105) · M4A3 (76) W · M4/T26 |
| M26 Pershing | T20 · T25 · M26 · M26 T99 · M26E1 |
| M46/47/48 Patton | M46 · M46 "Tiger" · M47 · M48A1 · T54E1 · T54E2 |
| M60 | M60 · M60A1 (AOS) · M60A1 RISE (P) · M60A2 · M60A3 TTS · M728 CEV · 120S |
| MBT-70 | MBT-70 · XM803 |
| M1 Abrams | XM1 (Chrysler) · XM1 (GM) |
| M1 Abrams · M1 KVT · IPM1 | |
| M1A1 · M1A1 HC · M1A1 Click-Bait | |
| M1A2 Abrams · M1A2 SEP · M1A2 SEP V2 | |
| Other | T95E1 |
| Australia | M1A1 AIM |
| Canada | M4A5 |
| Israel | ▃Magach 3 (ERA) · ▃Merkava Mk.1 · ▃Merkava Mk.2B · ▃Merkava Mk.3D |
| Turkey | M60 AMBT |