B1 ter
OLD‑WIKI.WARTHUNDER.COM (DEFUNCT)
| This page is about the premium heavy tank B1 ter. For the standard version, see B1 bis. |
Description
The Char de bataille B1 ter (prototype), specifically Renault Hull No. 101, was the final variant of the standard B1 series with only 4 prototypes built. Conceptualized in 1937 at the same time and with the same funds to develop B1 bis, the B1 ter started its life as B1 hull No. 101, built in 1929. It was remodelled completely to be a mock-up for the B1 ter's armour package and features, with only the structural parts remaining. However, this prototype would still be a far cry from the original plans for the B1 ter. After No. 101, 3 pre-production prototypes of the B1 ter were made by different companies from scratch, with different construction methods; prioritizing welding over bolting, a different 75 mm gun mount and different turret. With time running out, all the prototypes ended up falling back from their original assembly lines and 3 of the prototypes ended up sunk in a bombed transport ship on the Gironde river while attempting to sail to French Africa. The 4th and last prototype survived the invasion, but after the armistice leaving the tank in Vichy France, it was seized by the Italians. There is no further concrete information on its final fate.
Introduced in Update 1.75 "La Résistance" as a premium pack vehicle, B1 ter 'No. 101' may not have been the final form of the B1 ter, but it does showcase its capabilities in the armour department so well that it's seen as strongest tank for its BR, averaging 75 mm thick armour all around, causing headaches even to dedicated anti-tank guns. While it also suffers the same downsides as the B1 bis: slow speeds, hull mounted gun, some flat plating to the front; the overall armour is so much more superior that angling is not a necessity and it can shrug off almost all shells in combat. No. 101 can single handedly become the front-line and dictate where the battle goes and with allies near can charge forward to victory.
The B1 ter was discontinued from the store after War Thunder's 6th Anniversary sale, but was later reintroduced for War Thunder's 7th anniversary as a premium purchasable in-game for Golden Eagles  . It has also been obtainable several times through the Warbond shop since January 2020.
General info
Survivability and armour
Armour type:
- Rolled homogeneous armour (hull, side skirts, turret ring)
- Cast homogeneous armour (turret, 75 mm gun mantlet, 47 mm gun mantlet, mudguards)
| Armour | Front (Slope angle) | Sides | Rear | Roof |
|---|---|---|---|---|
| Hull | 70 mm (18-42°) Front glacis 70+70 mm (spherical) Gun mantlet 70 mm (49°) Lower glacis |
55 mm (1-18°) + 55 mm (0-43°) Top - Mudguards 55 mm + 50 mm (23-28°) Bottom - Front 70 mm (21-27°) Bottom - Centre 55 mm Bottom - Rear 20 mm Bottom - Tracks |
25 mm (65°) Top 55 mm (1°) Centre 55 mm (46°) Bottom |
25 mm 8 mm Engine vents 22+25 mm Tracks cover |
| Turret | 56 mm (0-46°) Turret front 56 mm (1-85°) Gun mantlet 56 mm (0-49°) Machine gun cover |
56 mm (5-19°) | 56 mm (18-19°) 38.1 mm (18°) Turret hatch |
30 mm |
| Cupola | 48 mm (cylindrical) | 30 mm (spherical) | ||
Notes:
- Suspension wheels are 15 mm thick while tracks are 20 mm thick.
- Lower turret ring armour 40 mm thick, while upper turret ring armour is 25 + 40 mm thick.
- Belly armour is 20 mm thick.
The B1 ter has arguably the best armour at its BR. Being an up-armoured model of the previous B1 bis, the ter model features thicker hull armour, especially on the side. Now the hull will be completely immune to the PzGr.40 belt of Pz.II light tanks which is a common opponent. There are also improvements such as a smaller turret ring, refined frontal hull, a large mudguard, etc. While angling the hull at ~40°, the B1 ter can be extremely hard to destroy for vehicles at the same BR and can even resist uptier tanks like the Pz.IV F2. Due to the extremely heavy frontal armour, one should try to use mobility to flank the B1 ter. However, if that isn't possible, you'll want to try and hit the turret ring. It may be a tricky shot, but there's only ~40 mm of armour there. When flanking, it is preferable to go for the right side of the tank as is is filled with ammo and fuel.
Mobility
| Game Mode | Max Speed (km/h) | Weight (tons) | Engine power (horsepower) | Power-to-weight ratio (hp/ton) | |||
|---|---|---|---|---|---|---|---|
| Forward | Reverse | Stock | Upgraded | Stock | Upgraded | ||
| Arcade | Expression error: Unexpected * operator. | 452 | Expression error: Unexpected round operator. | __.__ | |||
| Realistic | 310 | Expression error: Unexpected round operator. | __.__ | ||||
The B1 ter's mobility is below average, which is to be expected given its heavy armour. On flat/hard surface, the B1 has a rather slow acceleration and needs some time to pick up speed. Its average on-road speed is ~20 km/h which is just enough to keep up with equally slow tanks and will not allow the B1 to get to any position quickly. Its hull traverse speed is acceptable and it has neutral steering which is helpful when the B1 tries to angle the hull. On sloped surface or bad roads the acceleration will be more sluggish and top speed slower, further limiting the B1's mobility. The reverse speed is also extremely bad and will not allow you to back up fast enough. Lastly, the dated suspension leaves very little room for the road wheels to bounce up and down while the B1 is driving over rough surfaces, leading to the whole tank rocking around which can slow it down a bit.
Modifications and economy
Armaments
Main armament
The primary weapon of the B1 ter is the 47 mm cannon inside the turret. Although small in calibre, it can still be very effective in medium/close-range engagements. Its penetration of ~60 mm allows the B1 to easily penetrate common foes such as Pz.IV C and T-50. The post-penetration effect, just like every other solid shot, is not destructive and requires the player to target for crew compartments. At longer distances, however, the 47 mm gun will start to struggle. The shell drop makes targeting quite challenging, and the drastically decreased penetration means that one might not even penetrate the hull side of a Pz.IV. This cannon is also slightly limited by the turret's slow traverse speed.
The 47 mm cannon has a vertical stabiliser which can significantly increase its ability to target & fire on the move, making it harder for the opponents to aim carefully. The cannon also has an amazing -18° gun depression which is more than enough for any type of terrain.
| 47 mm SA35 L/32 | Turret rotation speed (°/s) | Reloading rate (seconds) | |||||||||||
|---|---|---|---|---|---|---|---|---|---|---|---|---|---|
| Mode | Capacity | Vertical | Horizontal | Stabilizer | Stock | Upgraded | Full | Expert | Aced | Stock | Full | Expert | Aced |
| Arcade | 60 | -15°/+18° | ±180° | Shoulder | 8.1 | 11.2 | 13.6 | 15.0 | 16.0 | 5.20 | 4.60 | 4.24 | 4.00 |
| Realistic | 6.0 | 7.0 | 8.5 | 9.4 | 10.0 | ||||||||
Ammunition
| Penetration statistics | |||||||
|---|---|---|---|---|---|---|---|
| Ammunition | Type of warhead |
Penetration @ 0° Angle of Attack (mm) | |||||
| 10 m | 100 m | 500 m | 1,000 m | 1,500 m | 2,000 m | ||
| Mle1935 | APC | 62 | 59 | 47 | 36 | 27 | 20 |
| Mle1935 HE | HE | 6 | 6 | 5 | 4 | 4 | 4 |
| Shell details | ||||||||||||
|---|---|---|---|---|---|---|---|---|---|---|---|---|
| Ammunition | Type of warhead |
Velocity (m/s) |
Projectile mass (kg) |
Fuse delay (m) |
Fuse sensitivity (mm) |
Explosive mass (TNT equivalent) (g) |
Ricochet | |||||
| 0% | 50% | 100% | ||||||||||
| Mle1935 | APC | 660 | 1.62 | - | - | - | 48° | 63° | 71° | |||
| Mle1935 HE | HE | 590 | 1.41 | 0.1 | 0.1 | 143 | 79° | 80° | 81° | |||
Ammo racks
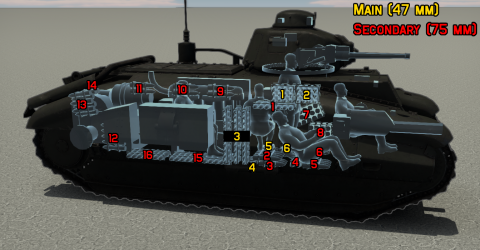
| Full ammo |
1st rack empty |
2nd rack empty |
3rd rack empty |
4th rack empty |
5th rack empty |
6th rack empty |
Visual discrepancy |
|---|---|---|---|---|---|---|---|
| 60 | 49 (+11) | 37 (+23) | 7 (+53) | 5 (+55) | 3 (+57) | 1 (+59) | No |
Note:
- As they are modeled by sets of 2 to 4, shells disappear from the rack only after you've fired all shells in the set.
Additional armament
Compared to the bis model, the 75 mm cannon inside the hull of the B1 ter sacrifices gun depression for more horizontal traverse angle. Though this change is useful in flat battlefields, the B1 ter will now struggle to use it in a hilly environment. The improved horizontal traverse, however, is still inadequate and may usually result in the 75 mm gun not being used, since the B1 has to angle a lot. This hull-mounted gun should only be used as a close range defence device, as it has poor penetration rates and high drop. Exposing your hull-mounted gun for long range engagements not only makes you vulnerable, it is also mostly ineffective. But if it hits and penetrates, it will usually kill.
| 75 mm SA35 L/17 | Turret rotation speed (°/s) | Reloading rate (seconds) | |||||||||||
|---|---|---|---|---|---|---|---|---|---|---|---|---|---|
| Mode | Capacity | Vertical | Horizontal | Stabilizer | Stock | Upgraded | Full | Expert | Aced | Stock | Full | Expert | Aced |
| Arcade | 90 | -4°/+9° | -7°/+5° | N/A | 3.2 | 4.5 | 5.4 | 6.0 | 6.4 | 11.1 | 9.8 | 9.1 | 8.6 |
| Realistic | 2.4 | 2.8 | 3.4 | 3.8 | 4.0 | ||||||||
Ammunition
| Penetration statistics | |||||||
|---|---|---|---|---|---|---|---|
| Ammunition | Type of warhead |
Penetration @ 0° Angle of Attack (mm) | |||||
| 10 m | 100 m | 500 m | 1,000 m | 1,500 m | 2,000 m | ||
| Mle1910M | APHE | 58 | 57 | 50 | 43 | 37 | 32 |
| Mle1915 | HE | 11 | 11 | 11 | 11 | 11 | 11 |
| Shell details | ||||||||||||
|---|---|---|---|---|---|---|---|---|---|---|---|---|
| Ammunition | Type of warhead |
Velocity (m/s) |
Projectile mass (kg) |
Fuse delay (m) |
Fuse sensitivity (mm) |
Explosive mass (TNT equivalent) (g) |
Ricochet | |||||
| 0% | 50% | 100% | ||||||||||
| Mle1910M | APHE | 470 | 6.4 | 1.2 | 14 | 90 | 47° | 60° | 65° | |||
| Mle1915 | HE | 500 | 5.55 | 0 | 0.1 | 740 | 79° | 80° | 81° | |||
Ammo racks
| Full ammo |
1st rack empty |
2nd rack empty |
3rd rack empty |
4th rack empty |
5th rack empty |
6th rack empty |
7th rack empty |
8th rack empty |
|---|---|---|---|---|---|---|---|---|
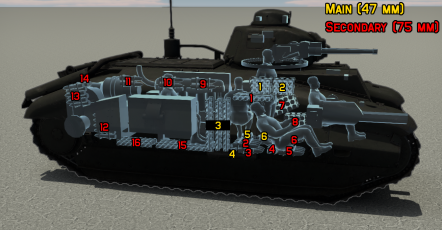
| 90 | 84 (+6) | 80 (+10) | 77 (+13) | 75 (+15) | 71 (+19) | 68 (+22) | 53 (+37) | 38 (+52) |
| 9th rack empty |
10th rack empty |
11th rack empty |
12th rack empty |
13th rack empty |
14th rack empty |
15th rack empty |
16th rack empty |
Visual discrepancy |
| 36 (+54) | 34 (+56) | 32 (+58) | 27 (+63) | 21 (+69) | 19 (+71) | 8 (+82) | 1 (+89) | No |
Notes:
- As they are modeled by sets of 2 to 4, shells disappear from the rack only after you've fired all shells in the set.
- Packing 38 (+52) shells keeps the forward crew compartment empty of 75 mm shells.
Machine guns
| 7.5 mm MAC 31 | ||||
|---|---|---|---|---|
| Mount | Capacity (Belt) | Fire rate | Vertical | Horizontal |
| Coaxial | 4,050 (150) | 551 | N/A | N/A |
The small calibre of the MAC 31 machine gun makes it largely ineffective against all armoured vehicles but the ones with an open compartment. It still can be used to ping targets as a rangefinding help or to mow down minor obstacles blocking your line of sight.
Usage in battles
The Char B1, upon playing it for the first time will be slow in both acceleration, max speed and turret rotation speed. The Hull gun is usable, while not being very suitable for this tank's main role. The best way to play the B1 ter is to hold down a position, preferably hull down (as its turret is thick and small, it will ricochet most shots it will take). Playing the B1 ter rightly, there are only 3 ways to get outplayed:
- Being outflanked by a light tank
- The enemy has been lucky enough to get a shot through a shot trap
- Meeting a dangerous gun (see Specific enemies worth noting)
All light tanks are dangerous as they can easily outflank you if they get too close, shoot them down before it happens. Also, do not engage medium and heavy tanks from the front as it is only a waste of efforts.
It is not advised to position the B1 in an overly-opened location where the B1 can get shot from multiple directions (more than 2) or from directions that are too wide apart (more than ~45° from the hull's longitudinal axis). This is because that although the B1 is heavily armoured, it is still most effective at dealing with threats from one direction only, just like every other tank, so the player can concentrate on said direction and not worry about getting flanked. Hence, memorise some spots where you only need to face enemies from one general direction, and that the spot overwatches a popular passageway of the opponents, for example the long narrow street at the right side of Berlin. At your battle position, decide whether to push or not depending on the battle's BR, the higher it is the more high-penetrating tanks you will face. While you charge towards the enemy defence, engage the 'battle' cruise mode (press 'E' once) to put the B1 at a speed just enough for the 47 mm gun's vertical stabiliser to work. This way you can comfortably aim and shoot while the enemy has to target your moving tank. It also creates great pressure for the opponents, seeing an invincible chunk of metallic fortress slowly but surely moving close. Some will definitely panic.
Enemies worth noting:
- M3 / M5 Stuart: as previously mentioned, light tanks can be a dangerous threat to the clumsy B1. The Stuarts have good acceleration, great top speed regardless of the terrain, and fast hull traverse, allowing them to sneak up or charge at a B1 without getting hit. When they are close, their 37 mm cannons can easily penetrate your hull cannon mount, turret sides and driving compartment, and their fast reload can knock out your crews one by one. But with the additional side armour of the B1 ter, Stuarts might struggle to penetrate your hull sides. To counter them, angle your hull for about 45 degrees, this way their small calibre shells tend to ricochet and will have a hard time to penetrate you. If they circle you, turn your hull and reverse at the same time to avoid them flanking, and if possible gain some separation. Target their hull, as their frontal turret is mostly covered by a curved gun mantlet which can cause non-penetrations.
- German tanks above its BR: their guns are usually more than enough to pierce the 70 mm front armour and if they do, most of the crew will be knocked out, likely resulting in a knock-out.
- M4A3 (105), Ho-Ro, Spj fm/43-44, etc: these vehicles all carry large-calibre howitzers which can critically damage if not straight up knock out the B1 ter with a frontal hit, through the B1's thick armour. If you see one, wait until they fire first or if they are distracted then poke out and shoot. For the 105 mm M4, the only effective way to destroy one is to get to its hull side and fire a salvo or two from both your guns. Its frontal hull armour or even the turret side can resist all of your rounds.
- T-34 (1940), SU-122: the T-34 chassis is arguably very effective at deflecting small-calibre shells and low-penetrating large-calibre shells, both of which are used by the B1 ter. For the SU-122, target the vertical hull side armour between the road wheels and upper angled hull side. For the T-34, also target this area plus the vertical parts of its curved turret cheeks to disarm it. Try not to get hit by them, the T-34's cannon is more than enough to punch through the B1 ter's frontal armour, while the SU-122 can destroy the B1 with its powerful HE shells.
- Churchill I, Matilda: these tanks are protected with thick armour that the B1 cannot easily penetrate. The thickness of their frontal & side armour on the hull and turret are all well beyond the B1's maximum penetration at point-blank range, thus the only effective way to damage them is to shoot at their rear hull armour which is around 50 mm. This can set fire on their engine/fuel tank. Or you can utilise the fast reload of your 47 mm gun and disable their guns and tracks, and call for more powerful teammates to destroy them. Although their guns are of small calibres and tend to bounce off an angling B1 ter, your weak spots (turret ring, commander cupola, vertical driver's armour, etc) are still vulnerable.
Pros and cons
Pros:
- Overall good armour
- Very heavy frontal armour for its rank
- Strong turret from the front
- Good at side-scraping (thick sides)
- Nearly impenetrable hull when angled
- Increased armour values all around from its predecessor (70 mm instead of 60 mm)
- Extra crew member (now 5 instead of 4)
- Smaller turret ring than its predecessor
- Sides are no longer completely flat
- Top part of tracks is now shielded
- Decent firepower
- One of the best in-game depression (-18°, turret gun)
- Has 2 main armaments
- A rare feature on French tanks: it has APHE ammunition
- MAC 31 coaxial MG
- Turret gun has LOCK, which makes stop-and-shoot tactics effective
- Hull gun has better horizontal traverse than its bis version
- Carries more ammo than the bis
Cons:
- Armour has minor weak spots:
- Has a tall and "thin" cupola
- Large turret ring is weak (25-40 mm poorly sloped)
- Fuel tank behind the grille lights up very often when penetrated.
- 8 mm grille above ammo and loader makes it vulnerable to aircraft HMG fire
- Crew is cramped
- Has a very noticeable and thick antenna sticking upwards
- Literally has a hallway full of ammo in the back
- Guns feel lacking
- Lacking penetration from both of its guns
- Poor traverse on 75 mm gun (12° total)
- The hull gun has reduced depression compared to the B1 bis version (-4°)
- Slow reload on both guns
- Only stock ammo choices
- APHE shell won't detonate when shooting at light targets (25 mm or less armour)
- Hull gun is hard to master (not beginner-friendly)
- Mobility is sub par
- Not very mobile due to weight
- Slow hull turning rate
- Reverse speed is low (-3 km/h)
- Turret slewing rate is slower than its predecessor
- 4 tons heavier than its predecessor while sharing its engine
History
The Char B1 was one of the most produced and widely used indigenous French tank designs employed during the Invasion of France in 1940. The Char B1 came in three modifications, with the ter modification marking the third and final one. Each modification brought with it several changes that would improve the design's overall performance, from the installation of more powerful engines, over enhanced armour protection and anti-tank capabilities to increased ammunition count. Although the Char B1's development began as early as the mid 1920s, the B1 ter version was conceived around the same time the Char B1 bis entered serial production, in 1937.
Compared to the B1 bis, the ter modification featured thicker frontal armour protection, going up to 75 mm. Apart of the extra armour, the B1 ter was also equipped with a more powerful 350 hp engine as well as a different transmission and received space for an additional crew member too. These changes increased the weight of the vehicle up to 36.6 tonnes, but also made the planned production process a lot easier, faster and most importantly, cheaper. The first prototype of the Char B1 ter was constructed and shown off to French military officials in 1937, with testing and production approval following in May 1940. However, at that point, it was a case of too little too late for the Char B1 ter. Three further prototypes were constructed before France capitulated in June 1940, with efforts to evacuate the prototypes from France ultimately failing, as the ship transporting the vehicles was sunk by a German air raid on 21 June 1940.
-From Devblog
Media
- Skins
- Videos
See also
- Other vehicles of similar configuration and role
External links
- [Devblog] Char B1ter: A Blast From The Past
- [Wikipedia] Char B1
- [Tanks Encyclopedia] Char B1/B1 bis
- [Military Factory] Renault Char B1
| France heavy tanks | |
|---|---|
| B1 | B1 bis · B1 ter |
| 2C | 2C · 2C bis |
| ARL-44 | ARL-44 (ACL-1) |
| AMX-50 | Somua SM · AMX-50 Surbaissé · AMX-50 Surblindé |
| USA | ▄M4A3E2 |
| France premium ground vehicles | |
|---|---|
| Light tanks | AMD.35 (SA35) · H.39 "Cambronne" · LVT-4/40 · AMX-13 (SS.11) · AMX-13-M24 · E.B.R. (1954) · E.B.R. (1963) · VBCI-2 (MCT30) |
| Medium tanks | M4A1 (FL10) · Panther "Dauphiné" · AMX-30 · AMX-30 Super · AMX-50 (TO90/930) |
| Heavy tanks | B1 ter · 2C bis · Somua SM |
| Tank destroyers | Lorraine 155 Mle.50 |