Object 120
OLD‑WIKI.WARTHUNDER.COM (DEFUNCT)
Description
In the 1960s, Soviet concern over the effectiveness of the T-54/55 and T-10 tanks against the newest enemy tanks caused them to put more research into tank armament and shells for better firepower. Object 120 was one such result, considered one of the most powerful self-propelled gun (SPG) with the usage of a 152 mm cannon capable of firing APFSDS and HEAT-FS. While promising, recent development in smoothbore guns and infantry-portable missiles showed that they were able to keep up with the 152 mm cannon's penetration capabilities, and so the Object 120 dedicated SPG was not adopted.
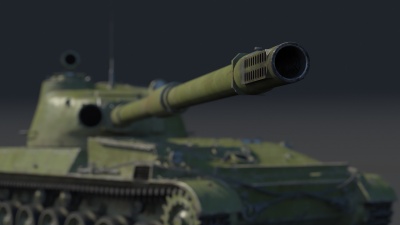
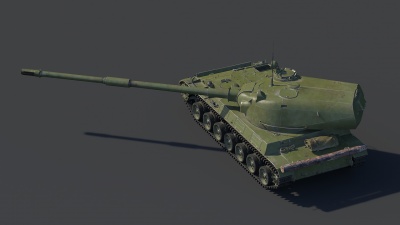
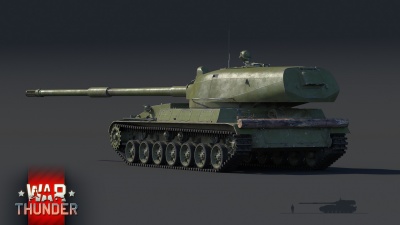
The Object 120 is a very prolific tank destroyer since its introduction in Update 1.71 "New E.R.A.". With the extremely long gun hanging past the hull front, players will very quickly get the impression that the Object 120's firepower has no equal at its place, and enemies will learn to fear that long gun. Despite that, enemies will not fear as much of the Object 120's construction, as the thin armour all-around mean even the smallest autocannon from a tank or aircraft has the potential to wreck the Object 120. In short, the Object 120 embodies the ultimate "glass cannon" form factor in the game, a tank destroyer with a very long and lethal gun, but with very little capability to take the same punishment in return.
General info
Survivability and armour
Armour type:
- Rolled homogeneous armour (hull, turret bustle)
- Cast homogeneous armour (turret front, gun mantlet)
| Armour | Front (Slope angle) | Sides | Rear | Roof |
|---|---|---|---|---|
| Hull | 30 mm (31-86°) Front glacis 30 mm (17-50°) Lower glacis |
15 mm | 10 mm (15-80°) Top 10 mm (5°) Bottom |
30 mm (86°) Front 10 mm Rear |
| Turret | 30 mm (1-68°) Turret front 30 mm (0-58°) Gun mantlet |
15-30 mm (0-51°) | 15 mm (14-21°) | 30 mm Front 10 mm Rear |
| Cupola | 15 mm (cylindrical) | 15 mm | ||
Notes:
- Suspension wheels are 20 mm thick while tracks are 15 mm thick.
- Belly armour is 10 mm thick.
- Barrel ring around the gun is 100 mm thick.
- Structural steel boxes on hull sides provide 4 mm of protection.
Mobility
| Game Mode | Max Speed (km/h) | Weight (tons) | Engine power (horsepower) | Power-to-weight ratio (hp/ton) | |||
|---|---|---|---|---|---|---|---|
| Forward | Reverse | Stock | Upgraded | Stock | Upgraded | ||
| Arcade | Expression error: Unexpected * operator. | 682 | Expression error: Unexpected round operator. | __.__ | |||
| Realistic | 425 | Expression error: Unexpected round operator. | __.__ | ||||
Modifications and economy
Armaments
Main armament
The Object 120 performs best in all game modes as a sniper/support. This means finding a good spot overlooking the battle with some cover, and taking out enemies from long range. The Object 120's long 152 mm gun and its powerful shells are well suited for this purpose.
The Object 120 can be used at a close-range battle, but it will not be able to perform as effectively due to its relatively long 10-second reload time and a lack of gun stabilizer. These two lacking features mean that the Object 120 cannot react to new threats quickly, especially when it tries to take the battle offensively. It is thus better to fight at range, where the Object's advantages can be used to the fullest.
| 152 mm M-69 | Turret rotation speed (°/s) | Reloading rate (seconds) | |||||||||||
|---|---|---|---|---|---|---|---|---|---|---|---|---|---|
| Mode | Capacity | Vertical | Horizontal | Stabilizer | Stock | Upgraded | Full | Expert | Aced | Stock | Full | Expert | Aced |
| Arcade | 22 | -5°/+15° | ±180° | N/A | 15.9 | 21.9 | 26.6 | 29.5 | 31.3 | 10.0 | 10.0 | 10.0 | 10.0 |
| Realistic | 10.7 | 12.6 | 15.3 | 16.9 | 18.0 | ||||||||
Ammunition
The Object 120 is armed with three types of shells. The first is an APFSDS round that is capable of going through almost all the armour of most vehicles it can face. It also has an extremely low shell drop, giving almost flat ballistics, which makes it one of the best kinetic rounds at its battle rating. The second round is a HEATFS shell, which has a high penetration and holds a huge amount of explosive. It is slower and has a more standard shell drop. The HEATFS is a high-penetrating chemical round against thick conventional armour. The third is an HE shell with a huge amount of explosive. It is effective to destroy lightly armoured vehicles with overpressure.
| Penetration statistics | |||||||
|---|---|---|---|---|---|---|---|
| Ammunition | Type of warhead |
Penetration @ 0° Angle of Attack (mm) | |||||
| 10 m | 100 m | 500 m | 1,000 m | 1,500 m | 2,000 m | ||
| 152 mm HEAT-FS | HEATFS | 480 | 480 | 480 | 480 | 480 | 480 |
| 152 mm HE | HE | 49 | 49 | 49 | 49 | 49 | 49 |
| 152 mm APDS-FS | APFSDS | 405 | 400 | 385 | 370 | 355 | 340 |
| Shell details | ||||||||||||
|---|---|---|---|---|---|---|---|---|---|---|---|---|
| Ammunition | Type of warhead |
Velocity (m/s) |
Projectile mass (kg) |
Fuse delay (m) |
Fuse sensitivity (mm) |
Explosive mass (TNT equivalent) (kg) |
Ricochet | |||||
| 0% | 50% | 100% | ||||||||||
| 152 mm HEAT-FS | HEATFS | 1,000 | 35 | 0.05 | 0.1 | 4.75 | 65° | 72° | 77° | |||
| 152 mm HE | HE | 960 | 43.5 | 0 | 0.1 | 5.9 | 79° | 80° | 81° | |||
| 152 mm APDS-FS | APFSDS | 1,710 | 8 | - | - | - | 76° | 77° | 80° | |||
Ammo racks

| Full ammo |
Ammo type |
1st rack empty |
2nd rack empty |
3rd rack empty |
Visual discrepancy |
|---|---|---|---|---|---|
| 22 | Projectiles Propellants |
1 (+21) 19 (+3) |
N/A 4 (+18) |
N/A 1 (+21) |
Yes |
Notes:
- The Object 120 uses two-piece ammunition, composed of projectiles (yellow) and propellant bags (orange). Both have separate racks.
- The visual discrepancy concerns the projectile rack: only 16 shells are modeled but it contains 22 shells.
- Shells are modeled individually and disappear after having been shot or loaded.
- It's best to carry the maximum number of rounds, since you will quickly be out of munition otherwise.
Usage in battles
The Object 120 is armed with a 152 mm M-69 and an autoloader with a 10-second reload time. It is capable of penetrating any tank thanks to its APFSDS it has access to very early at this BR. This tank shines in long range combat, where other tanks might need some time, trial and error to land a good shot. The Object 120 can be described as "point and shoot".
Long range maps
At long ranges, the Object 120 is the most dangerous sniper, being able to knock out everyone from any distance. Once spawned, head into the open terrain positions where you usually wouldn't be able to be useful to fight tanks, and find a suitable position where you can overlook the enemy passages or captured points. Make use of any obstacle that can hide your tank after you've shot, like a building, hills, trees, rocks, bushes, etc. Wait for the enemies to drive by and shoot at them. It's smart to start moving away to a new position but beware of advancing tanks and planes that are looking specifically for you.
Medium range maps
At medium ranges, the Object 120 is best used as a support tank, shooting from behind the friendly lines to the enemies that are attacking your teammates and flanking them. Be sure to use cover because you can easily be eliminated if not careful when the enemies flank or shoot you.
Short range maps
At short ranges, the object 120 is pretty difficult to be used, but the way you still can use the tank is as a camper. Awaiting for enemies to drive by or peek from around the corners to surprise them with a 152 mm APFSDS. It's also useful when peeking, to peek backwards. this will allow you to retract from your peeking position fast due to being able to drive forward, but will make you come to peek slower but faster to shoot back: because the turret is positioned at the back of the hull.
Additional tips and suggestions
Aim for ammunition racks and the enemy crew positions as your APFSDS does not have any explosive filler. You will have to learn the internal layout of enemy tanks.
Enemies worth noting:
- Maus and E-100: Both these tanks are heavily-armoured and carry a very thick armour against kinetic projectiles. When angled, they are capable of withstanding your APFSDS and even your HEATFS rounds, going up against multiple of them at once can be very challenging when in their proximity. When these tanks are spotted and not angled, it's best to instantly shoot at the right side of the turret and take down the gunner, to ensure it can't shoot back, or by any chance make ammunition explode the tank. As a second shot, shoot at the middle of the frontal angled hull to take care of its driver so it can't escape. Most of the time, this will result in the tank being eliminated because of crew depletion. If not, shoot your third shot again at the right side of the turret to take care of the ammunition or the replaced gunner/loader. When it is angling, do not attempt to shoot at it, it can simply ricochet or shatter your shell. Instead, shoot at its guns to take them down, they are perfectly aligned next to each other so you can take care of both guns when the turret is angled. Follow up with a shot to the tracks to ensure it can't run away or angle. And lastly get into a position to shoot at its sides or front and easily take care of the tank that is now both immobile and unarmed. Never shoot at its gun mantlet, the shell will never penetrate it nor take care of the gun breech.
Pros and cons
Pros:
- Very high velocity APFSDS round means "point and shoot" at typical War Thunder combat ranges, no need to account for projectile drop at range
- Outstanding armour penetration by HEAT-FS and APFSDS rounds
- Very good spalling effect from the kinetic energy spread and explosive mass from HEAT-FS round
- Good mobility for the size of gun
- Has neutral steering
Cons:
- Weak armour: vulnerable to anything bigger than a heavy machine gun, and even those from some angles at short range
- Poor depression for main armament
- Low ammunition load
- Poor optics for a tank destroyer with only 5x zoom
- All projectiles carried in rear of turret behind thin armour makes ammunition explosions very likely from turret hits
History
The Object 120 "Taran" was a tank destroyer developed after the USSR's conclusion that AP rounds from the T-10 and T-55 could not pierce the newest American tank the M60. The Object 120 (also noted as being the SU-152 "Taran") surpassed foreign tank destroyers with firepower and mobility at the time. The name Taran comes from its cannon which became the reason it wasn't adopted. The 125 smoothbore and anti tank missiles are the reason why the Object 120 was not put into production.
Media
- Skins
- Images




- Videos
See also
- Vehicles equipped with the same chassis
External links
| USSR tank destroyers | |
|---|---|
| SU-76M | SU-76M · SU-76M (5th Gv.Kav.Corps) · SU-85A |
| SU-57B | SU-57B · SU-76D |
| T-34 Derivatives | SU-122 · SU-85 · SU-85M · SU-100 · SU-122P |
| Heavy Tank Derivatives | SU-100Y · ISU-122 · ISU-122S · SU-152 · ISU-152 · Object 268 |
| SU-100P and Derivatives | SU-100P · Object 120 |
| Wheeled | YaG-10 (29-K) |
| Airborne | ASU-57 · ASU-85 |
| Rocket | BM-8-24 · BM-13N · BM-31-12 |
| ATGM | IT-1 · Shturm-S · Object 775 · Khrizantema-S |
| Artillery | 2S1 · 2S3M |
| Other | SU-5-1 · ZiS-30 · SU-122-54 |
| USA | SU-57 |
| USSR premium ground vehicles | |
|---|---|
| Light tanks | BA-11 · RBT-5 · BT-7A (F-32) · T-26 (1st Gv.T.Br.) · T-26E · T-126 · PT-76-57 · 2S38 |
| Medium tanks | T-34 (Prototype) · T-34 (1st Gv.T.Br.) · T-34E · T-34-57 (1943) · T-34-85E · T-34-100 · T-44-122 · TO-55 · T-55AM-1 · T-72AV (TURMS-T) · T-80UD · Т-80U-Е1 |
| ▂M3 Medium · ▂M4A2 · ▂T-III · ▂T-V · ▂МК-IX "Valentine" | |
| Heavy tanks | SMK · T-35 · ▂MK-II "Matilda" · KV-1E · KV-2 (1940) · KV-2 (ZiS-6) · KV-122 · KV-220 · IS-2 "Revenge" · Object 248 · IS-6 · T-10A |
| Tank destroyers | BM-8-24 · BM-13N · BM-31-12 |
| SU-57 · SU-76D · SU-76M (5th Gv.Kav.Corps) · SU-85A · SU-100Y · SU-122P · Object 120 | |
| SPAA | ▂Phòng không T-34 · ZUT-37 |