M4A3 (105) (France)
OLD‑WIKI.WARTHUNDER.COM (DEFUNCT)
| This page is about the medium tank M4A3 (105) (France). For other versions, see M4 Sherman (Family). For other uses, see M4 (Disambiguation). |
Description
During the Second World War, most French tank units were modelled in a similar structure to US Armored Divisions, but with French traditions and depending on the divisions, cavalry traditions. With this in mind, France operated M4A3 (105) self-propelled howitzers in its tank divisions, to provide direct fire support for infantry units, and offer a higher protection platform for artillery support, which allowed the units to operate closer to the front than regular artillery or mortar systems without much risk. The French 2nd Armored Division was the first to acquire the tanks in 1944, with the 1st and 5th divisions getting their own tanks in 1945.
Introduced in Update 1.97 "Viking Fury", the ▄Medium Tank M4A3 (105) HVSS Sherman is a peculiar Sherman, featuring a 105 mm howitzer instead of the regular M3 75 mm cannon. The howitzer grants the Sherman a much more powerful high explosive shell, which is very useful against ground vehicles. However it lacks access to an APHE shell so it relies on HEAT projectiles for heavier foes. The tank has very similar performance to the Sherman, but it lacks the vertical stabilization that is present in the rest of the family.
General info
Survivability and armour
Armour type:
- Rolled homogeneous armour (hull, turret roof, cupola roof)
- Cast homogeneous armour (turret, gun mantlet, transmission housing)
| Armour | Front (Slope angle) | Sides | Rear | Roof |
|---|---|---|---|---|
| Hull | 63.5 mm (46°) Upper glacis - Top 63.5 mm + 25.4 mm (spherical) MG port 63.5 mm (55°) Upper glacis - Bottom 107.9 mm (cylindrical) Transmission carter 63.5 mm (50°) Lower glacis |
38.1 mm | 38.1 mm (23°) Upper plate 38.1 mm (13°) Lower plate - Top 38.1 mm (44°) Lower plate - Bottom |
63.5 mm (35-44°) Front glacis 19.5 mm Centre 19.5 mm (7°) Rear - Centre 19.5 mm (23°) Rear - Sides |
| Turret | 76.2 mm (cylindrical) Turret front 88.9 mm (cylindrical) Gun mantlet |
50.8 mm (cylindrical) | 50.8 mm (3°) | 25.4 mm |
| Cupola | 63.5 mm (conical) | 63.5 mm (conical) Outer ring 25.4 mm Centre | ||
Notes:
- Suspension wheels are 15 mm thick while bogies are 10 mm thick and tracks are 20 mm thick.
- A 25.4 mm plate separates the crew compartment from the engine compartment.
The M4A3 (105) (France) is equipped with 12 smoke grenades that can be deployed individually. The launcher is on the turret and shoots grenades along the gun's heading.
Mobility
| Game Mode | Max Speed (km/h) | Weight (tons) | Engine power (horsepower) | Power-to-weight ratio (hp/ton) | |||
|---|---|---|---|---|---|---|---|
| Forward | Reverse | Stock | Upgraded | Stock | Upgraded | ||
| Arcade | Expression error: Unexpected * operator. | 775 | Expression error: Unexpected round operator. | __.__ | |||
| Realistic | 442 | Expression error: Unexpected round operator. | __.__ | ||||
Modifications and economy
- Research the M67 shot first as you start with an HE shell only.
- Parts and FPE come next as they are key to survivability.
- Follow up with accuracy improvements.
- Everything else is up to you, but Artillery Support and mobility upgrades are welcome.
Armaments
Main armament
| 105 mm M4 | Turret rotation speed (°/s) | Reloading rate (seconds) | |||||||||||
|---|---|---|---|---|---|---|---|---|---|---|---|---|---|
| Mode | Capacity | Vertical | Horizontal | Stabilizer | Stock | Upgraded | Full | Expert | Aced | Stock | Full | Expert | Aced |
| Arcade | 66 | -10°/+35° | ±180° | N/A | 5.7 | 7.9 | 9.6 | 10.6 | 11.3 | 13.00 | 11.50 | 10.60 | 10.00 |
| Realistic | 3.6 | 4.2 | 5.1 | 5.6 | 6.0 | ||||||||
Ammunition
| Penetration statistics | |||||||
|---|---|---|---|---|---|---|---|
| Ammunition | Type of warhead |
Penetration @ 0° Angle of Attack (mm) | |||||
| 10 m | 100 m | 500 m | 1,000 m | 1,500 m | 2,000 m | ||
| M1 shell | HE | 27 | 27 | 27 | 27 | 27 | 27 |
| M67 shot | HEAT | 130 | 130 | 130 | 130 | 130 | 130 |
| Shell details | ||||||||||||
|---|---|---|---|---|---|---|---|---|---|---|---|---|
| Ammunition | Type of warhead |
Velocity (m/s) |
Projectile mass (kg) |
Fuse delay (m) |
Fuse sensitivity (mm) |
Explosive mass (TNT equivalent) (kg) |
Ricochet | |||||
| 0% | 50% | 100% | ||||||||||
| M1 shell | HE | 472 | 14.85 | 0 | 0.1 | 2.18 | 79° | 80° | 81° | |||
| M67 shot | HEAT | 381 | 13.14 | 0.05 | 0.1 | 1.61 | 62° | 69° | 73° | |||
| Smoke shell characteristics | ||||||
|---|---|---|---|---|---|---|
| Ammunition | Velocity (m/s) |
Projectile mass (kg) |
Screen radius (m) |
Screen deploy time (s) |
Screen hold time (s) |
Explosive mass (TNT equivalent) (g) |
| M84 | 457 | 14.9 | 20 | 5 | 25 | 50 |
Ammo racks
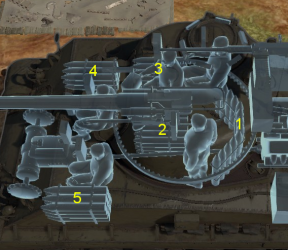
| Full ammo |
1st rack empty |
2nd rack empty |
3rd rack empty |
4th rack empty |
5th rack empty |
Visual discrepancy |
|---|---|---|---|---|---|---|
| 66 | 54 (+12) | 34 (+32) | 22 (+44) | 13 (+53) | 1 (+65) | No |
Notes:
- Racks disappear after you've fired all shells in the rack.
- To go into battle with the turret empty of ammo, pack 22 (+44) shells (racks 1 to 3 emptied).
Machine guns
| 12.7 mm M2HB | ||||
|---|---|---|---|---|
| Mount | Capacity (Belt) | Fire rate | Vertical | Horizontal |
| Pintle | 600 (200) | 577 | -10°/+30° | ±60° |
The roof-mounted M2HB .50 cal heavy machine gun is very good at knocking out tracks, punching through lightly armoured vehicles and shooting down low-flying aircraft. Use it sparsely because of its low ammo count.
| 7.62 mm M1919A4 | ||||
|---|---|---|---|---|
| Mount | Capacity (Belt) | Fire rate | Vertical | Horizontal |
| Coaxial | 3,000 (250) | 500 | N/A | N/A |
The small calibre of the M1919A4 machine gun makes it largely ineffective against all armoured vehicles but the ones with an open compartment. It still can be used to ping targets as a rangefinding help or to mow down minor obstacles blocking your line of sight.
Usage in battles
This tank plays best as a support tank, stay with other tanks that have better side armour while using the relatively thick front armour to soak a few shots. Use the HEAT rounds to penetrate most armour of the M4A3 (105)'s rank and above, and remember that the M4A3 (105) is no brawler, so staying in the front line too close to hostiles will most likely spell a K.O. by ammo or crew. This tank gun has a very low velocity, so make sure to compensate for a large amount of drop
Having in mind the large calibre of this tank's main weapon, one can conclude that the HE shell (M1 shell) is big enough to dispatch some tanks. However, any armour larger than 28 mm won't let the explosion result in penetration. So for firing at strong armour plates, the HEAT shell (M67 shot) is required. It should be a top priority to research it. The HE shell will, however, be the most effective option whenever this Sherman's controller can find a suitably soft spot in the enemy vehicle's armour. Against soft vehicles, like most SPAA, the choice of ammunition for the main gun is fairly irrelevant, since a single shot should be enough to dispatch one of these, and remaining crew members can be taken down with one of the tank's Browning machine guns, although HE is certainly the most effective at dishing out damage when armour is absent.
The HEAT round, unlike the HE one, has a tracer charge, which facilitates aiming. This is not critical, however, since the HE shell's sheer size allows for it to be seen without too much effort.
- Combat tactics
The M4A3 (105) HVSS Sherman is a support tank, not a front-line brawler. Its adequate armour protection and a powerful gun put it on about the level of the M10 Tank Destroyer, but it has certain flaws and qualities that make it different than the usual Sherman tanks. Due to the 105 mm howitzer, knocking out the enemy crew in lightly armoured vehicles is a piece of cake. Aim for the enemy tank's lower turret to cause the most damage possible with the HE shells, as the HE shrapnel can be deflected down onto the hull roof and mess up the enemy crew. The 105 mm HE could also be aimed at the enemy tracks to blow it off, immobilizing the enemy. If none of the HE shells does damage to the target (which shouldn't happen most of the time), a well-placed HEAT shell, once unlocked, can easily set a tank aflame or blow up ammo stores. Don't get to close to enemy vehicles unless it is a limited traverse gun tank destroyer, in which case blow up its tracks with a HE that should do the trick.
A downfall of the M4A3 (105) HVSS Sherman is its average mobility, slow turret traverse, and slow reload. Therefore, it is recommended to stick to allied tanks like glue or rely on hit-and-run tactics. The low velocity makes long-range shots relatively difficult. Never stay in the sights of tanks such as the long-barrel 75 mm Panzer IV F2/G, StuG III F/G or T-34/KV-1. These tanks can penetrate the M4A3 (105) HVSS Sherman's front armour, some more easily than others. Try not to get hit in the rear area as it will set the tank on fire and immobilize it, putting it in an extremely disadvantageous situation.
- Enemies worth noting
- LVT(A)(4)(ZiS-2): don't assume that you are indestructible in a downtier. If you see the giant boat-like chassis of a LVT but with a long cannon on top, be very careful. This LVT is able to penetrate your armour easily within 400 m, or if you are not angling the hull. To block its incoming shells, either angle your hull, be at a hull-down position or be >500 m away from it. While its shells can tear through your armour with ease, you can also effortlessly destroy it with your HEAT round by causing overpressure. While you reload, don't forget to wiggle around in a patternless way to mess up its aim. Its gun traverse rather slowly, making it quite hard to keep up with moving targets.
- ZiS-30: like the LVT(A)(4)(ZiS-2), this tank destroyer is armed with a similar 57 mm cannon capable of penetrating your front armour from any distance with ease. Apart from this, the ZiS-30 is also very narrow and small, making it very hard to get spotted especially when it is covered by bushes. This can become quite dangerous if the M4 commander does not scan the battlefield carefully enough. Luckily, comparing to the spacious LVT, the ZiS-30 is very compact and poorly protected. A spray of your roof-mounted 12.7 mm bullets will be enough to knock out its crew and components, let alone a hit from your 105 mm gun. Shells that land next to or behind the ZiS-30 can also damage it, since the side and rear of its fighting compartment has no protection at all, exposing its gunner and loader.
- How to defeat a M4A3 (105) (France)
The M4A3 (105) has certain flaws that can be exploited quite well. First of all, the howitzer armament means that the shell travels in a low-velocity, meaning the M4A3 (105) will be unlikely to engage at a long distance. Another is the fact that the M4A3 (105)'s gun has a long reload and a slow traverse speed, meaning it is also not very good in a close-range encounter. Despite these flaws, the M4A3 (105) is a formidable foe with its armament. The HE and HEAT shell the 105 mm can dish out has a real possibility to knock out friendly crew and teammates, if not absolutely destroying light tanks. These high-explosives can also break tracks easily, causing the player tank to be immobilized and exposed not only to the M4A3 (105), but to the other enemies as well, and the M4A3 (105) will most likely not be alone.
To engage the M4A3 (105), try not to engage its frontal armour if in a tank with BR lower than 3.7. Its frontal armour, despite what most will say about the Sherman's armour, is quite formidable and can deflect most incoming enemy round from light and medium tanks. This is why it is recommended to bring high-velocity guns like the M7 on the M10 GMC or the KwK40 L43 on the later Panzer IVs. If it can't be engaged from the front, manoeuvre to its side and rear armour, as these armour plate are extremely vulnerable to even 37 mm guns. When manoeuvring around the M4A3 (105), try not expose the tank for a prolonged time and move faster than the M4A3 (105)'s slow turret traverse rate (though beware that the M4A3 can compensate this slow turn by turning the entire body). If fast enough, a tank could also move past the 105 mm low-velocity shell and mess up the enemy's lead. This will eventually lead to a good shot on the M4A3's weak points. Another simpler and less mobile way is to lie in wait in a tank destroyer such as the StuG III for the M4A3 to move tight into the TD's line of fire, giving a clean shot to a vulnerable armour part. A good shot on a general part of the hull can ignite one of the many ammo racks strewn around the interior.
Pros and cons
Pros:
- Devastating against lightly armoured tanks
- HE shells can cause serious damages even with a non-penetrating hit
- HEAT shell option with approximately 130 mm of penetration at any range, making it able to take on even the KV-1 from the front
- Both HE and HEAT shells have a high chance of causing overpressure on lightly armoured foes
- .50 cal machine gun on top can provide AA defence
- Good mobility, best hp/weight ratio of any Sherman
- HVSS suspension gives good cross-country mobility
- Wide tracks makes it easier to brake at high speeds and climb steep mountains
- Better sloped frontal armour that can withstand lots of punishment
Cons:
- Poor ballistics, especially with HEAT shells, long-range fighting is not recommended, due to its extremely low shell velocity
- Slow reverse speed, retreating from dangerous situations may be a hassle
- Stock HE ineffective against even moderately armoured tanks
- HEAT shell post-penetration damage is somewhat punctual, follow up shots may be required at times
- Often targeted due to the large 105 mm gun
- Side and rear armour are very weak in comparison to the front
- Very slow turret traverse rate, relies on turning hull to get gun onto targets away from turret front
- Poor stationary turning ability combined with slow turret traverse makes flanking enemies a dangerous foe
- Long reload of more than 10 seconds
History
Each US tank regiment was equipped with a few 105 mm M4A3 at the end of WW2. Their role was to support the other armoured units by destroying fortifications and obstacles. The M4A3 (105) was not provided officially to the Free French Forces through the lend-lease program. However, as they were embedded under US command in preparation of the invasion of France, a few French armoured divisions received the tank from US Army stocks. The French 2nd Armoured Division received several M4A3 (105) under those circumstances in the UK in 1944. The 1ère and 5ème Divisions Blindées (1st and 5th Armored Divisions) were first equipped with M4A3(105) Shermans in April 1945. 18 M4A3(105) Shermans had been listed as authorized in January 1945, but they were not listed as on hand until April 29 - May 5. From images it can be seen that many of those tanks were M4(105)s, but at least one was an M4A3(105).
They saw combat action in France in 1944 and in Western Germany in early 1945.
After the war, many M4A3 (105) were supplied by the US to European countries as part of the Mutual Defense Assistance Act. France received 230 units they allocated to their cavalry units garrisoned in the French occupation zone in Germany. These M4A3 (105) never saw combat.
Media
- Skins
- Videos
See also
- Related development
- Other vehicles of similar configuration and role
External links
| France medium tanks | |
|---|---|
| M4 Derivatives | M4A1 (FL10) · M4A4 (SA50) |
| AMX-50 | AMX M4 · AMX-50 (TOA100) · AMX-50 (TO90/930) |
| AMX-30 | AMX-30 · AMX-30 (1972) · AMX-30B2 · AMX-30B2 BRENUS · AMX-30 ACRA · AMX-30 Super |
| AMX-32/40 | AMX-32 · AMX-32 (105) · AMX-40 |
| Leclerc | Leclerc · Leclerc S2 · Leclerc SXXI · Leclerc AZUR |
| Other | D2 · S.35 · Lorraine 40t |
| Germany | Panther "Dauphiné" |
| USA | ▄M4A1 · ▄M4A3 (105) · ▄M4A4 · ▄M26 |