Ho-Ri Production
OLD‑WIKI.WARTHUNDER.COM (DEFUNCT)
| This page is about the tank destroyer Ho-Ri Production. For the bundle version, see Ho-Ri Prototype. |
Description
The Type 5 Ho-Ri (五式砲戦車 「ホリ」) is a hypothetical production design of the Ho-Ri Prototype boasting more armour and a longer gun, making for a far more fearsome tank on the battlefield.
The Ho-Ri Production was introduced in Update 1.73 "Vive la France". While far stronger than its earlier iteration, it also faces much stronger opponents and may have the same drawbacks. Its armour has been increased from an effectively ~200 mm front plate to ~320 mm (120 mm construction) and a casemate boasting 200 - 225 mm armour protecting it decently well. The best course of action is to stay hull down and peek over ridges while using the -10° depression to increase its armour effectiveness and play it in a safe sniping position. The trade-off of superstructure armour is rewarded by forward mobility, accelerating to up to 40 km/h relatively quickly. A special feature of the Ho-Ri is its elevating roof armour: to reduce its vertical silhouette, the cannon breech can push the roof of the casemate up, to allow for the -10° depression it offers. This will expose the crew members, but won't be much of a threat as it's a very narrow angle for planes to strafe through and it doesn't cause the crew to be affected by explosive overpressure.
General info
Survivability and armour
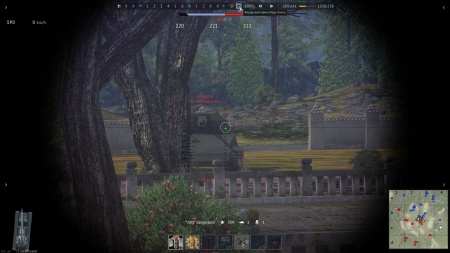
If you spot a Ho-Ri, never shoot it in the sloped UFP. It can bounce shells from even an Object 120 and the only good thing that can come from it is if you get lucky and shell bounces into the barrel. Instead, aim for the 120 mm lower plate to immobilize it, or for the right side of the mantlet to knock out the gunner. Note that the outer edges of the mantlet are slightly weaker, so if using APHE aim for that if possible.
Transmission is very sturdy and, combined with LFP armour, is too thick for lighter tanks and APHE, but some heavy pure AP tanks like Lorraine 40t can shoot through it and ammo rack the Ho-Ri in one shot.
Tank is overall resistant to attempts of bombing and overpressure attacks with HE, but the back and the roof of the tank are weak enough to let sufficient amount of HE or bombs to instantly destroy the tank, therefore putting the front of the tank towards them is better than running away.
There is also a minor, but important detail - whenever your gun is pointing down, it opens the hatch on top of your vehicle, so if the enemy attacker is trying to top-down your SPG, pull your gun up to make sure it won't destroy the vehicle. It is also possible to push HE inside of compartment when the hatch is opened, but for anything, with exception of rank I tanks, it would be easier to just shoot your tank directly.
Overall, the Ho-Ri is highly resistant to light tanks and many relatively low-velocity shells when angled (such as even its own APHE), however at flat angle front can be easily penetrated (especially when fired at point blank), flat sides can be easily penetrated by almost anything at the BR, and the rear can be penetrated by SPAA. As such, in urban environment, it's best to cut corners and drive out onto enemy while already being angled.
Worst case scenario, the Ho-Ri has 6 crew members, which are located in a very practical way (not just standing straight in the middle of the tank, but rather stand closer to the hull), so taking all of them out is a challenge in itself, and if player took less than maximal amount of ammo into fight, only the best-aimed shots can indefinitely knock out the tank with a single shot.
Armour type:
- Rolled homogeneous armour
- Cast homogeneous armour (Gun mantlet)
| Armour | Front (Slope angle) | Sides | Rear | Roof |
|---|---|---|---|---|
| Hull | 120 mm (70°) Front glacis 120 mm (8°), 60 mm (67°) Lower glacis 100 mm (16°) Hull cheeks |
75 mm (17°) Top 75 mm Bottom |
35 mm (10-40°) | 20 mm |
| Superstructure | 200-225 mm (5-20°) Superstructure front 175-225 mm Gun mantlet 175 mm (5°) Vision slits 50-200 mm (45°) Barrel shroud |
75 mm (17-48°) | 35 mm (5°) | 20-35 mm |
Notes:
- Suspension wheels and bogies are 15 mm thick while tracks are 20 mm thick.
- Bogie guards in the side suspension provide rows of 10 mm RHA at their locations.
- Belly armour is 20 mm thick.
- Hull underside right above tracks is 20 mm thick.
- 20 mm RHA plates separate the engine compartment from the front and rear.
Mobility
| Game Mode | Max Speed (km/h) | Weight (tons) | Engine power (horsepower) | Power-to-weight ratio (hp/ton) | |||
|---|---|---|---|---|---|---|---|
| Forward | Reverse | Stock | Upgraded | Stock | Upgraded | ||
| Arcade | Expression error: Unexpected * operator. | 1,562 | Expression error: Unexpected round operator. | __.__ | |||
| Realistic | 973 | Expression error: Unexpected round operator. | __.__ | ||||
When spaded, the Ho-Ri Production moves at the pace of a medium tank - about 40/30 km/h (AB/RB) forward and -10/-8 km/h (AB/RB) backwards when offroad. It climb hills easily, sometimes even getting up the mountains.
The biggest problem of this SPG is that its turn rate is quite low, and it lacks neutral steering. One must maximize "driving" skill of the crew to be able to indefinitely turn around, otherwise tank throttles and fails to turn around at gear 1-2, which can be easily exploited by enemy light tanks.
When just one track is broken, Ho-Ri Production still can bounce around to continue fighting. It is also worth noting, that if one track and engine are broken, Ho-Ri Production can barely turn around 1 degree per second, which is a big deal in urban combat.
In Arcade mode Ho-Ri Production's engine is powerful enough to move hostile heavy tanks and push them around, denying repairs. Due to its hull shape, hostile tanks often get pulled on it and become completely helpless, especially when pushed against the wall, making tanks like T29, IS-6 and T-54 vulnerable to point blank finishers. Wide and agile medium tanks like T-44-100 or Warrior often resist ramming attempts if away from walls and can eventually sidestep Ho-Ri Production, but there is no practical need to ram them anyway. If you absolutely have to do it, do not leave them enough space to squeeze between Ho-Ri Production and the wall, or they will escape.
While base turn rate of Ho-Ri Production is low, it can accelerate forward until it reaches its maximum speed, then let go of gas and do an unexpectedly quick 180 degree spin, allowing it to catch fast tanks like Leopard I off guard. Be aware, that after seeing such trick even once, most people stop playing around and start firing exclusively at Ho-Ri Production until it is annihilated, even if there are other tanks around. This is particularly useful in Arcade mode and is less useful in Realistic mode, as its power/weight ratio there is far less impressive.
Modifications and economy
Armaments
Main armament
The weapon used by the Ho-Ri is mostly suited to attack medium and heavy tanks, while heavy SPG and hull-down tanks at its BR can mostly deflect its shots unless a weak spot is hit. As such, engaging other SPG is always a great risk.
While APHE used by it sometimes struggles at penetrating enemy and hasty shot might result in ricochet, if it penetrates the enemy tank is probably going to blow up, making destroying anything like Tiger II (10.5 cm Kw.K) and Centurion (Family) relatively easy, which is also supported by SPG armour being able to bounce most, if not all, of their reply shots. Gun is also relatively easy to handle on move if self-discipline is maintained.
In close quarters, if gunner got taken out and situation looks grim, the Ho-Ri can ram the opponent and pull them onto a rock, wall, hill, or even itself, then push APHE into their now un-angled hull as soon as someone replaces the gunner. Usually APHE is potent enough to reach the ammo rack or the crew and knocks out the tank with a single shot, but if ammo rack is destroyed, the chain reaction also often destroys or completely immobilizes the Ho-Ri as well.
Apart from APHE, the gun can be armed with "Experimental HE", which is generally used to simply destroy light tanks without having to aim for too long. It can also be used to attack tank with unreasonably strong turrets and/or frontal armour without resorting to close range combat, due to its ability to hit their weak roof armour and destroy the entire crew via overpressure damage. It's not as strong as ones found on type 75 SPH, so it should only be used when necessary.
| 105 mm Type 5 | Turret rotation speed (°/s) | Reloading rate (seconds) | |||||||||||
|---|---|---|---|---|---|---|---|---|---|---|---|---|---|
| Mode | Capacity | Vertical | Horizontal | Stabilizer | Stock | Upgraded | Full | Expert | Aced | Stock | Full | Expert | Aced |
| Arcade | 51 | -10°/+20° | ±10° | N/A | 5.3 | 7.3 | 8.9 | 9.8 | 10.5 | 11.18 | 9.89 | 9.12 | 8.60 |
| Realistic | 3.6 | 4.2 | 5.1 | 5.6 | 6.0 | ||||||||
Ammunition
| Penetration statistics | |||||||
|---|---|---|---|---|---|---|---|
| Ammunition | Type of warhead |
Penetration @ 0° Angle of Attack (mm) | |||||
| 10 m | 100 m | 500 m | 1,000 m | 1,500 m | 2,000 m | ||
| Type 2 APHE | APHE | 233 | 228 | 205 | 181 | 159 | 140 |
| Experimental HE | HE | 30 | 30 | 30 | 30 | 30 | 30 |
| Shell details | ||||||||||||
|---|---|---|---|---|---|---|---|---|---|---|---|---|
| Ammunition | Type of warhead |
Velocity (m/s) |
Projectile mass (kg) |
Fuse delay (m) |
Fuse sensitivity (mm) |
Explosive mass (TNT equivalent) (g) |
Ricochet | |||||
| 0% | 50% | 100% | ||||||||||
| Type 2 APHE | APHE | 1,000 | 16 | 1.2 | 19 | 200 | 47° | 60° | 65° | |||
| Experimental HE | HE | 920 | 16 | 0 | 0.1 | 2,520 | 79° | 80° | 81° | |||
Ammo racks
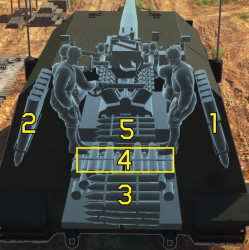
| Full ammo |
1st rack empty |
2nd rack empty |
3rd rack empty |
4th rack empty |
5th rack empty |
Visual discrepancy |
|---|---|---|---|---|---|---|
| 51 | 46 (+5) | 40 (+11) | 30 (+21) | 12 (+39) | 1 (+50) | No |
Casemate sides empty: 40(+11)
Usage in battles
The Ho-Ri can be used in multiple roles. Its most effective at medium range, where it's harder for the enemy to aim for the lower plate and shells have a harder time penetrating the mantlet, making it easy for you to destroy them. The Ho-Ri is also quite potent at long range, particularly in down-tiers, where your gun remains effective (though less so) and your armour becomes even better. Be careful using it as a brawler, however. Your transmission is easier to hit, the mantlet is easier to penetrate, and faster foes can surround you easier and get a shot at your weak side armour.
The Ho-Ri should be primarily played as a medium to long range sniper. Your potent cannon can dispatch most enemies and the thick frontal armour will stop most shots, especially the UFP which is basically an auto-bounce zone. Be careful in close quarters - the Ho-Ri turns quite slowly when not up to speed and an easy shot to the LFP will instantly eliminate your mobility allowing for an easy flank. Your surprisingly fast acceleration will also assist when getting to nice sniping spots, and the speedy reverse allows you to retreat when getting overrun.
Due to the Ho-Ri having more effective armour than most tanks at BR, and its weapon capable of single-shot knock-outs, it can be used as a flank attacker or even brawler in close range. The idea is to flank enemy, destroy as many tanks as possible before they realized what's going on, and then try to destroy them 1 by 1. While this strategy is most useful in AB (due to increased mobility of the vehicle and sometimes limited map space) and requires high "driving" crew skill, the Ho-Ri is undeniably scary in close quarters, due to it being able to survive dozens of direct shots (as example, 3 poorly placed direct shots of Centurion Mk.5 AVRE and about 10 shots from Tiger II (P)) and even somehow come out on top in 1v3 fights. Try to keep your head cool though, as while going completely berserk and sweeping streets of enemy tanks, one might forget about lighter enemy tanks like Vickers MBT and Panther II, users of which will never miss their opportunity to snipe ammo rack of an unsuspecting opponent from 50 to 2,000 m alike.
Some concerning enemies are:
- T-54 (1947): This tank can be quite the pain to destroy, and if they are using the more advanced APHE shells found in the 100 mm gun they can wipe out most of your crew in the mantlet. Your biggest chance at destroying them is through the commander's cupola, the shot trap at the mantlet, or the mantlet itself at very close range. In arcade mode, one can try to ram T-54 to fire at the base of their turret and also push them onto something to fire a gun at their exposed roof, though in case T-54 in question had full ammunition load, the sheer power of explosion might take the Ho-Ri out as collateral. As such, the safest way to fight a T-54 head-on at close range is firing at their commander cupola, as even if it is sometimes harder to aim at, at least you do not have to push them anywhere and T-54 has lesser chances of causing chain explosions to take Ho-Ri out that way.
- IS-2 / IS-2 (1944) / ISU-122: These machines carry a huge 122 mm cannon that penetrates literally anything they see, including the Ho-Ri. Their shells will go through the Ho-Ri's vertical armour of the fighting compartment pretty easily, killing the crew inside or detonating the ammo. To deal with the IS-2, try get a shot at them before the notice you / when they are reloading. These tanks tend to get knocked out with a single shot due to their lack of crew or the cramped interior. For the IS-2, aim for the hull armour that curves and blends into the side, or aim at the turret cheeks. For the IS-2 (1944), only go for the turret as the hull is very thick and well sloped. For the ISU-122, aim at anywhere but the gun mantlet, as it often absorb shells or cause ricochet.
- AMX-50 Foch: Wielding a powerful cannon and heavy sloped armour, the Foch is a rare yet dangerous enemy. Do not give them time to knock you out with a single shot through the transmission and aim for the gun. If your quick aim is good enough, one or two shots to optics on top of the hull will destroy Foch, due to APHE spalling down inside of heavy SPG. In the worst case scenario, you can just de-track it and call your teammates, which is not a bad idea, considering Foch drivers like ramming their opponents, rendering them unable to do anything.
- T32E1: Though rare, this tank is completely immune to your APHE in the front, while it can still go through your lower plate easily. Shoot the barrel and either flank it or retreat.
- Jagdtiger: It's best to just retreat on sight of this SPG, as it can easily knock out the Ho-Ri with a single shot, while it's barely possible to destroy it back. If direct combat is unavoidable, try to destroy its gun first. MG port weak spot on the hull can be exploited to do crew damage, but the shot must be pixel perfect and even with arcade mode aim assist you will likely fail to push the shell through, so only try that if there is no other way. If the Ho-Ri is on the low ground, an LFP shot becomes possible, resulting in a knock-out.
- ATGM light tanks and high tier SPAA: While APHE is adequate at destroying most of the light tanks, it is sometimes better to load "experimental HE", especially for the ones, which carry ATGM as secondary weapons. Keep in mind, that certain light tanks like BMP series and Warrior will resist poorly landed explosives and should be attacked with APHE until disabled. If low calibre non-combat SPAA is trying to destroy the Ho-Ri, you can just put your rear next to a wall and make sure the roof hatch is closed. They will not be able to do anything to you like this.
Pros and cons
Pros:
- Heavy amount of frontal sloped armour
- Can bounce anything it faces at its battle rating when angled right
- Very fast for a heavy SPG, with high acceleration thanks to its massive engine
- Reverse speed is good enough to get away from trouble and even when the Ho-Ri loses one track it can still balance around to continue fighting
- High-velocity cannon with decent penetration and high post-penetration damage, perfect against medium tanks
- Good gun depression
Cons:
- No neutral steering
- Can get outflanked by turret tanks easily
- Enemy heavy SPG destroy it easily and usually shrug off its attacks
- Mantlet is easily penetrated in close quarters, especially by sabot rounds
- Large weak spot in the LFP, protected by transmission, resulting in a quick immobilization
History
In September 1942, the Japanese Army Staff received word of the new American M4 Sherman tank, which they realized had completely outclassed every Japanese tank in production at the time. There were three projects proposed by the Staff, each bearing their own gun selection; the 47 mm Kou, 57 mm Otsu, and 75 mm Hei designs. As combat data was filtered to the Japanese High Command, they ordered that the model Kou and Otsu merge to become the basis of what would eventually become the Type 4 Chi-To. Meanwhile, the Hei proposal would lead to the development of the Type 5 Chi-Ri.
Additional development projects came from a change in the Weapons Administration Headquarters Research Policy in July of 1943, a change that was made due to analyzing tank warfare between the German Army and the Soviet Union. Through the analysis of said data, the Japanese Army shifted their tank doctrine towards an emphasis on developing tanks that prioritized anti-armour missions instead of infantry support. Upon the enacting of this policy, the Army started a program to develop a series of tank destroyers based on the chassis of the medium tanks being designed.
The Type 5 Chi-Ri was chosen to become the basis for a new tank destroyer, as it was Japan's primary medium tank project and was more mature than other alternatives, while also mounting some of the most advanced technology Japan had produced at the time.
The tank destroyer would eventually be titled the Ho-Ri. Development of the vehicle began shortly after the Chi-Ri's, and after the decision was made to use the reliable coil spring suspension system that the Japanese manufacturers were familiar with, the Army began work on designing the superstructure and casemate with the first design mimicking the Chi-Ri chassis entirely and replacing the turret with a reinforced rear-mounted superstructure.
During the development of the new tank destroyer series, the Army chose to design a new anti-tank gun to fit the role. In July of 1943, the Army Military Customs Council began designing a 105 mm anti-tank gun based off of the Type 96 150 mm Strategic artillery cannon. It was shortened and given a single piece barrel and tank breech. Unfortunately, the two chief engineers of the cannon project the task that it meet a requirement of penetrating 200 mm at 1,000 m with a 1,000 m/s muzzle velocity. Naturally, the tank gun was not capable of this and instead was only able to penetrate 150 mm at 1,000 m with a 915 m/s muzzle velocity. Although it did not meet the requirements, it was still superior to any other Japanese tank gun and was accepted into service as the Type 5 10cm.
Originally, the Ho-Ri was to keep the hull-mounted Type 1 37 mm from the Chi-Ri due to the idea that the primary cannon could only do so much for itself and a secondary weapon was required. The development of the design was split into to concepts; one being a rear mounted superstructure with a central engine (Ho-Ri I) and the other being a centralized superstructure with a rear engine placement (Ho-Ri II). The engine selection was quite different from the traditional diesel engines that powered most Japanese tanks throughout their production. Instead, Japan had used a V12 gasoline aircraft engine designed by BMW, making 550 horsepower at 1,500 RPM. This engine was chosen due to the industrial capacity of Japan reaching its peak, and many assets from aircraft development were readily available for usage.
However, by the time both designs of the vehicle were proposed, the armour was no longer sufficient to thwart most US anti-tank armaments. Despite this, the design showed considerable promise and it was ordered that a third vehicle be designed with significantly improved armour. This new design was commonly labeled as Ho-Ri III.
The Ho-Ri III took the basis of the Ho-Ri I and revamped it, changing the frontal plate from a flat 75 mm thick plate to a 120 mm thick plate sloped at 70°, deleting the hull-mounted 37 mm gun in the process. Although this was seen as a considerable blow to the tank's self-defense capabilities, it was accepted due to its vastly improved survivability. The removal of the 37 mm gun meant that the extra crew member who previously operated the gun could be used as a second loader to assist with the autoloading mechanism and provide shells for the primary loader.
The construction of the prototype was completed in 1944 and achieved a top speed of 40 km/h during trials. Being seen as a success, the Army ordered 5 units of the vehicle and put it into service as the Type 5 Ho-Ri. However only one operable prototype was fully completed by the war's end and the series only made it to 50% completion, resulting in the design being scrapped and no further testing was pursued.
Media
- Skins
 Market
- Videos
See also
- Related development
- Other vehicles of similar configuration and role


External links
| Mitsubishi Heavy Industries (三菱重工業株式会社) | |
|---|---|
| Light Tanks | |
| Type 95 | Ha-Go · Ha-Go Commander |
| Medium Tanks | |
| Type 89 | I-Go Ko |
| Type 97 | Chi-Ha · Chi-Ha Kai |
| Type 1 | Chi-He · Chi-He (5th Regiment) |
| Type 3 | Chi-Nu · Chi-Nu II |
| Type 4 | Chi-To · Chi-To Late |
| Type 5 | Chi-Ri II |
| SPGs | |
| Chi-Ha Derived | Ho-Ro |
| Chi-He Derived | Ho-I |
| Chi-Ri Derived | Ho-Ri Prototype · Ho-Ri Production |
| Other | Na-To · Ro-Go Exp. |
| Captured | ␗Chi-Ha · ␗Chi-Ha Kai |
| Note | Most tank designs would be contracted by the Army Technical Bureau to Mitsubishi |
| See also | Mitsubishi Heavy Industries Ltd. (Post-War) |
| Japan tank destroyers | |
|---|---|
| Ro-Go Derivatives | Ro-Go Exp. |
| Chi-Ha Derivatives | Ho-Ni I · Ho-Ni III · Ho-Ro · Chi-Ha LG |
| Ho-Ri | Ho-Ri Prototype · Ho-Ri Production |
| Other | Na-To |
| JGSDF | |
| SPRG | Type 60 (C) |
| SPH | Type 75 · Type 99 |
| ATGM | Type 60 ATM |
| Rocket | Type 75 MLRS |
| USA | ▅M36 |