Marder III
OLD‑WIKI.WARTHUNDER.COM (DEFUNCT)
| This page is about the German tank destroyer Marder III. For the other version III, see Marder III H. |
Description
The Marder III (Sd.Kfz. Index: Sd.Kfz. 139) was a modified Pz.38(t) up-gunned with captured Russian 76.2 mm field guns rechambered with the munition of the PaK 40 as a self-propelled anti-tank gun, adding significant firepower among self-propelled battalions. It was primarily decided to be built due to the increase of heavier Russian targets such as the KV-1 and T-34 as the German anti-tank tools in early Barbarossa failed to deal with these targets.
It was introduced in Update 1.43. Being a field gun strapped onto a light tank hull, it offers little protection to the crew, but this is compensated by the firepower the Marder does offer with its dangerous gun. It provides an excellent sniper vehicle to support the team at longer ranges, and to crack open heavier targets the rest of the team can't deal with.
General info
Survivability and armour
Armour type:
- Rolled homogeneous armour
| Armour | Front (Slope angle) | Sides (Slope angle) | Rear | Roof |
|---|---|---|---|---|
| Hull | 50 mm (19°) Front plate 12 mm (74°) Front glacis 50 mm (13°) Lower glacis |
16 mm Upper 15 mm Lower |
15 mm | 12 mm |
| Turret | 11 + 8 mm (31°) | 11 mm (8-9°) | - | - |
Notes:
- Belly armour (under the tank) is 15 mm thick.
- Suspension wheels and tracks are 15 mm thick.
- Aside from the front gun shield, there is no armoured encasement for the gunner and loader crew members.
- The vehicle is so lightly armoured that it is extremely vulnerable to artillery strikes, plane strafings, ramming attacks and light machine gun fire.
Mobility
| Game Mode | Max Speed (km/h) | Weight (tons) | Engine power (horsepower) | Power-to-weight ratio (hp/ton) | |||
|---|---|---|---|---|---|---|---|
| Forward | Reverse | Stock | Upgraded | Stock | Upgraded | ||
| Arcade | Expression error: Unexpected * operator. | 227 | Expression error: Unexpected round operator. | __.__ | |||
| Realistic | 142 | Expression error: Unexpected round operator. | __.__ | ||||
Modifications and economy
Which modules to unlock first:
- Parts and FPE - Mandatory first 2 upgrades, to aid in your survival.
- Modules related to gun accuracy and targeting quality: Horizontal Drive, Adjustment of Fire & Elevation Mechanism.
- Modules related to mobility: Tracks, Suspension, Brake System, Filters, Engine, Transmission.
- Smoke grenade and Crew Replenishment, to increase your survivability.
- Research the shells last, the stock shell offering the best post-penetration damage.
Armaments
Main armament
| 76 mm PaK36 (r) | Turret rotation speed (°/s) | Reloading rate (seconds) | |||||||||||
|---|---|---|---|---|---|---|---|---|---|---|---|---|---|
| Mode | Capacity | Vertical | Horizontal | Stabilizer | Stock | Upgraded | Full | Expert | Aced | Stock | Full | Expert | Aced |
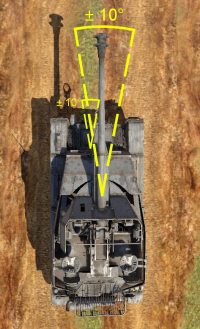
| Arcade | 30 | -6°/+18° | ±10° | - | 10.6 | 14.6 | 17.8 | 19.6 | 20.9 | 6.50 | 5.75 | 5.30 | 5.00 |
| Realistic | 7.1 | 8.4 | 10.2 | 11.3 | 12.0 | ||||||||
Ammunition
| Penetration statistics | |||||||
|---|---|---|---|---|---|---|---|
| Ammunition | Type of warhead |
Penetration @ 0° Angle of Attack (mm) | |||||
| 10 m | 100 m | 500 m | 1,000 m | 1,500 m | 2,000 m | ||
| PzGr 39 rot | APCBC | 138 | 135 | 124 | 112 | 101 | 91 |
| Hl.Gr 38C | HEAT | 100 | 100 | 100 | 100 | 100 | 100 |
| PzGr 40 | APCR | 182 | 178 | 160 | 140 | 122 | 107 |
| Sprgr. 39 | HE | 9 | 9 | 9 | 9 | 9 | 9 |
| Shell details | ||||||||||||
|---|---|---|---|---|---|---|---|---|---|---|---|---|
| Ammunition | Type of warhead |
Velocity (m/s) |
Projectile mass (kg) |
Fuse delay (m) |
Fuse sensitivity (mm) |
Explosive mass (TNT equivalent) (g) |
Ricochet | |||||
| 0% | 50% | 100% | ||||||||||
| PzGr 39 rot | APCBC | 710 | 7.6 | 1.2 | 14 | 34 | 48° | 63° | 71° | |||
| Hl.Gr 38C | HEAT | 450 | 5.05 | 0 | 0.1 | 875.5 | 62° | 69° | 73° | |||
| PzGr 40 | APCR | 990 | 4.15 | - | - | - | 66° | 70° | 72° | |||
| Sprgr. 39 | HE | 550 | 6.25 | 0 | 0.1 | 585 | 79° | 80° | 81° | |||
Ammo racks
| Full ammo |
1st rack empty |
2nd rack empty |
3rd rack empty |
4th rack empty |
5th rack empty |
6th rack empty |
7th rack empty |
8th rack empty |
Visual discrepancy |
|---|---|---|---|---|---|---|---|---|---|
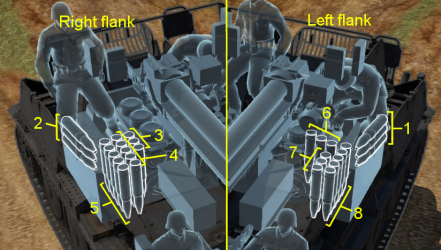
| 30 | 28 (+2) | 25 (+5) | 22 (+8) | 17 (+13) | 12 (+18) | 9 (+21) | 6 (+24) | 1 (+29) | No |
Notes:
- Turret "cheeks" empty (racks 1 & 2 empty): 25 (+5) shells.
- Right flank empty of shells (racks 1 to 5 empty): 12 (+18) shells.
Machine guns
| 7.92 mm MG37(t) | ||||
|---|---|---|---|---|
| Mount | Capacity (Belt) | Fire rate | Vertical | Horizontal |
| Hull | 1,200 (200) | 769 | ±10° | ±10° |
Usage in battles
- Offensive role
The Marder III should be played as a long range sniper, taking advantage of the APCBC shell's high penetration values, high gun accuracy and good mobility. Find a shooting spot and engage targets from at least 1,000 m away to prevent enemy progress towards the objectives. You will also suppress enemy fire to prevent your team from being pinned down by enemy snipers attempting the same in return. Because of your weak armour and open turret, always stay away from the frontline to avoid being flanked or swarmed and thus maximise your chances of survival. When engaging enemy tanks, prioritise firing hull-down from behind cover. With such firepower, any enemy wandering in your sight alone is practically dead. A flanking enemy, artillery strikes or CAS will be the greatest threats to the Marder III.
- Defensive role
In case of an enemy breakthrough, your role is to contain the enemy advance by pinning them down. The enemy will be moving the front line, so engagements will take place at a closer range than you're comfortable with. You should identify and target in priority choke points, narrow passages and corridors of the map that the enemy will be forced to take. Your limited gun traverse still allows you to monitor an area spanning 350 m at 1,000 m distance without having to reposition your hull.
- Other roles
If you try to use the Marder III in a different role on the battlefield, you will be confronting with the following:
- If you try to play the Marder III as a front-line tank, you will be quickly disabled by any type of fire coming from enemy tanks. Your armour is extremely thin and your open turret crew is very exposed to MG fire, artillery strike, HE shells blast or ramming attacks. Your turning speed is also too poor to manoeuvre quickly enough in close combat.
- If you attempt to play support tank, your poor reverse speed will make it difficult for you to overextend. Your high profile will make it difficult to stay hidden behind obstacles without taking fire. The enemy will flush you out with artillery strike (which can be accurate enough from middle ranges to disable you). Even with an escape route planned and cover to hide behind, your chances of survival are meagre. You will also be at risk of being flanked by light tanks or armoured cars, especially if they swarm you. Anyone who manages to get behind you has a very high chance to destroy you, even with just machine gun fire.
- Notable enemies
- Any tank will disable you with little effort in a close range encounter because of your weak armour.
- For long range engagements, T-34s & M4s are the enemies most likely to bounce your shell if they are properly angling from a distance.
- Defeating a Marder III
- If you are alone, flanking a Marder III undetected remains your best chance to destroy it. But it is difficult because the Marder positions itself very far from the frontline.
- Force the Marder III out of position with indirect fire (artillery strikes) if you're at relative close range.
- The most suitable shells to deal with a Marder are HE, HEAT or Shrapnel shells.
- In case of a frontal attack (choke point/corridor), try blinding the Marder III with smoke and then swarm it with several tanks to saturate its defensive capacities. A barrage of MG fire is very likely to make a Marder III retreat and relocate.
Pros and cons
Pros:
- Good gun penetration
- Powerful at all ranges
- Relatively high forward speed
- Relatively good HE filler in APCBC rounds
- Average hull armour of 50 mm
- Capable of penetrating all tanks frontally at its BR range
- High capacity spotting machine gun in the hull
Cons:
- Tall profile, hindering concealment ability
- Slow turning movement
- Very prone to falling over due to height, especially for newer players with low amounts of invested crew points towards driver
- Very thin gun shield for the gun crew
- Open top vehicle, gunner and loader can be easily machine-gunned
- Prone to destruction by overpressure
- Will struggle against heavily sloped armour due to penetration drop-off with increasing angle-of-attack
History
Development
After the start of Operation Barbarossa, the Wehrmacht found a very dire problem of the lack of a mobile anti-tank system and adequate anti-tank weapons, especially after the appearance of the Soviet T-34 and KV-1 tanks. The only mass-issued anti-tank was the fairly weak 37 mm Pak 36 and the only mobile anti-tank system widely used was the Panzerjäger I with the Czech 47 mm anti-tank gun. Modifications to current vehicles in service was done to put more self-propelled anti-tank weapons into service, which created the Marder I from the French Lorraine, the Marder II from the Panzer IIs, and the Marder III from the Czech Panzer 38(t).
Specifications
The Marder III, with the rest of the Marder series, gave Germany forces a self-propelled gun mounting a better gun than what was available on German tanks, such as the 75 mm Pak 40 or captured Soviet 76.2 mm guns chambered for the Pak 40 ammo. All of the Marders share a lack of armour for the crew, the top and rear of the vehicle is left exposed to mortar, shrapnel, or infantry weapons. This weakness is mitigated with the fact that the Marders are supposed to be anti-tank motor carriages that are to ambush incoming enemy tanks.
The Marder III use the Panzer 38(t) as it was a design going obsolete, and lots of Soviet 76.2 mm guns were captured, so they mounted these guns onto the Panzer 38(t) first. The finished self-propelled mount had a higher silhouette than the Panzer 38(t), which left it more vulnerable, but had a rechambered 76.2 mm Pak 36(r) gun with the Pak 40 ammo and could hold 30 rounds in the vehicle. A machine gun on the hull was retained for anti-infantry purposes.
The Marder III with a 75 mm Pak 40 gun mounted instead of the rechambered 76.2 guns was called the Marder III Ausf. H. Another variant created, the Ausf. M, featured a lower silhouette and a better-sloped armour and fighting compartment, despite only holding 27 rounds for the mounted Pak 40. A total of 3,472 Marder IIIs and its version was created or converted from Panzer 38(t) during its production life.
Combat usage
The Marder III fought on all front of the war, being produced from 1942 to 1945, with 2,080 Marder III with the 76.2 mm gun converted and produced. Using the tested design of the Panzer 38(t), the Marder III experienced a reliable mechanical history and has a gun that could take out most allied tanks in the war. The vulnerability to the crew due to lack of armour was its most pressing issue, with only a front shield plate at most 15 mm thick and side plates that can't enclose the crew. This makes it as very poor assault vehicles or tank substitutes as the open top could allow infantry to easily kill the crew from hidden areas, despite that, it is sometimes repurposed to this role to the chagrin of the crew.
As its production was underway, Germany already had a few self-propelled assault weapons being produced such as the StuG III that could have the same anti-tank capabilities, yet was fully-armoured, enclosing the crew in adequate armour. This obvious advantage over the open Marder series encouraged the development of a new kind of tank destroyer from the Panzer 38(t) with better armour, which will eventually create the Jagdpanzer 38(t). Despite that, the Marders continued to serve to the end of the war.
| Archive of the in-game description | |
|---|---|
|
An antitank vehicle designed on the basis of the Pz.38(t) tank by the BMM company (formerly ChKD) by installing a 76.2 mm F-22 division cannon on the chassis of a captured Soviet tank that had been modified by German engineers. The impetus for building this platform was the fact that in 1941 it became clear on the Eastern Front that the Wehrmacht did not have the means to fight Soviet heavy tanks. At the time, the captured 76.2 mm F-22 division cannon was able to fight these tanks, so they decided to install it on the reliable frame of the Pz.38(t). BMM produced 344 of these antitank vehicles. | |
Media
- Skins
See also
External links
| Germany tank destroyers | |
|---|---|
| Pz. I Derivatives | Panzerjäger I |
| Pz. II Derivatives | 15cm sIG 33 B Sfl |
| Pz. 38(t) Derivatives | Marder III · Marder III H · Jagdpanzer 38(t) |
| Pz. III Derivatives | StuG III A · StuG III F · StuG III G · StuH 42 G |
| Pz. IV Derivatives | Jagdpanzer IV · Panzer IV/70(A) · Panzer IV/70(V) · Dicker Max · Nashorn · Brummbär · VFW |
| Pz. V Derivatives | Jagdpanther G1 · Bfw. Jagdpanther G1 |
| Pz. VI Derivatives | Sturer Emil · Elefant · Ferdinand · 38 cm Sturmmörser · Jagdtiger |
| Wheeled/Half-track | 8,8 cm Flak 37 Sfl. · Sd.Kfz.251/9 · Sd.Kfz.251/10 · Sd.Kfz.251/22 · Sd.Kfz.234/3 · Sd.Kfz.234/4 · 15 cm Pz.W.42 |
| ATGM Carrier | RakJPz 2 · RakJPz 2 (HOT) · Wiesel 1A2 |
| Other | Waffenträger · M109G · JPz 4-5 · Raketenautomat · VT1-2 |