Wellington Mk III
OLD‑WIKI.WARTHUNDER.COM (DEFUNCT)
| This page is about the British bomber Wellington Mk III. For other versions, see Wellington (Family). |
Description
The Wellington Mk III is a rank British bomber with a battle rating of (AB), (RB), and (SB). It has been in the game since the start of the Open Beta Test prior to Update 1.27.
General info
Flight performance
| Characteristics | Max Speed (km/h at 4,572 m) |
Max altitude (metres) |
Turn time (seconds) |
Rate of climb (metres/second) |
Take-off run (metres) | |||
|---|---|---|---|---|---|---|---|---|
| AB | RB | AB | RB | AB | RB | |||
| Stock | 398 | 384 | 31.3 | 32.5 | 3.1 | 3.1 | 650 | |
| Upgraded | 441 | 418 | 28.4 | 30.0 | 10.2 | 5.3 | ||
Details
| Features | ||||
|---|---|---|---|---|
| Combat flaps | Take-off flaps | Landing flaps | Air brakes | Arrestor gear |
| ✓ | ✓ | ✓ | X | X |
| Limits | ||||||
|---|---|---|---|---|---|---|
| Wings (km/h) | Gear (km/h) | Flaps (km/h) | Max Static G | |||
| Combat | Take-off | Landing | + | - | ||
| 315 | 264 | 223 | ~5 | ~3 | ||
| Optimal velocities (km/h) | |||
|---|---|---|---|
| Ailerons | Rudder | Elevators | Radiator |
| < 275 | < 275 | < 310 | > 320 |
Survivability and armour
- 9 mm Steel plate in the pilot's seat.
Modifications and economy
Armaments
Suspended armament
The Wellington Mk III can be outfitted with the following ordnance:
- 10 x 250 lb G.P. Mk.IV bombs (2,500 lb total)
- 18 x 250 lb G.P. Mk.IV bombs (4,500 lb total)
- 9 x 500 lb G.P. Mk.IV bombs (4,500 lb total)
- 2 x 1,000 lb G.P. Mk.I bombs + 6 x 250 lb G.P. Mk.IV bombs (3,500 lb total)
- 2 x 18 inch Mark XII torpedoes
- 1 x 4,000 lb H.C. Mk.II bomb (4,000 lb total)
- 9 x 500 lb S.A.P. Mk.II bombs (4,500 lb total)
- 2 x 2,000 lb A.P. Mk.I bombs (4,000 lb total)
Defensive armament
The Wellington Mk III is defended by:
- 2 x 7.7 mm Browning machine guns, nose turret (1,000 rpg = 2,000 total)
- 4 x 7.7 mm Browning machine guns, tail turret (2,500 rpg = 10,000 total)
- 1 x 7.7 mm Browning machine gun, 2 x side turrets (600 rpg)
Usage in battles
Air battles
In Air Battles, the winning tactic is to climb high and bomb your targets. If you don't want to climb the Wellington Mk III, is a great low flying bomber, offering great speed and manoeuvrability. However, it lacks any armour and only offers limited protection with turrets in the front, side and rear. It lacks armour plates, unlike other bombers of the other nations. A few well placed shots will see Wellington Mk III, getting torn apart to any aircraft which drop down to engage it from the top or belly. However, its rear gun turret offers four 7.7 mm machine guns which are able to shoot down the enemy aircraft with a few well placed shots.
Ground battles
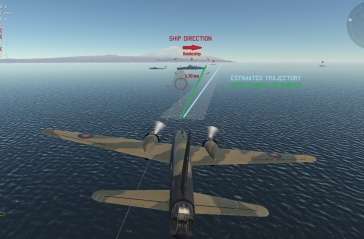
Using the Wellington Mk III should be used as a strategic bomber, that is what it excels at in this game mode. It is too big to be used in the ground attack role, making it an easy target for enemy tankers. To use the Wellington Mk III, load up on 500 lbs or the single 4,000 lb cookie bomb. The 500 lbs, offer 65.5 Kg of HE filler and the cookie offers 1,339 kg of explosive filler.
Fly around the map, waiting for the enemy to cap the cap zones, when they start capping the zone - head towards it while gaining altitude. Do not come in low as a single shot fired from a tank can knock you out of the game. Once at a good height, line up on the cap zone and drop the bombs. Any tank in the zone will be destroyed.
All of the Wellington bombers are well suited for the naval warfare, The Wellington Mk III being one of the best of them provides improved Browning turrets, highest top speed of them all and two supreme payloads that will allow you to change the tides of a naval war in both Arcade and Realistic battles.
Those are:
- 2 х 18 inch Mark XII torpedoes
- 1 x 4,000 lb H.C. Mk.II bomb
With the torpedoes, the strategy goes in finding a good approach angle to successfully deliver both torpedoes to preferably gunboats and destroyers as they will have a tougher time evading them. Beware of anti-aircraft fire and swiftly turn back to safety while preparing the next drop.
The technique at the moment of launching the torpedoes is shown in the image: "Torpedo attack!"
Using the 4,000 lb bomb, the scenario takes place a bit higher. Way above the enemies' short and medium anti-aircraft guns that reach around 3,000 - 4,500 m altitude. Here you will be able to spot the biggest of the fishes. Those will be your targets and with some developed practice in predicting the drops you will decimate the entire enemy destroyers population in a short time, tanks to this extremely lethal bomb.
Just be alert of enemy planes that will be eager to take you down, using the Armoured targets belt provides some of the boost in defence you need as it cripples engines and pierces through metal.
Manual Engine Control
| MEC elements | ||||||
|---|---|---|---|---|---|---|
| Mixer | Pitch | Radiator | Supercharger | Turbocharger | ||
| Oil | Water | Type | ||||
| Not controllable | Controllable Not auto controlled |
Controllable Not auto controlled |
Controllable Not auto controlled |
Separate | Controllable 2 gears |
Not controllable |
Pros and cons
Pros:
- Has twice as many tail guns as its predecessor
- Can carry a reasonable maximum payload for a medium bomber
- Engines seem to be indestructible and will remain operational even under heavy fire
- Can survive belly landings if need be
- Half-decent at operating in the gunship role
- Engines are capable of using WEP
Cons:
- Weaponry consists purely of 7.7 mm machine guns, making fighting against fighters a serious challenge at best
- Low speed makes the lack of defensive guns painfully obvious
- Anything with a cannon will be able to destroy the bomber without much effort
- Gun turrets have no protective armour, leaving turret gunners vulnerable
- Although you can carry torpedoes, they are some of the worst ones in the game due to the terrible drop requirements
- Tail controls are easily knocked out from fighters or flak
History
| Archive of the in-game description | |
|---|---|
|
The Vickers Wellington was a twin-engine medium bomber used by RAF Bomber Command and Coastal Command. In May 1939, a prototype Wellington was fitted with Bristol Hercules engines; after successful trials with a converted Mk.IC, this model was launched for full-scale production at the beginning of 1941 under the designation of Wellington Mk.III (Type 417). Production Mk.III aircraft were equipped with two 1,590 hp Bristol Hercules Mk.XI radial, air-cooled engines. Building on the experience amassed by Wellington crews, the defensive armament was upgraded on later models; the Frazer-Nash FN-5A rear turret with two 0.303 inch machine guns was replaced with a Frazer-Nash FN-20 turret holding four 0.303 inch machine guns with 2,000 rounds each. The take-off weight of the Mk.III was increased to 15,650 kg while bomb capacity was reduced to 4,000 lbs (1,814 kg). Originally, the bomber was to be equipped with a ventral turret, the low-drag Frazer-Nash FN-21A, but the further decrease in bomb capacity was deemed to be unacceptable. The Mk.III had its armour reinforced, all fuel tanks were self-sealing and barrage balloon cable cutters were positioned in the leading edge of the wings. By 1941 the Wellington was used almost exclusively at night and therefore, attention was given to decreasing the area of the glazing that visibly reflected moonlight or searchlight beams during night flights. To that end, the Mk.III differed from the late Mk.IC aircraft by removing side glazing and the side blisters of the bombardier/navigator's cockpit. The only side glazing that remained was from the trapezoidal gun blisters. The Wellington Mk.III was manufactured until the end of 1943, and a combined total of 1,519 bombers were produced. | |
Media
- Skins
- Videos
See also
Links to the articles on the War Thunder Wiki that you think will be useful for the reader, for example:
- reference to the series of the aircraft;
- links to approximate analogues of other nations and research trees.
External links
Paste links to sources and external resources, such as:
- topic on the official game forum;
- other literature.
| Vickers-Armstrongs Aircraft Limited | |
|---|---|
| Bombers | Wellington Mk Ic · Wellington Mk Ic/L · Wellington Mk III · Wellington Mk X |
| Captured | ▀Wellington Mk Ic |
| Britain bombers | |
|---|---|
| Torpedo | Swordfish Mk I · Swordfish Mk II · ▄Avenger Mk II |
| Dive | V-156-B1 |
| Hydroplanes | ▄Catalina Mk IIIa · Sunderland Mk IIIa · Sunderland Mk V |
| Light | Blenheim Mk IV · Beaufort Mk VIII · ▄Hudson Mk V · Brigand B 1 |
| Based on A20 | ▄Havoc Mk I · ▄Boston Mk I · ▄DB-7 |
| Hampden | Hampden Mk I · Hampden TB Mk I |
| Wellington | Wellington Mk Ic · Wellington Mk Ic/L · Wellington Mk III · Wellington Mk X |
| Halifax | Halifax B Mk IIIa |
| Stirling | Stirling B Mk I · Stirling B Mk III |
| Lancaster | Lancaster B Mk I · Lancaster B Mk III |
| Lincoln | Lincoln B Mk II |
| Shackleton | Shackleton MR.Mk.2 |