Enduring Confrontation
Game modes
OLD‑WIKI.WARTHUNDER.COM (DEFUNCT)
Enduring Confrontation (also known as "EC") is a separate game mode for aircraft in War Thunder. Unlike in traditional random battles, this mode allows you to join a battle at any time. You also have unlimited respawns, subject to certain rules. In EC, the emphasis is on the players’ ability to influence the situation on the battlefield.
Battles in EC occur as Events, so you can find this mode in the "Events and Tournaments" section underneath the "To Battle" button. EC is the primary game mode for aircraft in Simulator Battles, and a simplified version of it in Arcade Battles is the only separate game mode for helicopters. To join a battle in Enduring Confrontation, you can either wait in the general queue as you would in random battles, or call up a list of active rooms (ongoing battles) sorted by country and rank and, if there are available spots on a team, join your preferred side in that room. You can call up a list of rooms by pressing the button of the same name.
Main differences between Enduring Confrontation and random battles:
- Battles are longer. Every battle lasts up to 3 hours, ending earlier if one of the teams meets the conditions for winning. You don’t have to participate in the entire battle from beginning to end. Players can leave the battle and come back to it whenever they want (as long as there are free spots on their team), but you can’t change teams nor vehicle sets during a battle.
- In EC, players have more opportunities to alter the situation on the battlefield both directly and indirectly, and the distribution of power across both teams can change several times depending on the success of the players on one side or the other.
- There are various mechanics that are unique to EC, such as the front line and modular airfields.
Ranks in Enduring Confrontation
Every two days, a BR range set of 10 new ranges will be cyclically changed both for random battles and the room list in the lobby. The switching will be sequential between four sets of Battle Ratings:
| 1.0 | .3 | .7 | 2.0 | .3 | .7 | 3.0 | .3 | .7 | 4.0 | .3 | .7 | 5.0 | .3 | .7 | 6.0 | .3 | .7 | 7.0 | .3 | .7 | 8.0 | .3 | .7 | 9.0 | .3 | .7 | 10.0 | .3 | .7 | 11.0 | .3 | .7 | 12.0 | .3 | .7 | 13.0 | .3 | .7 | |
|---|---|---|---|---|---|---|---|---|---|---|---|---|---|---|---|---|---|---|---|---|---|---|---|---|---|---|---|---|---|---|---|---|---|---|---|---|---|---|---|
| 1 | EC1 | EC2 | EC3 | EC4 | EC5 | EC6 | EC7 | EC8 | EC9 | EC10 | |||||||||||||||||||||||||||||
| 2 | EC1 | EC2 | EC3 | EC4 | EC5 | EC6 | EC7 | EC8 | EC9 | EC10 | |||||||||||||||||||||||||||||
| 3 | EC1 | EC2 | EC3 | EC4 | EC5 | EC6 | EC7 | EC8 | EC9 | EC10 | EC11 | ||||||||||||||||||||||||||||
| 4 | EC1 | EC2 | EC3 | EC4 | EC5 | EC6 | EC7 | EC8 | EC9 | EC10 | EC11 | ||||||||||||||||||||||||||||
The current BR range is displayed in the events tab in game.
New Aircraft Security Deposit
In Enduring Confrontation you are not charged any funds to repair lost vehicles, but you do pay a security deposit in Silver Lions (SL) for each new aircraft you use in battle. The security deposit is charged the moment you press the "To Battle" button. If you keep your aircraft in one piece, perform a decent landing on an airfield, and get out of the aircraft, you won’t have to pay a security deposit next time you take off in that aircraft – you’ve already paid it. However, if you lose an aircraft, you’ll have to make another security deposit next time you take off in it. Security deposits are not refunded at the end of the match.
Requirements and Recommendations for Building Vehicle Sets
We recommend including aircraft of various types in a set (fighters, strike aircraft, bombers) in order to increase your tactical flexibility and allow you to withstand enemy aircraft and ground vehicles on the front line over the course of the battle, as well as for performing bombing runs against enemy bases and airfields. The mission will spawn ground units like pillboxes against which it is the best rockets, there are also carriers and ground bases which require bombs in order to cause any damage. A plane with good climb rate and armament like cannons should also be included to be able to intercept AI planes like attackers or bombers.
Conditions for Winning and Losing
To win a battle, a team must fulfill one of the following conditions:
- Earn 150,000 victory points. The victory points for both teams are always displayed in the lower left corner of the screen when you are in the cockpit. Teams are awarded victory points for completing mission objectives and, to a lesser extent, for destroying enemy vehicles.
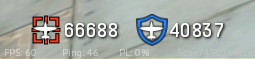
- Destroy the airstrips, hangars, of all the enemy’s airfields. You can read more about airfield zones in the "Modular Airfields" section.
- Victory is automatically awarded to the team that has earned the most victory points when the time limit for the battle ends (the limit for all battles in 3 hours).
Mission Objectives, Explicit and Hidden
As in other game modes, there are special mission objectives in EC for which a team can earn victory points. They can be divided into "explicit" and "hidden" objectives. The difference is that explicit objectives are displayed in the list of current objectives on the map during battle, and hidden objectives are not (this is done in order to save space on the list and not fill it up with obvious objectives). In other words, hidden objectives are always in effect, so they aren’t listed on the objectives list, although they are still assumed to be there. Victory points are awarded for completing both explicit and hidden objectives.
Hidden objectives:
- Earn 150,000 points to win the battle.
- Find an enemy airfield – at the beginning of the battle, when the location of the enemy’s airfields is still unknown.
- Destroy the enemy airfield in a certain sector.
- Help win a skirmish in a certain sector – you can participate in destroying enemy ground vehicles in an active ground skirmish where one side is attacking, and the other is defending. There can be multiple active skirmishes at the same time in various sectors of the map (or even in the same sector, but in different directions). The attacking side in a skirmish is shown as an arrow on the map. The blue arrow is the allies’ attack, and the red arrow is the enemies’. The direction of the attack determines the kind of ground vehicles that will be used: the attacking side’s ground forces are represented by tanks and Howitzers, and the defending side is represented by light pillboxes and Howitzers.
Explicit objectives:
- Cover/destroy the allied/enemy spotter in a certain sector – this is a single AI aircraft that comes in from the allied team’s rear and flies around for a while above the enemy team’s territory at a certain altitude depending on battle rank. Its presence in the air makes it possible to discover objectives at greater distances.
- Cover/destroy the allied/enemy bombers/attack aircraft in a certain sector – this is a group of AI aircraft made up of 6 bombers or 9 attack aircraft covered by 2 AI fighters. The group comes in at a certain altitude from the allied team’s rear in order to complete a certain objective. The bombers’ target is always the enemy team’s base, and the attack aircraft’s target is the last active ground skirmish.
- Cover/destroy the allied/enemy vehicle column in a certain sector – this is a column of AI ground vehicles made up of tanks, trucks, and mobile AA guns. It advances from the allied team’s rear toward the front line. When it reaches its target sector, it increases the military presence of the allied team to the maximum in that sector. This leads to the generation of a land skirmish in which the attacking side is the team to which the column belongs. There can be up to 3 active convoys per team.
- Achieve air supremacy in a certain sector – capture an air sector that is adjacent to the front line. It is marked with a little circle with the letter A in the middle of one of the sectors on the map. The sector’s area fully corresponds to the sector on the map, and the air sector’s altitude is 6,000 metres. Only player-controlled aircraft count toward capture – AI vehicles don’t count. A limited amount of time is allotted to capture the sector. If one of the teams captures the sector, a land skirmish will be generated either in this sector or in one adjacent to it. The attacking side will be the team that achieved air supremacy.
- Destroy the enemy base in a certain sector – bomb the enemy base in the indicated sector. The base’s durability depends on the battle rank.
- Locate the enemy carrier - at the beginning of the battle, when the location of the enemy’s carrier is still unknown, available only on a few maps like Sicily or Tunisia.
- Destroy the enemy carrier - one carrier unit escorted by a few destroyers, all of them are moving, to be completed only the carrier unit needs to be destroyed, damaging or sinking destroyers does not do anything.
Discovering Objectives
In addition to the fact that mission objectives are conditionally divided into explicit and hidden, certain objectives need to be discovered in order to appear and become completable. Objectives will be discovered if an allied vehicle (either AI or player-controlled) finds itself next to them within a certain range, although players have a larger detection range than AI units do. The presence in the air of an allied spotter increases the detection range for both players and AI vehicles. Once an explicit objective has been discovered, all players on the team receive an on-screen notification, and the corresponding objective is added to the list of active objectives in the map window.
If a mission objective is discovered by players, the team is rewarded with a certain number of victory points (usually about 20% of the reward for completing the objective in question).
Map Window and Map
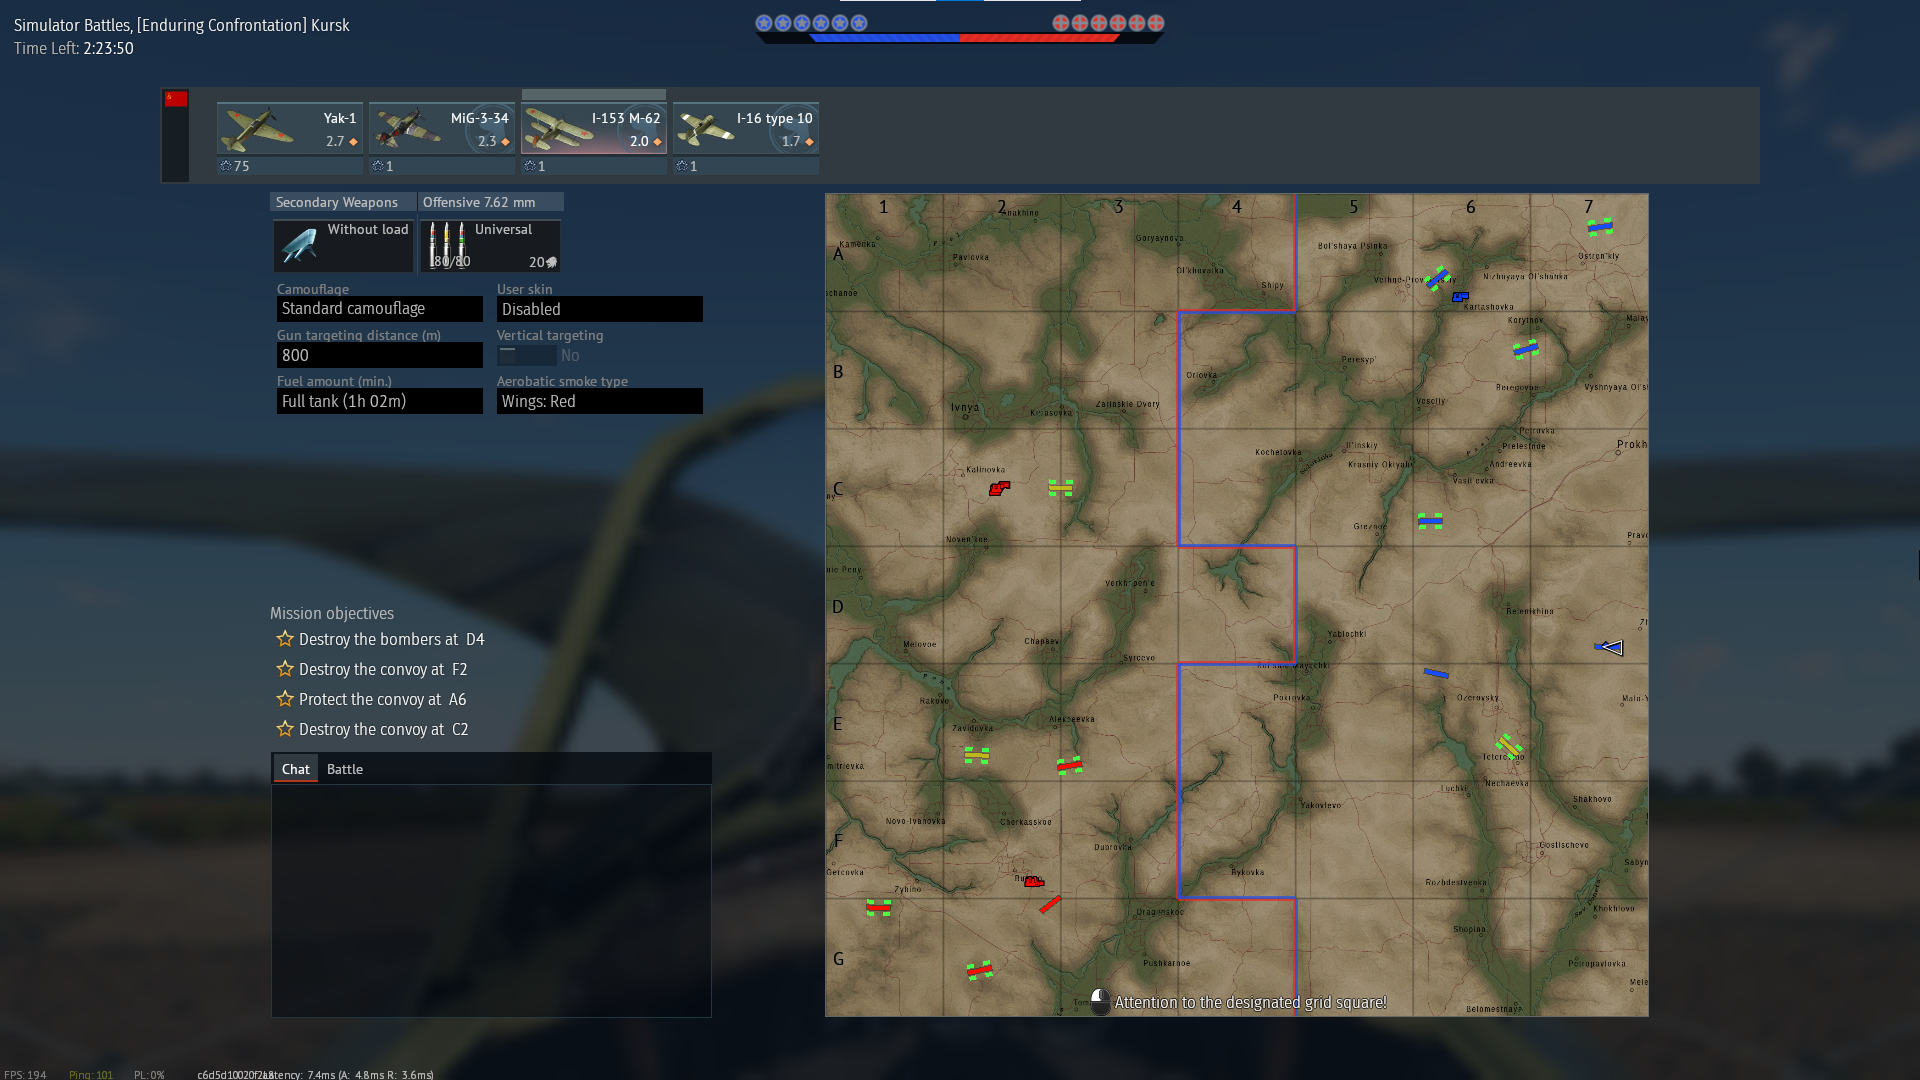
The map window is an essential helper to all players in Enduring Confrontation and provides a lot of useful information. The following information is displayed in the map window at all times:
- The current mission and location, as well as the time remaining until the end of the battle (in the upper left corner).
- Information on the vehicle set being used in the battle, including the status of aircraft, the cost to take off in each aircraft, and your current SP and SL.
- Current aircraft settings (these can be changed at an airfield prior to takeoff), including weapon loadout, equipped ammo belts, camouflage, frontal armament convergence, explosive delay, and remaining fuel.
- A list of active mission objectives.
- The chat window/battle log.
- The mission map.
The map of every EC location is divided into grid sectors of a fixed size:
- In EC missions with a map size of 64 x 64 km, the size of a map grid sector is 8,192 x 8,192 metres.
- In EC missions on location "Dover", the size of a map grid sector is 12,288 x 12,288 metres.
- In EC missions on location "Denmark", "Sinai", "Afghanistan", "Spain" and "Vietnam", the size of a map grid sector is 16,384 x 16,384 metres.

The map itself displays the following information in real time:
- Your current location and flight direction.
- The state of the front line.
- The location and status of discovered airfields. Your team’s airfields are always displayed, but you have to discover the other team’s airfields first.
- The location and integrity of bases that are currently active (if there are any).
- Air supremacy sector and status (if such an objective is active).
- The location of ground convoys that are currently active (if there are any).
- The location of ground skirmishes that are currently active (if there are any). The directions of attacks are shown as arrows, and allied and enemy ground vehicles are shown as markers.
Front Line
The front line is one of the unique game mechanics found in Enduring Confrontation missions. The front line extends along the borders of adjacent sectors of the map and unambiguously defines the side to which they belong. At the beginning of every battle the front line extends along the borders of the middle sectors of the map, but as the battle progresses, it shifts to one side or the other. Changes to the front line occur as a result of ground skirmishes fought by AI vehicles – a successful attack gives control over the current sector to the attacking side and moves the front line accordingly. Players can affect the outcome of ground skirmishes (and thus change the front line) by destroying the AI ground vehicles that are participating in them. If neither team interferes in a ground skirmish, it depends on the AI units who wins it, they can damage each other, also the ground battle can be attacked by the formation of AI attacker planes.
Influencing the front line during a battle: if, as the result of a shift in the front line, an airfield ends up within territory controlled by the enemy team, this airfield will cease to function. If, due to another shift in the front line, this airfield ends up back within allied territory, it will start working again.
You can read more about the front line in this Devblog.
Airfields and their Modules
All aircraft in EC spawn on airfields and return to them to reload and repair. Since battles in EC last a significant amount of time, airfields are a crucial strategic target – they directly affect the course of the battle.
In EC missions, airfields are distributed randomly on the map – when every new battle is generated, the server chooses depending on the map up to five potential airfield locations for each side. At the beginning of the battle, each team knows the location of their own airfields (they are displayed on the map), but they do not know the location of the enemy’s airfields. Enemy airfields can be discovered visually by being in the air at a sufficient altitude, but in order to get an airfield detected in this manner to appear on the map, you need to fly close enough to it (within a range of a few kilometres – altitude doesn’t matter). Just like other targets, airfields can be discovered by AI vehicles.
You can always see the status of allied and enemy airfields on the map. Additionally, the detection status and overall integrity of airfields are displayed in the top middle part of the screen, above the bar with the double victory point indicator – look for the circles above the inner edge of the corresponding indicator. Blue circles represent the status of allied airfields, and red ones represent the status of enemy airfields. The number of circles shows how many of a given team’s airfields have been discovered by the enemy. The degree to which they are colored in represents their integrity. By the same token, the number of blue circles shows how many allied airfields have been discovered by the enemy, and the number of red ones shows how many enemy airfields your allies have found. If there are no circles on one side or the other, this means that none of that team’s airfields have been discovered by the enemy yet.
Every airfield is defended by ten anti-aircraft ground units, they spawn around the airfield and consist of three different types, short, medium, long range AAA units and units equipped with the ground-to-air missiles in high tier battles (EC6+). All those mentioned unit types respawn after certain amount of time when they are destroyed. The other type of units that defends them are two fighter planes circling above them, they attack every unit that gets close to the airfield and disengage when that attacking plane gets too far away from it. Those planes are being respawned after being destroyed and sometimes land on the airfield to refuel and rearm itself.
The airfields themselves have a modular structure in EC, i.e. they are heterogeneous. This is yet another unique feature of this mode. Every airfield represents a set of four modules, or damageable functional zones of varying size, configuration, and appearance. They include the airstrip, fuel warehouses, parking area (also the aircraft repair area), and the living quarters (this is where the crew is located). Each of these zones performs its own unique function, has its own level of durability, and does not intersect with the areas of the other zones. The durability of all modules depends on the rank of the EC mission, increasing from lower ranks to higher ones. A zone can only be damaged or destroyed if it is hit by a bomb within its own area. Bombs that miss zones or hit destroyed zones do not count. Damaged zones are repaired over time. The speed at which they are repaired depends on the condition of the living quarters.
Thanks to this mechanic, airfields cannot be completely destroyed during EC missions. It is only possible to temporarily disable their functionality – unlike in other aircraft game modes. However, destroying the airstrip and living quarters of all of a team’s airfields prevents the players on that team from bringing new aircraft into the battle and thus automatically leads to defeat.
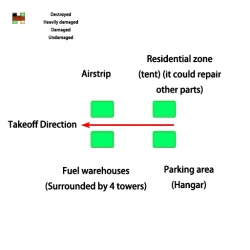
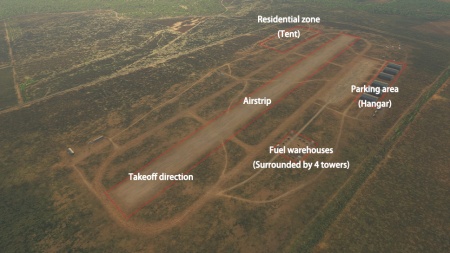
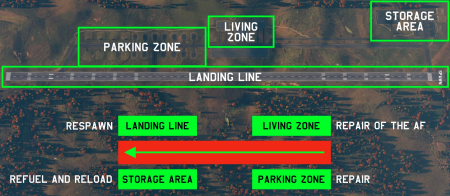
You can read more about airfield modules and their functions in this Devblog.
Additional information
Amount of bombs required to destroy bases in Enduring Confrontation for planes
| Bomb type / USA | BR 1.0 - 2.0 | BR 2.3 - 3.3 | BR 3.7 - 4.7 | BR 5.0 - 6.3 | BR 6.7 - 7.7 | BR 8.0+ |
|---|---|---|---|---|---|---|
| 100 lb AN-M30A1 | 4 | 6 | 9 | 14 | 19 | 22 |
| 250 lb AN-M57 | 3 | 4 | 6 | 9 | 12 | 14 |
| 250 lb LDGP Mk 81 | 3 | 4 | 6 | 9 | 12 | 14 |
| 300 lb H.E. M31 | 3 | 4 | 6 | 9 | 12 | 14 |
| 500 lb AN-M64A1 | 2 | 2 | 3 | 5 | 7 | 8 |
| 500 lb LDGP Mk 82 | 2 | 3 | 4 | 6 | 9 | 10 |
| 600 lb H.E. M32 | 2 | 2 | 4 | 5 | 7 | 8 |
| 750 lb M117 cone 45 | 1 | 2 | 3 | 4 | 6 | 7 |
| 750 lb M117 cone 90 | 1 | 2 | 3 | 4 | 6 | 7 |
| 1,000 lb AN-M65A1 | 1 | 1 | 2 | 3 | 4 | 5 |
| 1,000 lb AN-M65A1 Fin M129 | 1 | 1 | 2 | 3 | 4 | 5 |
| 1,000 lb LDGP Mk 83 | 1 | 2 | 2 | 4 | 5 | 5 |
| 1,000 lb Mk 13 Mod 0 Mine | 1 | 1 | 1 | 2 | 2 | 3 |
| 1,600 lb AN-Mk 1 | 2 | 3 | 5 | 7 | 10 | 11 |
| 2,000 lb AN-M66A2 - | 1 | 1 | 1 | 2 | 2 | 3 |
| 2,000 lb LDGP Mk 84 | 1 | 1 | 1 | 2 | 2 | 3 |
| 2,000 lb GBU-8* | 1 | 1 | 1 | 2 | 2 | 3 |
| 2,000 lb GBU-15(V)1/B* | 1 | 1 | 1 | 2 | 2 | 3 |
| 3,000 lb M118 | 1 | 1 | 1 | 1 | 2 | 2 |
| 4,000 lb AN-M56 | 1 | 1 | 1 | 1 | 1 | 2 |
| MK 77 Mod 4 incendiary | 1 | 1 | 2 | 3 | 4 | 4 |
| MK 79 incendiary | 1 | 1 | 2 | 3 | 4 | 4 |
| BLU-1 incendiary | 1 | 1 | 2 | 3 | 3 | 4 |
| BLU-27/B incendiary | 1 | 1 | 2 | 3 | 3 | 4 |
| Bomb type / Germany | BR 1.0 - 2.0 | BR 2.3 - 3.3 | BR 3.7 - 4.7 | BR 5.0 - 6.3 | BR 6.7 - 7.7 | BR 8.0+ |
|---|---|---|---|---|---|---|
| 10 kg SD10C | 15 | 22 | 36 | 57 | 78 | 91 |
| 50 kg SC50JA | 4 | 5 | 9 | 14 | 18 | 22 |
| 250 kg SC250JA | 2 | 3 | 4 | 6 | 8 | 10 |
| 250 kg C250 Incendiary | 1 | 1 | 2 | 3 | 4 | 4 |
| 500 kg PC500 | 2 | 3 | 5 | 8 | 11 | 13 |
| 500 kg C500 Incendiary | 1 | 1 | 2 | 3 | 4 | 4 |
| 500 kg SC500K | 1 | 2 | 3 | 4 | 5 | 6 |
| 1,000 kg SC1000L2 | 1 | 1 | 1 | 2 | 2 | 3 |
| 1,400 kg PC 1400 X (Fritz X) | 1 | 1 | 2 | 3 | 4 | 5 |
| 1,600 kg PC1600 | 1 | 2 | 2 | 3 | 4 | 5 |
| 1,800 kg SC1800B | 1 | 1 | 1 | 1 | 2 | 2 |
| 2,500 kg SC2500 | 1 | 1 | 1 | 1 | 1 | 1 |
| Bomb type / USSR | BR 1.0 - 2.0 | BR 2.3 - 3.3 | BR 3.7 - 4.7 | BR 5.0 - 6.3 | BR 6.7 - 7.7 | BR 8.0+ |
|---|---|---|---|---|---|---|
| 25 kg AO-25M-1 | 10 | 15 | 25 | 40 | 55 | 65 |
| 50 kg FAB-50sv | 4 | 5 | 8 | 13 | 18 | 21 |
| 100 kg FAB-100sv | 3 | 4 | 7 | 11 | 15 | 17 |
| 100 kg FAB-100M43 | 3 | 4 | 7 | 11 | 15 | 17 |
| 100 kg OFAB-100 | 3 | 4 | 7 | 10 | 14 | 17 |
| 250 kg FAB-250sv | 2 | 3 | 4 | 6 | 8 | 10 |
| 250 kg FAB-250M-44 | 2 | 3 | 4 | 6 | 8 | 10 |
| 250 kg FAB-250M-46 | 2 | 3 | 4 | 6 | 8 | 10 |
| 250 kg FAB-250M-62 | 2 | 2 | 3 | 5 | 7 | 8 |
| 250 kg OFAB-250sv | 2 | 3 | 5 | 7 | 10 | 11 |
| 500 kg FAB-500sv | 1 | 1 | 2 | 3 | 4 | 4 |
| 500 kg FAB-500M-44 | 1 | 1 | 3 | 3 | 4 | 4 |
| 500 kg FAB-500M-46 | 1 | 1 | 2 | 3 | 4 | 4 |
| 500 kg FAB-500M-54 | 2 | 2 | 3 | 5 | 6 | 7 |
| 500 kg FAB-500M-62 | 1 | 1 | 2 | 3 | 4 | 4 |
| 500 kg KAB-500Kr* | ||||||
| 500 kg KAB-500L* | ||||||
| 1,000 kg FAB-1000 | 1 | 1 | 1 | 2 | 3 | 3 |
| 1,000 kg FAB-1000M-44 | 1 | 1 | 1 | 2 | 3 | 3 |
| 1,500 kg FAB-1500M-46 | 1 | 1 | 1 | 2 | 2 | 3 |
| 3,000 kg FAB-3000M-46 | 1 | 1 | 1 | 1 | 1 | 2 |
| 5,000 kg FAB-5000 | 1 | 1 | 1 | 1 | 1 | 1 |
| ZB-360 incendiary | 1 | 1 | 2 | 2 | 3 | 4 |
| ZB-500 incendiary | 1 | 1 | 2 | 2 | 3 | 4 |
| Bomb type / UK | BR 1.0 - 2.0 | BR 2.3 - 3.3 | BR 3.7 - 4.7 | BR 5.0 - 6.3 | BR 6.7 - 7.7 | BR 8.0+ |
|---|---|---|---|---|---|---|
| 250 lb G.P. Mk.IV | 3 | 5 | 8 | 12 | 16 | 19 |
| 500 lb G.P. Mk.IV | 3 | 4 | 6 | 9 | 12 | 14 |
| 500 lb H.E. M.C. Mk.II | 3 | 4 | 6 | 9 | 12 | 14 |
| 540 lb Mk.M2 | 2 | 2 | 4 | 5 | 7 | 9 |
| 1,000 lb G.P. Mk.I | 1 | 2 | 2 | 3 | 4 | 5 |
| 1,000 lb M.C. Mk.I | 1 | 2 | 2 | 3 | 4 | 5 |
| 1,000 lb L.D H.E. M.C. Mk.1 | 1 | 1 | 2 | 3 | 4 | 4 |
| 1,000 lb H.E. M.C. Mk.13 | 1 | 2 | 2 | 3 | 4 | 5 |
| 546 kg Mk.13* | 1 | 2 | 2 | 3 | 4 | 5 |
| 4,000 lb H.C. Mk.II | 1 | 1 | 1 | 1 | 2 | 2 |
| 8,000 lb H.C. Mk.II | 1 | 1 | 1 | 1 | 1 | 1 |
| 12,000 lb H.C. Mk.I | 1 | 1 | 1 | 1 | 1 | 1 |
| Bomb type / France | BR 1.0 - 2.0 | BR 2.3 - 3.3 | BR 3.7 - 4.7 | BR 5.0 - 6.3 | BR 6.7 - 7.7 | BR 8.0+ |
|---|---|---|---|---|---|---|
| 50 kg D.T. No.2 | ||||||
| 50 kg G.A. MMN. 50 | 4 | 5 | 8 | 13 | 18 | 21 |
| 50 kg Type 61C | ||||||
| 100 kg No.1 | 3 | 4 | 6 | 9 | 13 | 15 |
| 200 kg No.1 | 2 | 3 | 5 | 7 | 10 | 11 |
| 250 kg Matra 25E | ||||||
| 250 kg SAMP Type 25 | 2 | 3 | 4 | 6 | 8 | 10 |
| 250 kg SAMP Mk 82 | 2 | 3 | 4 | 7 | 9 | 11 |
| 400 kg BGL-400* | ||||||
| 400 kg SAMP Type 21 | 2 | 2 | 3 | 5 | 7 | 8 |
| 500 kg No.2 | 1 | 2 | 3 | 4 | 5 | 6 |
| 500 kg SAMP Mk 83 | 1 | 2 | 3 | 4 | 5 | 6 |
| 970 kg BGL-1000* | ||||||
| 1,000 kg SAMP Mk 84 |
| Bomb type / Sweden | BR 1.0 - 2.0 | BR 2.3 - 3.3 | BR 3.7 - 4.7 | BR 5.0 - 6.3 | BR 6.7 - 7.7 | BR 8.0+ |
|---|---|---|---|---|---|---|
| mb m/37AT | 4 | 5 | 8 | 13 | 18 | 21 |
| sb m/42 | 8 | 12 | 20 | 31 | 42 | 50 |
| sb m/47 | 8 | 11 | 19 | 29 | 40 | 47 |
| Model 1938 (50 kg) | 4 | 5 | 8 | 13 | 18 | 21 |
| Model 1938 (100 kg) | 3 | 4 | 7 | 11 | 15 | 17 |
| sb m/61 | 3 | 4 | 7 | 10 | 14 | 16 |
| m/71 | ||||||
| mb m/40 | 2 | 3 | 4 | 7 | 9 | 11 |
| mb m/50 | 1 | 2 | 3 | 4 | 6 | 7 |
| mb m/41 | 1 | 2 | 3 | 4 | 6 | 6 |
| mb m/56 | 1 | 2 | 2 | 3 | 4 | 5 |
| mb m/50 (600 kg) | 1 | 1 | 1 | 2 | 3 | 3 |
| Brandbomb m/58 (incendiary) | 1 | 1 | 2 | 3 | 4 | 4 |
| Bomb type / Israel | BR 1.0 - 2.0 | BR 2.3 - 3.3 | BR 3.7 - 4.7 | BR 5.0 - 6.3 | BR 6.7 - 7.7 | BR 8.0+ |
|---|---|---|---|---|---|---|
| Mk.2 (incendiary) | 1 | 1 | 2 | 3 | 4 | 4 |
| SD50 | 6 | 9 | 15 | 23 | 32 | 38 |
| SD70 | 5 | 7 | 11 | 17 | 23 | 27 |
| 100/50 kg G.P. | 2 | 3 | 5 | 8 | 11 | 13 |
| 250/50 kg G.P. | 2 | 2 | 4 | 5 | 7 | 9 |
| 360/50 kg G.P. | 1 | 2 | 3 | 4 | 6 | 7 |
| 500/50 kg G.P. | 1 | 1 | 2 | 3 | 4 | 4 |
| Bomb type / China | BR 1.0 - 2.0 | BR 2.3 - 3.3 | BR 3.7 - 4.7 | BR 5.0 - 6.3 | BR 6.7 - 7.7 | BR 8.0+ |
|---|---|---|---|---|---|---|
| Type 250-2 | 2 | 3 | 5 | 7 | 10 | 12 |
| Type 250-3 | 2 | 3 | 5 | 7 | 10 | 12 |
| Type 500-3 | 1 | 2 | 3 | 4 | 6 | 7 |
| Type 500-4 | 1 | 1 | 2 | 3 | 4 | 4 |
List of available maps in Enduring Confrontation
| Map | Size | Sector size | Has naval units |
|---|---|---|---|
| Afghanistan | 128 x 128 km | 16,384 x 16,384 m | No |
| Bulge | 64 x 64 km | 8,192 x 8,192 m | No |
| Denmark | 128 x 128 km | 16,384 x 16,384 m | Yes |
| Dover Strait | 86 x 86 km | 12,288 x 12,288 m | Yes |
| Khalkhin Gol | 64 x 64 km | 8,192 x 8,192 m | No |
| Korsun | 64 x 64 km | 8,192 x 8,192 m | No |
| Kursk | 64 x 64 km | 8,192 x 8,192 m | No |
| Maginot Line | 64 x 64 km | 8,192 x 8,192 m | No |
| Port Moresby | 64 x 64 km | 8,192 x 8,192 m | Yes |
| Rocky Canyon | 128 x 128 km | 16,384 x 16,384 m | No |
| Ruhr | 64 x 64 km | 8,192 x 8,192 m | No |
| Sicily | 64 x 64 km | 8,192 x 8,192 m | Yes |
| Sinai | 128 x 128 km | 16,384 x 16,384 m | No |
| Smolensk | 128 x 128 km | 16,384 x 16,384 m | No |
| Spain | 128 x 128 km | 16,384 x 16,384 m | No |
| Stalingrad | 64 x 64 km | 8,192 x 8,192 m | No |
| Tunisia | 64 x 64 km | 8,192 x 8,192 m | Yes |
| Vietnam | 128 x 128 km | 16,384 x 16,384 m | No |
| Winter Stalingrad | 64 x 64 km | 8,192 x 8,192 m | No |
| Zhengzhou | 64 x 64 km | 8,192 x 8,192 m | No |
| Zhengzhou (1946) | 64 x 64 km | 8,192 x 8,192 m | No |